The file and directories in Linux have different accesses for the users, group, and other members. Transferring the files for different users requires changing the directories ownership. The chown (change ownership) command allows you to transfer the file ownership to another user.
If a user has left a company and you want to change the owner to a new user, the chown will help to change ownership. After changing the ownership, the new owner can manage (add, remove, change permissions, etc..) the files or directories.
This guide covers several ways of using the chown command with different examples.
- What is a chown Command in Linux?
- How to Use a chown Command in Linux?
- Types of Permissions in Linux
- Types of Users in Linux
- Example 1: Changing the Owner of a File
- Example 2: Changing Ownership of Multiple Files
- Example 3: Checking chown Command Status
- Example 4: Changing Ownership Using UID
- Example 5: Changing the Group of a File
- Example 6: Changing Group Using GID
- Example 7: Changing Ownership From a Particular User
- Example 8: Copy Ownership from One File to Another File
- Example 9: Change Group of the File
- Example 10: Change Owner and Group of a File
- Example 11: Recursively Change the Directory Ownership and Group
- Example 12: Hide the chown Command Errors
Let’s start with the understanding of the chown command.
What is a chown Command in Linux?
This section will discuss a detailed guide and examples for chown command. Let’s have a look at the syntax of the chown command:
General Syntax:
The chown command in Linux is utilized with this syntax:
$ chown [option] owner[:[group]] file
The chown command depends on the options supported by it.
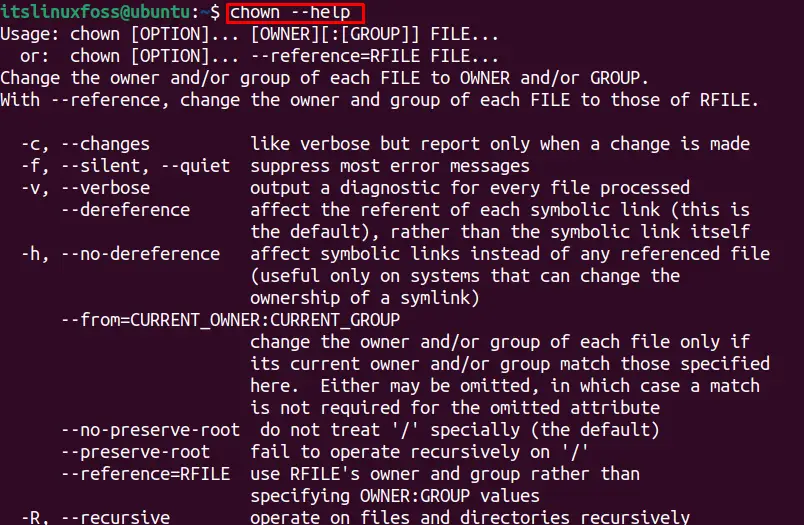
Options:
The following options are available for the “chown” command:
$ chown --help
Prerequisite for chown Command
To change the owner of the file, the “chown” (change ownership) command is used, and to execute the “chown” command, you must have “sudo” privileges. If you execute the “chown” command without sudo permissions, the below error will occur
$ chown peter testfile.txt

In the next section, we will discuss how you can use the chown command in Linux.
How to Use the chown Command in Linux?
This section will elaborate on the chown command with different examples. Before that, let’s check the different sets of permissions and users available in Linux OS.
Types of Permissions in Linux
Permissions allow or restrict the users to access files and directories. The permissions classifications are as follows:
- Read (r): Have access to read the files.
- Write (w): Have access to change the content.
- Execute (x): Have access to execute the commands or scripts.
- Types of Users in Linux: Different users have separate permissions for the file or directories, which can be changed utilizing the chmod command. The three user categories in Linux are
- User: The user who works on the system.
- Group: A user is a part of a group, and the group’s permissions apply to all members.
- Other: The user which accesses virtually from another system.
In the upcoming section, we will explain how the chown command is used differently.
Note: There are two users in the system named “itslinuxfoss” and “peter”. This article will use these two users to use the “chown” command. If you want to add a user, use the “sudo adduser <user-name>” command.
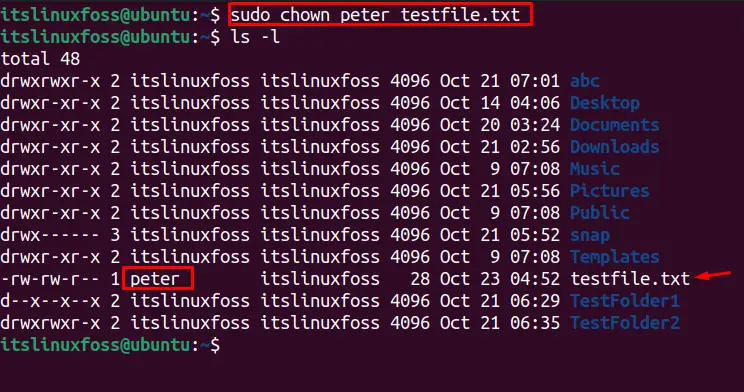
Example 1: Changing the Owner of a File
For changing the ownership of a file named “testfile.txt” to another user named “peter”, use the below-stated command:
Note: To check the details, the “ls -l” command is utilized:
$ sudo chown peter testfile.txt $ ls -l
Example 2: Changing Ownership of Multiple Files
Multiple file’s ownership can be changed by utilizing the “chown” command. To change the owner of the files “testfile.txt” and “testfile2.txt” to “peter”, use the below command:
$ chown peter testfile.txt testfile2.txt

Example 3: Checking chown Command Status
If you want to get the prompt status after changing the ownership, use the “c” option with the chown command. For instance, to change the owner of “testfile.txt” to itslinuxfoss with reporting its status, run the below command:
$ sudo chown -c itslinuxfoss testfile.txt

The “v” flag of the chown command prints out the text after executing every line of code whether the ownership changes or an error occurs. Let’s understand with the below example, the status is shown after the execution of the code, which helps you to track the working of the executing command:
$ sudo chown -v peter testfile.txt

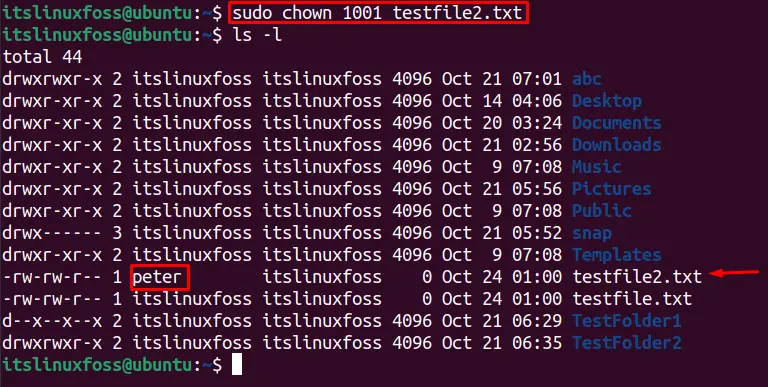
Example 4: Changing Ownership Using UID
The User ID (UID) can be utilized with the “chmod” command to transfer the ownership. To change the owner, use the chown command with uid and name of the file (in my case, testfile2.txt) as shown below:
Note: If you don’t know how to find the User ID of a user, use the “id -u owner-name” command.
$ sudo chown 1001 testfile2.txt
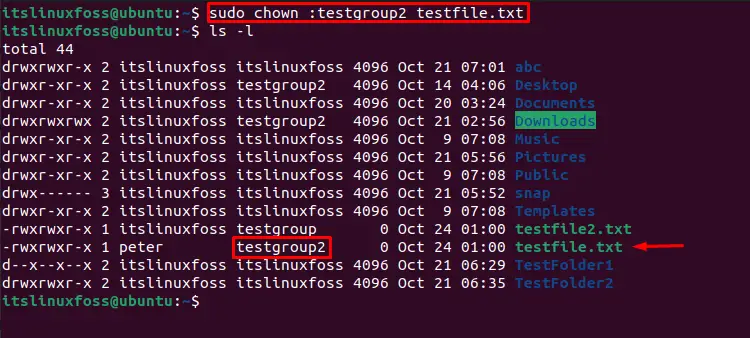
Example 5: Changing the Group of a File
In Linux, every user is assigned to a group, and the group owner can add or remove a user from the group. The files in a system are in different groups; if you want to change the group of a file, use the “sudo chown :group file” command.
To change the “testfile.txt” group to “testgroup2”, use the following command:
$ sudo chown :testgroup2 testfile.txt
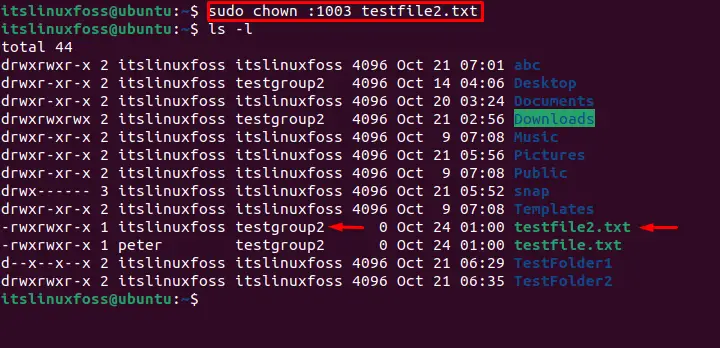
Example 6: Changing Group Using GID
The Group ID (GID) is utilized to change the group for a specific file. To change the “testfile2.txt” group to a different group with GID (1003), use the below command:
$ sudo chown :1003 testfile2.txt
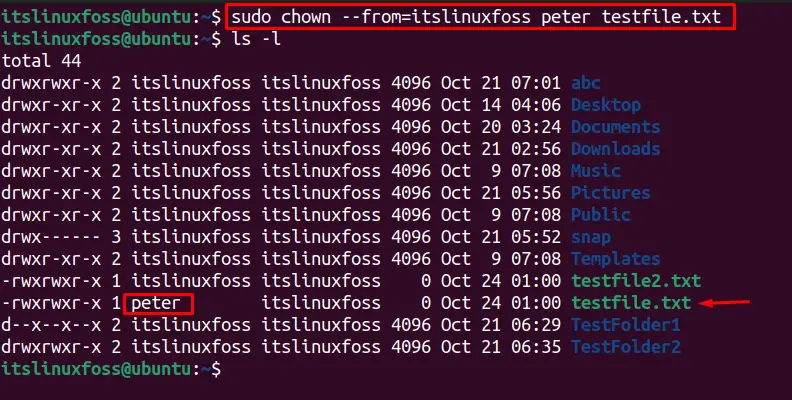
Example 7: Changing Ownership From a Particular User
Do you want to change the ownership from a particular user, you can use the “–from=”UserName” option of the “chown” command. To transfer the ownership of the “testfile.txt” file from itslinuxfoss to peter, execute the below command:
$ sudo chown --from=itslinuxfoss peter testfile.txt
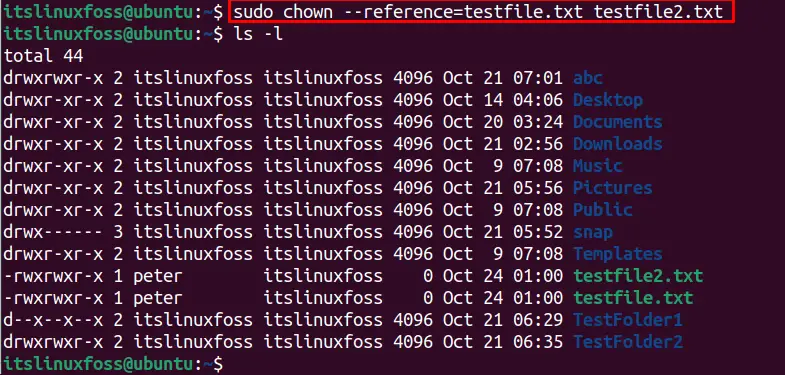
Example 8: Copy Ownership from One File to Another File
You can copy the ownership of the files to the desired file owner. To change the owner of the file “testfile2.txt” to the “testfile.txt”’s owner, execute the below command:
$ sudo chown --reference=testfile.txt testfile2.txt
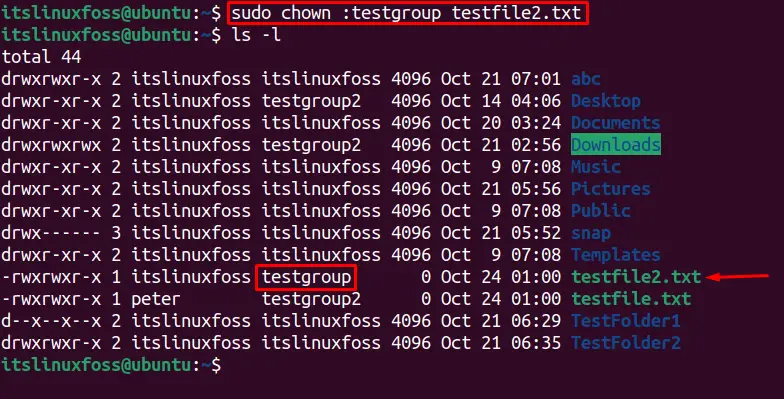
Example 9: Change Group of the File
To change a group of a file named “testfile2.txt” to the new group “testgroup”, utilize the following command:
$ sudo chown :testgroup testfile2.txt
Example 10: Change Owner and Group of a File
To change the owner of the file as well group of the file in Linux, use the chown command & owner name with a colon (:) before the new group for the file and the file name. For changing the “testfile.txt” group and owner to the “testgroup”, use the below command:
$ sudo chown peter:testgroup testfile.txt

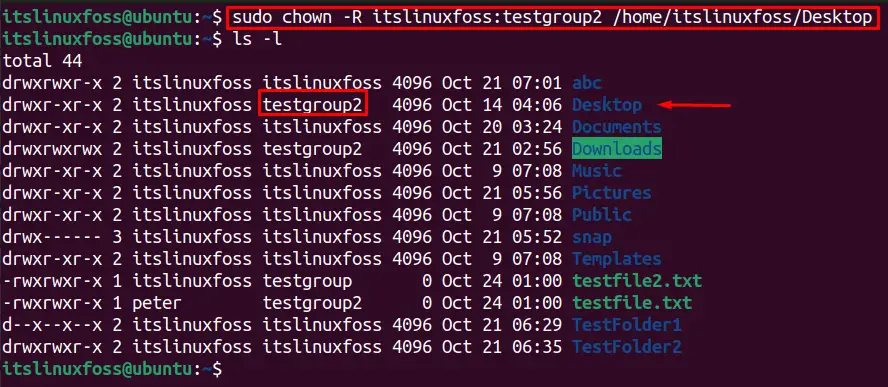
Example 11: Recursively Change the Directory Ownership and Group
We can use the “r” option of the chmod command to delete a file or folder in a system recursively. To change the owner & group of the “Desktop” directory to “itslinuxfoss”, use the following command:
$ sudo chown -R itslinuxfoss:testgroup2 /home/itslinuxfoss/Desktop
Example 12: Hide the chown Command Errors
To suppress the errors from the chown command, we can use the “f” flag of the chown command. The pictures below show the “No such file or directory” error after executing the command. To hide the error in the command shell, utilize the “f” option of the chown command as follows:
$ sudo chown -f peter testfile3

The force “f” option can hide all the chown errors except the “Invalid User” error, as shown below.
$ sudo chown -f testuser testfile

That’s all from this guide!
Conclusion
The “chown” command in Linux changes the ownership of files, directories, or groups. The ownership of the file can be changed using the “sudo chown owner FieName” command and the “sudo chown :GroupName FileName” to change the file’s group. Moreover, different ways to use the chown command are discussed in this article.