The “Oracle VirtualBox” is a powerful open-source virtualization tool. It is mainly designed for running multiple operating systems, like Linux, Mac OS, Microsoft Windows, and Oracle Solaris, at the same time. Sometimes it needs to be uninstalled due to its improper working, outdated version, and not being used in the future. Like its installation, the removal/deletion process is easy and straightforward.
This post provides a complete procedure to completely remove the VirtualBox from Linux.
- Check the VirtualBox Version (Optional)
- Uninstall Virtual Box
- Remove VirtualBox Dependencies
- Delete All Virtual Machines
- Verify the VirtualBox
How to Completely Remove Virtualbox From Linux?
The “VirtualBox” can be easily removed from the majorly used Linux distribution using their default package managers. Follow the essential steps to perform this operation.
Step 1: Check the VirtualBox Version (Optional)
First, check out the Virtualbox installed version by specifying the application package name as “vboxmange” name with the “version” flag:
$ vboxmanage --version

The Virtualbox installed version is “6.1.38”.
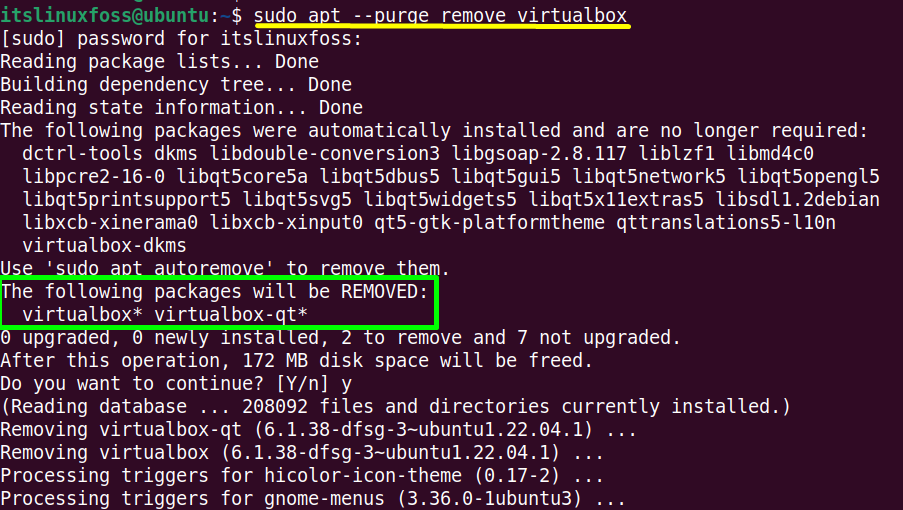
Step 2: Uninstall Virtual Box
Use the default package manager alongside the “–remove” and “–purge” flags to completely remove the “VirtualBox” tool.
The “–remove” flag will remove the installation files, and the “–purge” will uninstall the configuration files. The “purge” flag is not used in Fedora/CentOS/RHEL because its “remove” flag completely deletes all the files of the package:
$ sudo dnf remove virtualbox                           #For CentOS/RHEL
$ sudo dnf remove virtualbox                           #For Fedora
$ sudo apt --purge remove virtualbox                   #For Ubuntu/Debian-Based
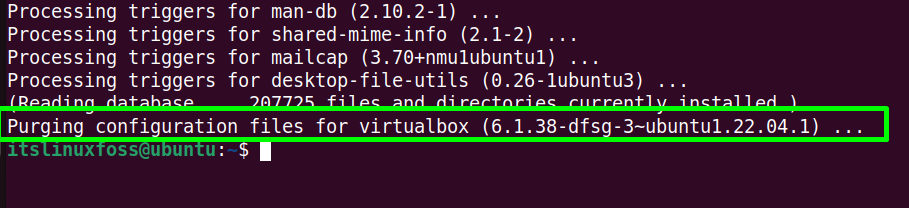
The highlighted section confirms that all the installation and configuration files of Virtualbox have been removed.
Step 3: Remove VirtualBox Dependencies
When an application is installed in the Linux system, additional dependencies are installed. Execute the “autoremove” command to remove the additional dependencies of Virtualbox:
$ sudo yum autoremove virtualbox                   #For CentOS/RHEL
$ sudo apt autoremove virtualbox                   #For Ubuntu/Debian-Based
$ sudo dnf autoremove virtualbox                   #For Fedora
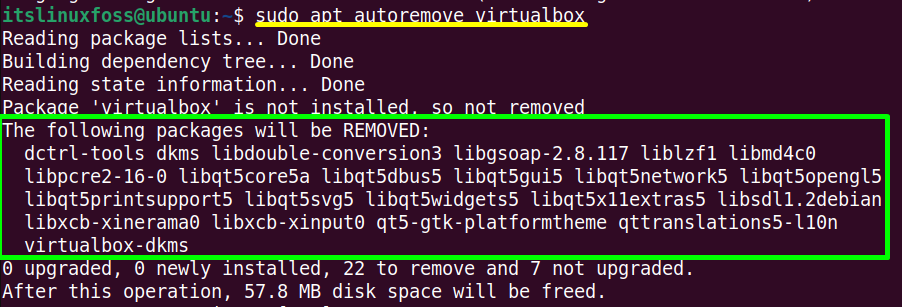
The Virtualbox dependencies have also been removed completely.
Step 3: Delete All Virtual Machines
The Virtualbox contains the virtual machine occupying a specific size in the virtual hard drives. By default, the virtual machines of VirtualBox are created in the “Home” directory, while it can be different in your case. So, use the path of the virtual machines as per your system.
To delete these files and settings, run the “rm(remove)” command with the combination of “R(recursively) and “f(forcefully)” flags in this way:
$ sudo rm ~/"VirtualBox VMs" -Rf
$ sudo rm ~/.config/VirtualBox/ -Rf
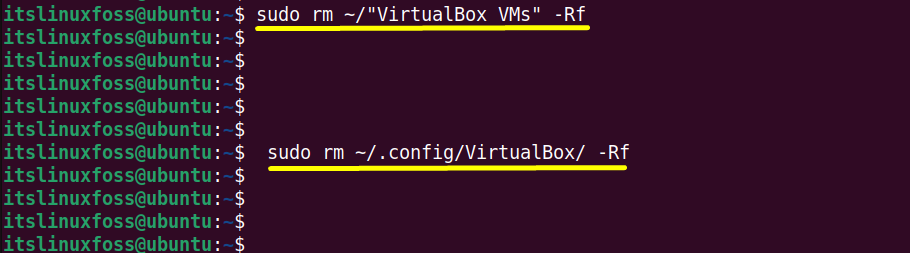

The first command deletes the virtual machine’s files, and the second removes their setting from the virtual hard drive.
Step 4: Verify the VirtualBox
Verify the “VirtualBox” uninstallation process by again executing the “version” command on the terminal:
$ vboxmanage --version

It is verified that “VirtualBox” has been completely removed from the Linux system.
Conclusion
In Linux, use the default package managers of Linux distribution, i.e., “apt(Ubuntu/Debian)” and “dnf(Fedora/CentOS/RHEl)” to completely remove the Virtualbox. The Virtualbox package also contains the virtual machine files and settings that can be quickly removed utilizing the “rm(remove)” command.
This post has provided the complete procedure to remove the Virtualbox from Linux completely.
