In Linux, multiple users can work on a single system with different logins and accessibilities. A system administrator usually manages the users through commands and graphical support (if available). To add a user via command, the useradd is the most used and effective utility.
In this post, we will discuss the creation of the users in Linux using the useradd command. The content of the write-up is given below.
- What is Useradd Command in Linux?
- How to Create Users Using Useradd Command?
- How to Display Account Details?
- Bonus Tip: How to Delete a User in Linux
Let’s begin with this tutorial.
What is Useradd Command in Linux?
In Linux, the “useradd” command is used to add users to the Operating System. There are multiple features of the “useradd” command, such as giving access to the user with or without a password, login in with a unique user id, creating a user with an expiry date, and many more. The syntax for using the “useradd” command is shown below:
Syntax:
$ useradd [options] UserName
The components of syntax are:
- “Useradd” is the main keyword.
- “options” represents the options supported by the useradd command.
- The “UserName” defines a new user name.
Multiple options can be used with the useradd command; some of the most used options are shown in the table.
| Options | Description |
| -d | Add the user with a specific directory. |
| -u | Add the user with a specific user ID. |
| -g | Add the user with group ID. |
| -e | Add the user with an expiry date also used for the password. |
| -c | Add the user with a Comment. |
| -p | Add the Password for the user. |
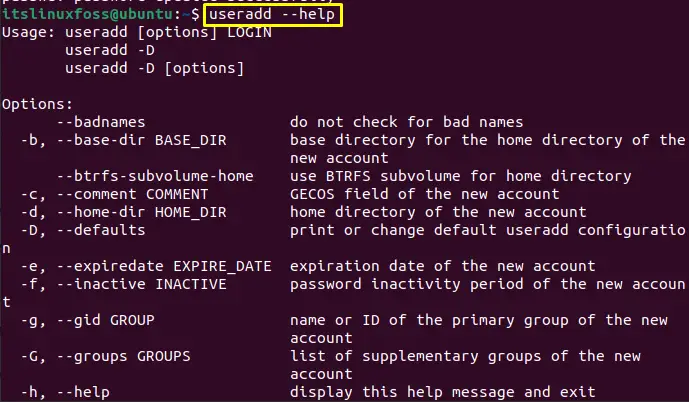
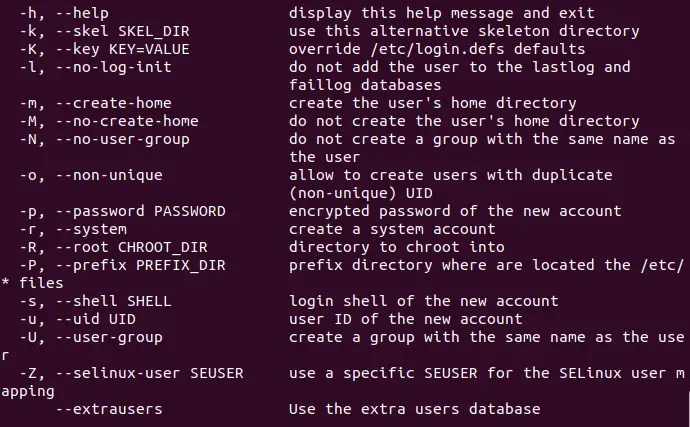
For more details on options, you can execute the following command:
$ useradd --help
Let’s get into the usage of the useradd command to add a user.
How to Create Users Using useradd Command in Linux?
This section represents various examples of the useradd command to add users in Linux. To verify the user’s creation in each command, the following commands will be used:
- The “<id username>” command will be used to verify whether the user has been created.
- Moreover, the “cat /etc/passwd | grep <pattern>” will be used to verify the user’s addition to the user’s list.
Example 1: Create the User
To create a user using the “useradd” command, add the username in the following manner. Here, a user named “HenryUser” will be created. Moreover, the “id username” command is used to verify the creation of the user:
$ sudo useradd HenryUser $ id HenryUser

The above image shows that the user has been added successfully.
Example 2: Create the User With a Specific Directory
By default, the Home directory is the same as the user name. However, you can set a different directory name using the “-d” flag of the useradd command. The following command provided below will add a user named “HenryUser”, and its “Home” directory will be “/Home/HenryUser3”.
$ sudo useradd -d /New-user/HenryUser4 HenryUser4

To verify it, the “cat /etc/passwd | grep HenryUser5” is used, which shows that the “Home” directory is set to “Home/HenryUser3”.
Example 3: Create the User With Specific ID
Using the useradd command, we can create the users with our specific id. The command below will create a user with an id “1009”:
$ sudo useradd -u 1009 user3

The user is created with our assigned specific id.
Example 4: Create the User For Specific Time
Using the useradd command, we can also set the expiry date for the user so that, after a specific duration of time, the user cannot access the account. The command below will add a user named “E-user”, which will expire on “2022-12-31”:
$ sudo useradd -e 2022-12-31 E-user

The user cannot access the account after the date we have given. By default, it will notify the user automatically about expiry before 7 days.
Example 5: Create the User With Comment
Users can add comments while creating an account. The command below will create the user named “C-user” with a comment. This comment can be viewed in the list of users:
$ sudo useradd -c "Comment on the user" C-user


The above displays the information and comment that is added to the account.
Example 6: Creating a User Into Specific Group
When a user is created using the “useradd” command, by default, it creates the group name same as the username and also the same group-id(gid) as user-id(uid). Using the “-g” flag with the useradd command, we can add a user to a specific user group. For instance, the below command represents that we have an exciting user, “HenryUser3”, and a “NewUser” is added to his group:
$ sudo useradd -g HenryUser3 NewUser

To verify the user belongs to the specific group use the following command:
$ id -gn NewUser

The above image shows that “NewUser” belongs to the group name “HenryUser3”.
Example 7: Creating a System User
You can create a user with the “r” flag to add a system user. Every system user can be a normal user, but a normal user cannot be a system user. The difference is system user’s id starts from 999, while a normal user id starts from 1001. For instance, the following command shows that system “Berlin” is created with id 999:
$ sudo useradd -r berlin

To verify the difference between normal and system users, execute the “cat /etc/passwd” command to show all users list:

The above image shows that system user’s id starts from 999 while normal user starts from the 1001 id.
Example 6: Create a user With a Password
You can create a user with a password using the “-p” flag. For better understanding, the password in the below command is not hidden. The user name “Linux-User” will be created having the password “itslinuxfoss”:
$ sudo useradd -p itslinuxfoss Linux-User

The password for the user has been set as shown in the above image.
How to Set a Password For the Already Created User?
To set or change the password for already created users, you can use the “passwd” command in the terminal. If the password is set, it will update it. Otherwise, the password will be set for the user. Check the execution of the below command:
$ sudo passwd E-PassUser

In the above image, the password is set for the “E-PassUser”.
How to Display User Details?
To display any account detail, use the “chage” command with the “-l” flag and the username as described in the following syntax:
$ sudo chage -l [UserName]
To practice it, the following command is used:
$ sudo chage -l E-user
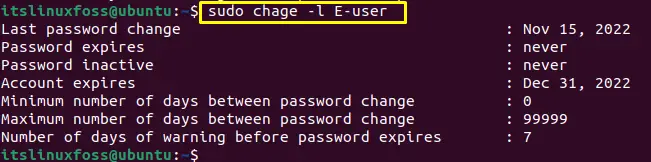
The output contains various information about the user such as last password change date, password expiry, password inactive, account expiry and much more.
Bonus Tip: How to Delete a User in Linux?
To remove any user account, run the “userdel” command with the username to delete that user. The syntax to remove the user is as follows:
$ sudo userdel [UserName]
For instance, the command provided below will remove the user named “user45”:
$ sudo userdel user45

The output shows that the “user45” has been deleted, which is verified from the “id” command as well.
That’s all from this guide.
Conclusion
In Linux, the useradd command is used to create users. The standard syntax to add a user is “sudo useradd <username>”. This command has a variety of options that allows you to create users with different functionalities. This post has demonstrated the creation of users using the useradd command with examples. With the exception of this, the method to display the user details and remove any user in Linux has also been demonstrated in this write-up.
