File permissions are an important aspect of Linux security, as they allow you to control who has access to your files and prevent unauthorized users from accessing or modifying sensitive data. To modify files or directories, it is necessary to understand and use certain flags that display the available rights.
These flags allow the user to make changes as needed, but using them properly requires practice and understanding. In this article, we aim to provide a detailed and clear understanding of the topic at hand. We have carefully crafted this content to help improve your comprehension.
File Permissions in Linux
There are three main file permissions in Linux. Their explanation has been discussed below:
What is Read Permission?
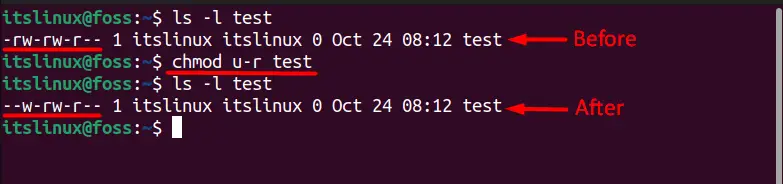
Read permission will allow you to give or remove permission from any owner. First, we have created a random file with the name ‘test’, and after that, its ownership access can be seen by writing the below command:
$ ls -l test

So now we are removing the reading ownership from the user that can also be a system administrator and comes first. So after removing the reading right, you can see that the file is not opening and showing an error:
$ chmod u-r test
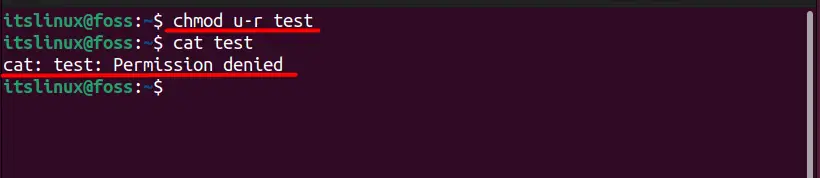
You can further verify this by typing the ls command that permission to read a test file is taken away from the user as now ‘r’ is missing which was there before:
$ ls -l test
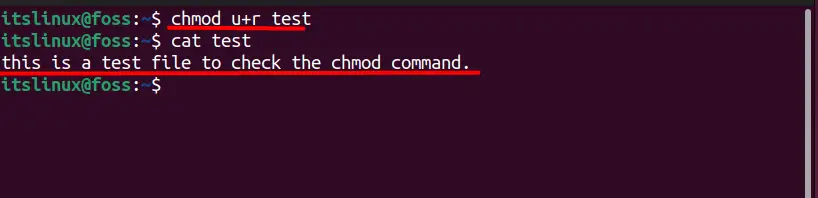
You can see that after typing this command the user is no longer able to read the content of that file. Similarly, you can allow permission to the user by using the below command:
$ chmod u+r test
If you are planning to remove or add the reading rights from the group that comes at second, then you need to type the following command:
$ sudo g-r test
$ sudo g+r test
Same thing can be done for other users that come at third by typing:
$ sudo o-r test
$ sudo o+r test
What is write Permission?
Giving “write” permission to any owner means that they can now write anything on that file and modify it. So, if you are planning to remove these write permission from the user, you need to type:
$ chmod u-w test
$ vim test


In the above image, you can see that it is showing the ‘read-only’ option at the end of the file, which means that a user can only read and not write on the test file. To further verify this, you can use the ls command again, which will give you the result shown in the image below:
$ ls -l test

You can see that the ‘w’ is missing from the user rights, which was there before. So, to give the writing permission to the user again, you need to type the following command:
$ chmod u+w test
After that, you will notice that the read-only option is not there at the bottom, and now you can write anything on this file:

Similar things can be applied for the group and other owners as well.
What is Execute Permission?
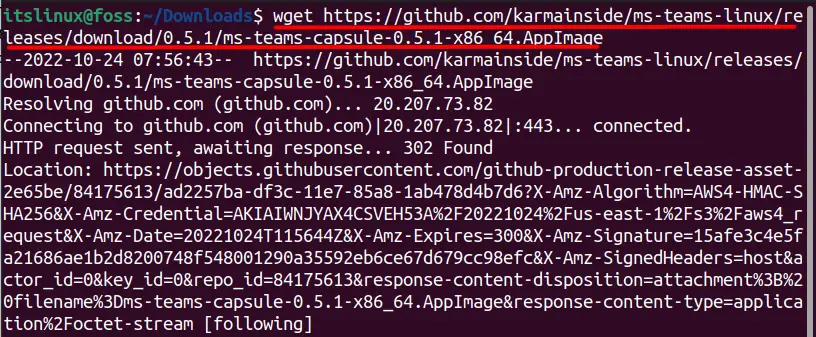
The execute permission usually doesn’t work on the text files for which we have downloaded the ms teams application with the format of appimage. We have downloaded the wget application by typing the below command:
$wget https://github.com/karmainside/ms-teams-linux/releases/download/0.5.1/ms-teams-capsule-0.5.1-x86_64.AppImage
By default, this application doesn’t have the execution permission that can be seen in the image below, which is why you won’t be able to execute it.
$ ls -l ms-teams-capsule-0.5.1-x86_64.AppImage

When you try to execute this application without giving it the execution permission first, you will get this error as displayed below:
$ ./ms-teams-capsule*.AppImage

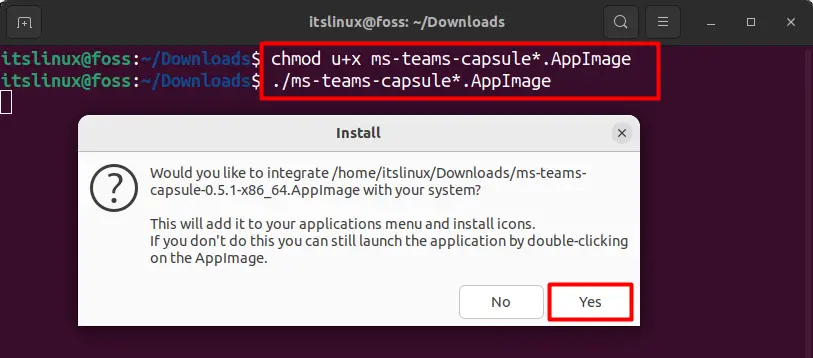
So now we will be giving the execution right to the user, and after that, this file should be executed without any issue:
$ chmod u+x ms-teams-capsule*.AppImage $ ./ms-teams-capsule*.AppImage
After that, you can see in the below image that the file is now executed, and you can proceed further with its installation.
Pro Tip: If you want to give everyone the same rights, then you can type the below command:
$ chmod a+r [File_Name] $ chmod a+w [File_Name] $ chmod a+x [File_Name] $ chmod a+rwx [File_Name]
In the above commands ‘a’ represents all owners followed by the rights you want to give on any specific file.
There is another method that you can implement to change file permissions which is by using numbers as explained below:
Read → 4
Write → 2
Execute → 1
So if you want to give any specific rights, then its explanation is mentioned below:
Read and Write → 6 (4 +2)
Read and Execute → 5 (4 +1)
Write and Execute → 3 (2 + 1)
Read Write and Execute 7 (4 + 2 + 1)
Now if you want to give all the rights to all the users then you need to type:
$ chmod 777 test
That’s all from the file permissions.
Conclusion
Sometimes, you want to modify specific files on the Linux OS, but you don’t have permission to do that, making things difficult. But there is a solution to this issue by using a ” chmod” command, also known as change mode. This post has briefly demonstrated the file permissions in Linux.