In Linux, the command line navigation is usually done using the “cd” command. The “cd” command stands for “Change Directory”. This command is often used to navigate the root over directories. But the user can also use the two other important commands to improve the navigation. These two commands are “pushd” and “popd”.
In this post, the usage and working of the “pushd” and “popd” commands are described in detail. The outline of this post is specified below:
- What is the pushd Command in Linux?
- How to Use pushd Command in Linux?
- What is the popd Command in Linux?
- How to Use popd Command in Linux?
What is the pushd Command in Linux?
The “pushd” command is used to manipulate the directories on the stack. During this process, the user pushes the current working directory on the stack and changes the directory to the one specified as a parameter.
Syntax
The general syntax of the “pushd” command is written below:
$ pushd [options] [directory]
In the syntax, the “pushd” is the main keyword, whereas the square brackets represent the supported “options” and the particular “directory”.
| Options | Description |
|---|---|
| -n | Adds the new recent directory into the stack list but can’t change the present working directory. |
| +N | Strats counting from left to right while navigating the Nth element. |
| -N | Strats counting from right to left while navigating the Nth element. |
| dir | Adds the specified directory at the top of the stack list. |
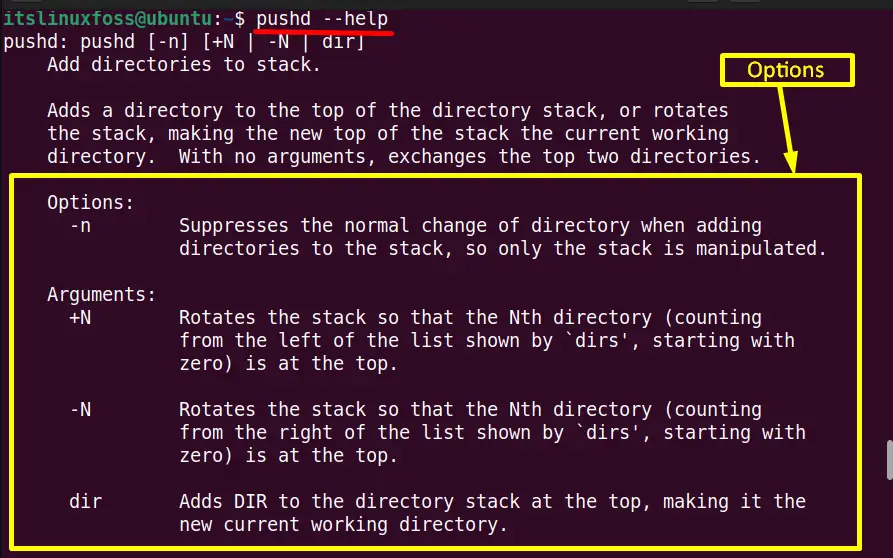
To get the list of more supported options, use the “pushd” help command in the terminal:
$ pushd --help
How to Use pushd Command in Linux?
The main objective of the “pushd” command is to add new directories onto the stack. The “pushd” command allows the users to maintain the record of the visited directories in the terminal. This section provides various practical examples to add/push the directories into the stack via different options.
Example 1: Add the Directories
Type the “pushd” command and the specific directory name in the terminal. It will change the present working directory and add it into the stack:
$ pushd ~/Downloads
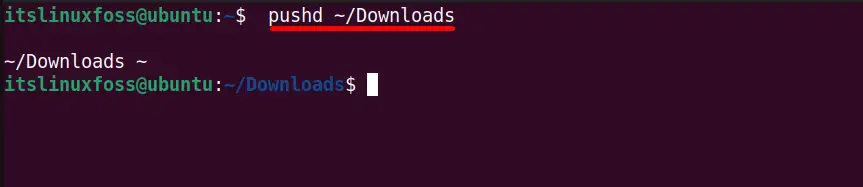
The current working directory is now being changed to “Downloads” and added into the stack.
Example 2: Display the Directories Stack
To check the stack status, run the below-mentioned “dirs” command with the combination of “-l” and “-v” options. The “-l” option displays the directories path. However, the “-v” shows each directory per line with index (0-nth):
$ dirs -l -v
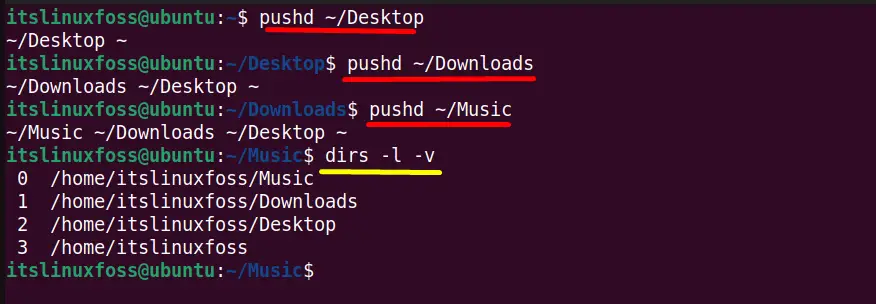
The output displays the stack list in order (0-3). As the most recent directory, “Music” is added to the top of the stack.
Example 3: Add the New Directory Without Changing the Working Directory
The “-n” option of the “pushd” command is beneficial to add the new directory into the stack but can’t change the present directory. Suppose the present working directory is “Downloads”. Enter the new directory “Desktop” with the “-n” option:
$ pushd -n ~/Desktop

The output verifies that the new “ Desktop” directory is added into the stack at the second position and the pwd is not changed.
Example 4: Position of pwd
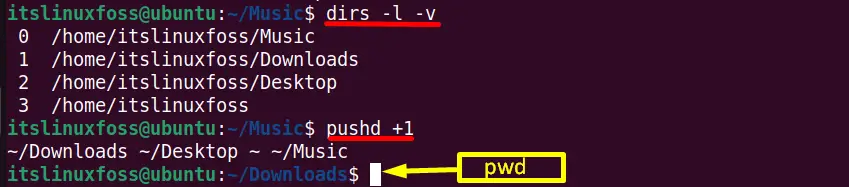
The “pushd” command provides the “+n” option. It is useful to navigate the “nth” directory in the stack list and push the specified directory at the top of the list.
For example, the “Downloads” directory is in the “1st” position in the list. Execute the “pushd” command with the “+1” numeric parameter. It will hit the “Downloads” directory and change it to the present working directory:
$ pushd +1
What is the popd Command in Linux?
The “popd” command moves back to the previous directory. These directories are maintained in the stack. The stack stores a list of recently visited directories. We can remove the particular directories from this stack using the “popd” command.
Syntax
The basic syntax of the “popd” command is defined below:
$ popd [options] [directory]
In the syntax, the “popd” is the main keyword. However, the square brackets identify the supported “options” and the particular “directory”.
| Options | Description |
|---|---|
| -n | Only update the stack list by adding new recent directories. |
| +N | Strats counting from left to right while navigating the Nth element. |
| -N | Strats counting from right to left while navigating the Nth element. |
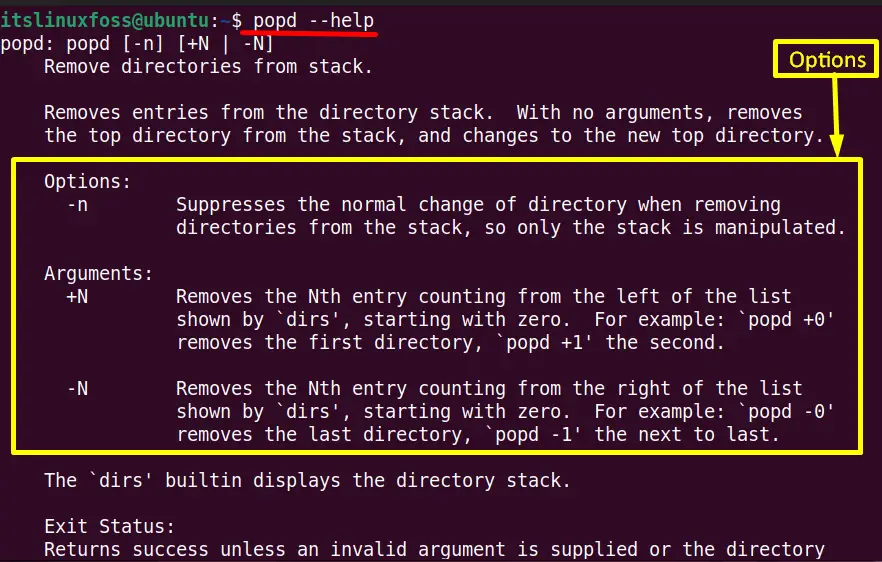
Execute the below “popd” help command to get more information and options of the “popd” command:
$ popd --help
How to Use popd Command in Linux?
The “popd” command pops out the directories from the stack respectively. The user can navigate the directories from the stack and remove them. In this section, a few examples are described to remove the directories via the “popd” command using its supported options.
Example 1: Remove the Directories From Stack
Before removing the specific directory from the stack, first check the stack list using the “dirs” command:

The stack contains four directories, and the “Videos” directory is at the top of the stack.
Simply running the “popd” command without any option or argument will remove the recent top directory from the stack list:
$ popd

As the output verifies that the “Videos” directory has been removed from the list and the PWD has been shifted to the second directory in the list which is “Desktop” directory.
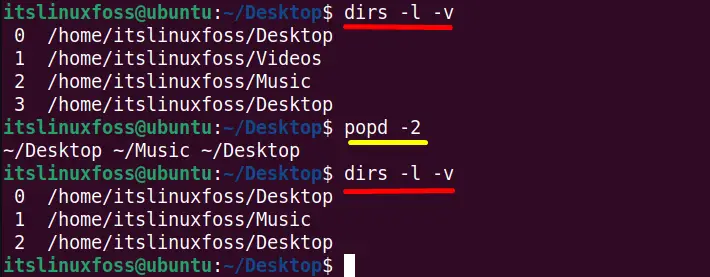
Example 2: Delete the Nth Stack Directory
Same as the “pushd” command, the “popd” command also supports the numeric parameters. Type the “popd” command in the terminal with the “+2” parameter. It will remove the directory that is on the second index:
$ popd +2

The “popd +2” command is removed from the “Music” directory, which was on number “2” in the list.
Note: The user must pass the numbers must be in the range available in the stack. Furthermore, the “-0” removes the directory from the last of the stack, not from the top of the list:
$ popd -0

In the above output, the last directory, “Desktop” has been removed.
Example 3: Remove the Directory Without Changing the Working Directory
The “-n” and the “+n” options of the “popd” command allow the user to remove the directory placed at the “nth” position in the stack. The “+n” option starts removing the directory from top to bottom. While the “-n” option removes the directory from bottom to top.
Run the below command to understand this concept:
$ popd -2
The “popd” command with the “-2” parameter removed the “Videos” directory that is on the “2” index from the bottom. Moreover, this command will not change the pwd as it remains the same as “Desktop”.
Conclusion
The “pushd” command stores a directory path in the stack of the directory, while the “popd” command removes the first directory from the specified stack. The generalized syntax of both these commands is “$ pushd [option] [directory]” and “$ popd [option] [directory]”. In this post, the working, purpose, and usage of “pushd” and “popd” commands are described in detail.
