Linux provides the “usermod” command to change the specific “user” attributes and properties. These attributes include the “owner name”, “group”, “primary group id”, “user information,” and many others. However, they can be easily changed using the “usermod” Linux command. Before doing this, the user must have the root privileges.
This post will describe the basics, working, and usage of the “usermod” command in Linux. The table of content of this post are mentioned below:
Let’s get started with the basics of the “usermod” command.
What is the usermod Command in Linux?
The main objective “usermod” command is to change the existing user attributes like shell, password, username, and much more. These attributes or information are stored in the following files:
- /etc/passwd
- /etc/shadow
- /etc/group
- /etc/login.defs
- /etc/login.defs
- /etc/gshadow
Syntax
The syntax of the “usermod” command is specified below:
$ usermod [options] [username]
The above syntax holds the following components:
- usermod: It is the main keyword in the syntax.
- options: These are the supported options of “usermod” commands.
- username: The user whose account needs to be customized or modified.
To get more knowledge about the “usermod” command, execute the below-mentioned command in the console:
$ usermod --help
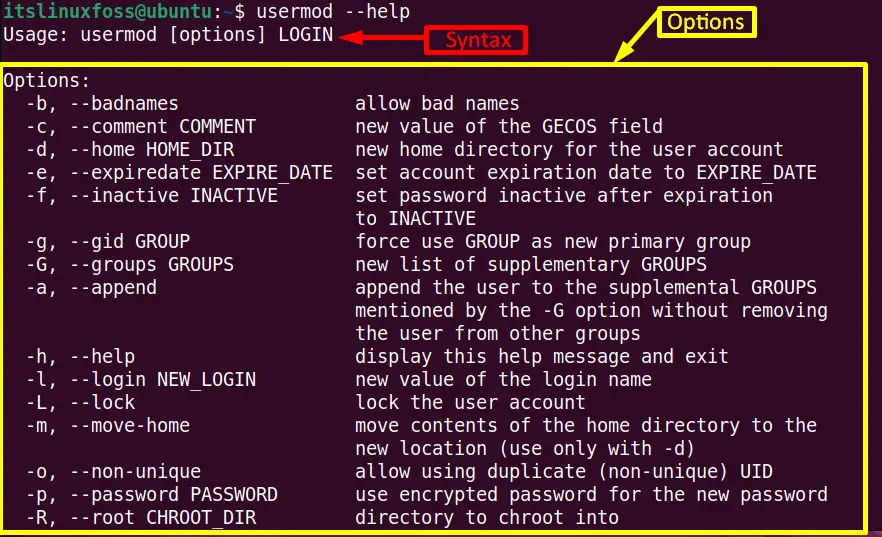
Scroll down the page to see more options.
How to Use usermod Command in Linux?
This section provides numerous practical examples of the “usermod” command using its supported options.
Example 1: Modify the Particular User’s Group
Before applying the changes in any user account through the “usermod” utility, first, log in as a root user. It can be done by entering the “su” command and the root user “password” in the terminal:
$ su -

By default, the user is a primary group member. The basic information of the specific user can be obtained by issuing the “id” command with the particular “username” in the console. As the mentioned user “peter” is a member of the primary group “peter” having PGID “1022”:
$ id peter

The “-g” option of the “usermod” command will change the primary group of the above user “peter” to “herry”. Make sure that the modified group is present in the current system. Enter the following command and see the output:
$ sudo usermod -g herry peter

The output confirms that the primary group of “peter” has been changed to “herry”.
Example 2: Add Information to Particular User Account
Once the account is created, it can be customized by adding comments or information about it. This task can be performed by utilizing the “-c(comment)” argument of the “usermod” command.
$ sudo usermod -c “This is the new user ” milton

To check the mentioned comment run the “grep” command that is specified in the below screenshot:
$ sudo grep -E --color ‘milton’ /etc/passwd

The comment “This is new user” has been added into the “milton” account.
Example 3: Lock the User’s Account
The “-L” option of the “usermod” command provides the “lock” facility to the users. It will lock the specified user account. Once the account is locked, the user can’t log in to this account as it shows the “!(exclamation)” mark before its encrypted password stores in “/etc/shadow”.
$ sudo usermod -L anna

The account “anna” has been locked.
Example 4: Unlock the User’s Account
The “-U” flag of the “usermod” command line utility is useful to unlock any particular locked account that is locked. In the above example, the user “anna” account has been locked. Now use the “-U” option to unlock it:
$ sudo usermod -U anna

For the verification, run the “grep” command with the username “anna” as shown below:
$ sudo grep -E --color ‘anna’ cat/etc/shadow

It is verified that the above user “anna” account is now unlocked.
Example 5: Modify the Username
The “usermod” is also beneficial for changing the existing user name of the specified user. Suppose, in our case, we changed the username of the already created user “johnson” to “user1”:
$ sudo usermod -l newuser herry

The username “herry” has been changed to “newuser”. To verify it, run the “id” command with the “old username” and the “new username” as shown below:
$ id peter
$ id newuser

Example 6: Set the Password of an Account
The “-p” option of the “usermod” command allows the user to set a password for any user. Suppose the “johnson” user account is not secured by the password. Type the “usermod” command with “-p” and set its new password “12345”:
$ sudo usermod -p 12345 peter

Execute the “grep” command to check the new un-encrypted password of “peter” account:
$ sudo grep -E --color ‘12345’ /etc/shadow

The “peter” account has been secured by password “12345”.
Example 7: Change the Shell
The “-s” flag helps change the default shell of any user. For example, the “milton” user is working in the “bash” shell by default, as shown in the screenshot via the “grep” command:
$ sudo grep -E --color ‘newuser’ /etc/passwd

Type the desired existing shell “/bin/zsh” with the specific username “newuser” and “usermod -s” in the terminal. It will change the “milton” shell from “bash” to “zsh”:
$ sudo usermod -s /bin/zsh/ newuser

Again run the “grep” command to see the changes:
$ sudo grep -E --color ‘newuser’ /etc/passwd

The output confirms that “bash” is changed to “zsh” successfully.
That’s all about the usermod command in Linux.
Conclusion
The “usermod” command helps change and update the information related to the existing user account. The modified information may be the password, comment, shell, username, and many others. This post has explained the objective, working, and functionalities of the “usermod” command through examples.
