The remote network can access the user’s GUI by authentically connecting to the local server. The remote server configures the default Xauthority file data to connect to the local server, and if the Xauthority file does not log in as the user whose credentials are present in the default file. It shows the “x11 connection was rejected because of a wrong authentication” error.
This article will provide the solution for this error using this timeline:
- Reason: User Default Xauthority File is not Accessible
- Solution 1: Change the Ownership to Logged-in User
- Solution 2: Set Display Variable to Xauthority File
Reason: User Default Xauthority File is not Accessible
The X11 connection allows the user to interact with the keyboard using the default Xauthority file. If the file is not accessible or owned by the logged-in user, it shows the x11 connection rejected error. The next sections will explain the working solutions for this error.
Solution 1: Change the Ownership to Logged-in User
This section will discuss the steps to enable the x11 forwarding to remove this error.
Step 1: Check System Disk Space
The “df” command lists the features of the system disk. If you have low disk space delete the unnecessary files:
$ df -H
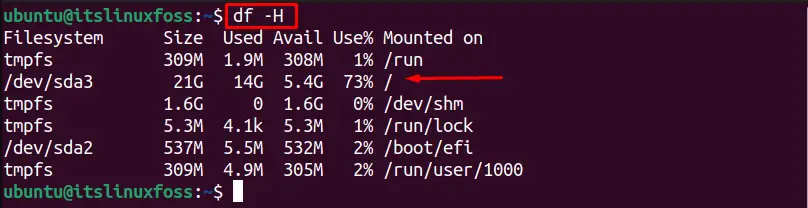
You must have enough space in the “root (/)” directory as indicated above.
Step 2: Check Xauthority File Permissions
Check the permissions of the “Xauthority”; the logged-in user must own it. For checking the default Xauthority file permissions, use:
$ ls -l ~/.Xauthority

The owner of the “Xauthority” file is “root”, but I am logged in as a normal user, “itslinuxfoss”. Let’s change the Xauthority file permissions to the currently logged-in user using the following syntax:
$ sudo chown <user-name>:<group-name> ~/.Xauthority
The syntax components are:
- <user-name>: Replace with its logged-in user name.
- <group-name>: Replace it with the currently logged-in user group.
Step 3: Set File Ownership and Permissions
For instance, my user name and group are “ubuntu”; the below will be used for my system:
Note: To check the user name and group of the system, use the”id <user-name>” command.
$ sudo chown ubuntu:ubuntu ~/.Xauthority $ ls -l ~/.Xauthority

The output verifies the ownership of the Xauthority file is changed to the user named “ubuntu”.
To set file permissions to give read and write permissions to the owner only, execute the following command:
$ chmod 0600 ~/.Xauthority

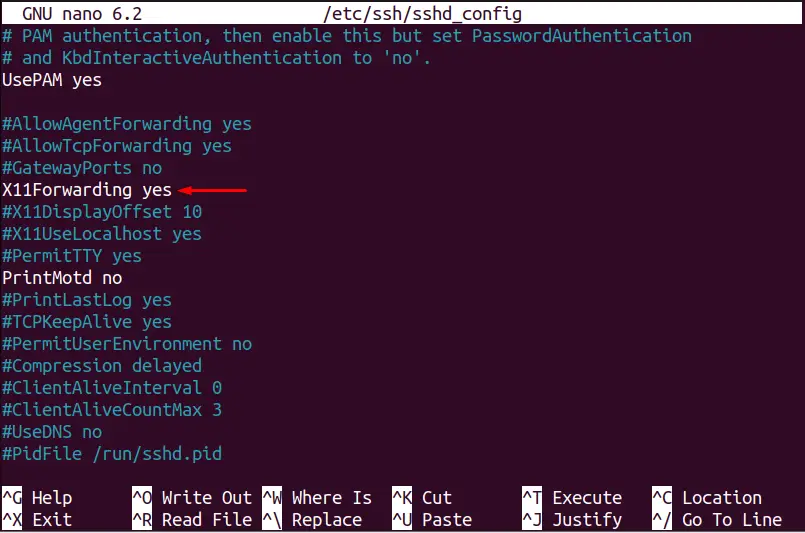
Step 4: Enable SSHD X11Forwarding (Server Side)
Ensure that X11 SSHD forwarding is enabled by using the below command:
$ grep X11Forwarding /etc/ssh/sshd_config

The X11 SSHD forwarding is enabled (yes), as seen in the output. The line starting with the “#” symbol is not executed; ignore this line.
If the SSHD forwarding is not enabled, then run the below command to open the SSH config file in the nano editor:
$ sudo nano /etc/ssh/sshd_config
Search for “X11Forwarding” in that file and uncheck the “X11Forwarding yes” line as shown below:
Now restart the SSH server to update the X11 Forwarding changes by using the following command:
$ sudo systemctl restart ssh
Now, the X11 forwarding is enabled in the SSHD configuration file. Let’s check the local SSH configuration file.
Step 5: Enable Local SSH X11 Forwarding (Client Side)
Check the local SSH configuration file has enabled the SSH X11 forwarding. To check the SSH X11 Forwarding, open the SSH configuration file in the nano editor by executing this command:
$ sudo nano /etc/ssh/ssh_config
Check the following two lines in the “ssh_config” files, as shown in the below output:
Host *
ForwardX11 yes

The error is removed, now login to the remote server and run the X11 with the following command:
$ ssh -X <user-name>@<remote-host.com>
The syntax components are provided below:
- <user-name>: Replace it with the remote user name.
- <remote-host.com>: Replace it with the remote server address.
This x11 connection will be authenticated to the remote server.
Solution 2: Set Display Variable to Xauthority File
The x11 MAGIC_COOKIE can be added manually to the root user xauth file by following the below-performed steps:
Step 1: Get Authorization Key
To get the x11 authorization MAGIC_COOKIE to xauth, execute the below command:
$ xauth list $DISPLAY

Step 2: Switch to Root User
Switch to the root user to add the Xauth key to Xauthority file
$ sudo -s

The user is logged in as root user as seen from the above output.
Step 3: Add the Authorization Key to Xauthority File
Add the Xauth key (obtained from step 1) with the xauth add command to manually add the authorization key to the Xauthority file as shown below:
Note: If you get the error xauth: file /home/ubuntu/.Xauthority does not exist, then use the “touch /root/.Xauthority” command to create the Xauthority file.
# xauth add MIT-MAGIC-COOKIE-1 a66b2890c8eef782454575fb6ee0d369

The error is removed and connected to the remote server.
Conclusion
The x11 connection was rejected because a wrong authentication error occurs when the root user does not have the correct credentials in the Xauthority file, which is not accessible to a remote server. To remove this error, we can enable the x11 Forwarding in the default Xauthority file or add the updated authorization key to the Xauthority file. This post has provided the reasons, and the solutions to fix the “x11 connection rejected because of the wrong authentication”.