
Java is a high-level, object-oriented programming language that is widely used for developing desktop, mobile, and web applications. Java, like other applications, offers updated versions regularly. If your system or any programs are Java-dependent, then it is necessary to keep the Java version updated to get the latest features and support.
This post will address the possible methods to upgrade Java on Ubuntu:
Method 1: Using Apt Package Manager to Upgrade Java on Ubuntu
The most common method is to use the “APT” package manager, which allows users to easily upgrade to the latest version of Java by running a few commands in the terminal.
Step 1: Check the Existing Java Version
To check the installed java version in the operating system, run the “java” command with the “version” option:
$ java -version

The output shows that currently, the “1.8.0_352” version of Java is installed in the system.
Step 2: Update the Package Manager
To update the package manager’s list, use the “apt” command with the “update” utility in the following command:
$ sudo apt update

The output shows that the package manager has been updated.
Install the Latest Version (Upgraded)
To install the latest version of OpenJDK, use the “APT” package manager by specifying the “openjdk-19-jdk” command:
$ sudo apt install openjdk-19-jdk
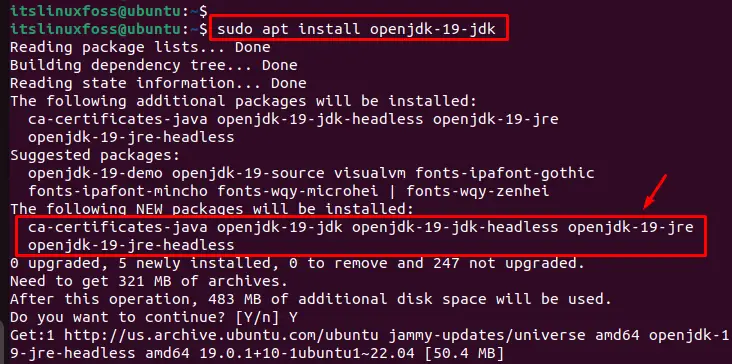
The output shows that the latest version of Java 19 along with dependent files have been installed in the system.
Note: Users can also utilize the “sudo apt upgrade” command to upgrade all installed packages, including Java, in the current system. In addition, Java 19 is the extended version of the Java 17 LTS version.
Verify the Upgraded Java Version
To verify the installed version of Java, specify the “java” command with the “version” option as below:
$ java -version

This command displays the “19.0.1” version of Java that is upgraded on the system.
Method 2: Using the .deb File to Upgrade Java (Manually)
To upgrade Java manually, download the latest version of Oracle JDK from the Official Website and install it on the Ubuntu system. Follow these steps to do this:
Step 1: Download the Latest JDK Version
Go to the Oracle JDK download page and download the upgraded version of the .deb file for Linux:
$ sudo wget https://download.oracle.com/java/19/latest/jdk-19_linux-x64_bin.deb
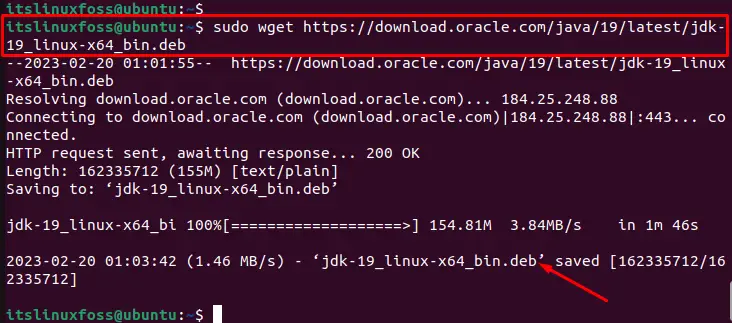
The output shows that the latest version of the .deb file has been downloaded in the system.
Note: Go to the Official Website to have the latest available “.deb” version of Java.
Step 2: Install the Latest Version of OpenJDK
To upgrade Java on Ubuntu, use the .deb package file to install the most recent version of OpenJDK:
$ sudo apt install ./jdk-19_linux-x64_bin.deb
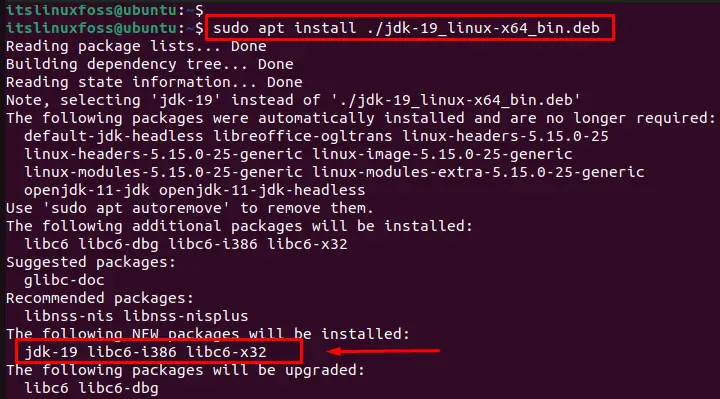
In this way, all dependencies with the latest version of java are installed in the system.
Step 3: Verify Upgraded Version of Java
To verify the upgraded version of Java, utilize the “version” option with the “java” command:
$ java -version

It displays the “19.0.1” version of Java that is currently installed on the system.
Conclusion
To upgrade Java on Ubuntu, use the “$ sudo apt install openjdk-19-jdk” command or download the latest version of Java from the Oracle Website and install it manually on the system. After the upgrade, execute the “java -version” to confirm the installed version of Java.
This article has explained all possible methods to upgrade Java on Ubuntu.
