
In Ubuntu, the default gateway is the IP address of the router which connects the machine/computer to the internet. The objective of setting a default gateway is to allow the computer to communicate with devices on other networks. When a computer wants to communicate with a device on a network, it sends the data packet to the default gateway. The default gateway then forwards the packet to the destination network.
This article will explain the possible ways to set the default gateway in Ubuntu:
Method 1: Using the “ip route” Command
To set the default gateway, users can utilize the “ip route” command in Ubuntu terminal. Here are the steps that are given below:
Step 1: View the Current Gateway
It is a fine practice to view the current network configuration in the terminal. For this, execute the “ip route” command with the “show” option as below:
$ ip route show

It displays the default gateway address as “192.168.157.2”.
Step 2: Set the New Default Gateway
To set the new default gateway, use the “ip route” command with the “add” option by specifying the gateway IP address. In our case, specify the “192.168.157.5” IP address of the default gateway:
$ sudo ip route add default via 192.168.157.5

The output shows that the new default gateway address “192.168.157.5” has been added.
Step 3: Set the Default Gateway to the Particular Network Interface
Users can also specify the network interface for setting the default gateway. For instance, mention the network interface “ens33” with the gateway address “192.168.157.5”:
$ sudo ip route add default via 192.168.157.5 dev ens33

The output shows that default gateway has been added to the “ens33” network interface.
Step 4: Verify the Added Default Gateway
To verify the newly added default gateway, use the “ip route” command with the “list” option as below:
$ ip route list

The output shows that “192.168.157.5” has been newly added as a default gateway. While the “192.168.157.2” can be seen which is the previous gateway address.
Method 2: Edit the Configuration File
Users can also set the default gateway by editing the “01-network-manager-all.yaml” configuration file. Follow the given steps for the configuration:
Step 1: Set Default Gateway
Open the “01-network-manager-all.yaml” configuration file that is located in the “netplan” directory via the below command:
$ sudo nano /etc/netplan/01-network-manager-all.yaml
It navigates to the particular file. Add the IP address in the particular section of the default gateway. In our case, mention the “192.168.157.2” IP address in the default section:
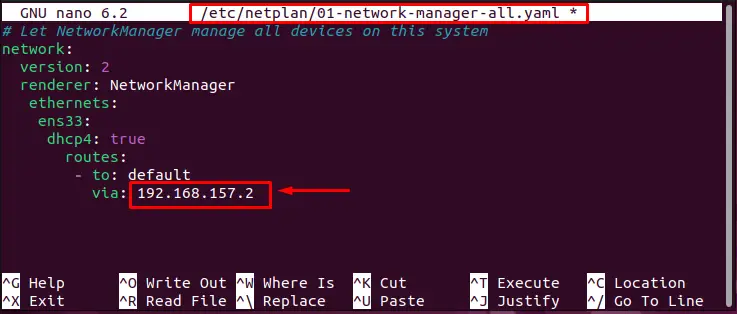
Save the changes and exit the text editor.
Note: The NetworkManager has by default a gateway in the “via” section that users can modify according to their requirements.
Step 2: Restart the Networking Service
To restart the networking service, use the “systemctl” script with the “restart” utility by mentioning the “NetworkManager” in the following code:
$ sudo systemctl restart NetworkManager

Hence, the network properties of the system are restarted.
Conclusion
To set the default gateway in Ubuntu, execute the “sudo ip route add default via <IP Address>” command or edit the “01-network-manager-all.yaml” file. After adding the default gateway, it is required to restart the network manager properties.
This article has explained several ways to set the default gateway in Ubuntu.
