The full form of NFS is Network File System. It was designed by Sun /microsystems in 1984. NFS works on a client-server model. In NFS, a server allows a client to access the files over a network in the same manner as the client would access some files in his/her local storage or in his/her machine. The biggest perk of NFS is that it is open-source which means anyone anywhere in the world can implement NFS.
We can store or update data in the client or server. The server will decide the permissions which means the server has the right to give access to some client and how much control he wants to give to a client. There can be multiple clients depending on the server.
Now that we know what NFS is, let’s install and configure it on Ubuntu 20.04. We’ll take your hand and walk you through every little step in the way. So, Let’s get started.
Prerequisites
We have to use two Ubuntu machines to follow the client-server model. Both machine’s Ip addresses will be different and we can make them communicate over a private network. The two Ubuntu machines we have been using the following IP addresses:
IP_Server : 192.168.18.89
IP_Client : 192.168.18.90
Setup NFS Server
We have to set up the host Server. For this purpose, we have to install all the required packages. After that, we have to create and then export the NFS directories. In the end, we have to configure the firewall.
Step1: The first step is the installation of the NFS kernel Server Package. This will basically convert our Ubuntu 20.0 into a server. However, to achieve this task we have to update all our packages first. Go to your terminal and type the following:
$ sudo apt update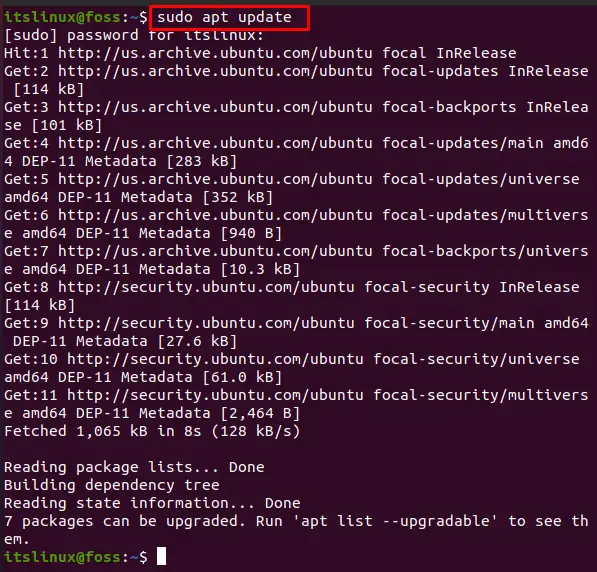
Now run the following command to upgrade the repositories:
$ sudo apt upgrade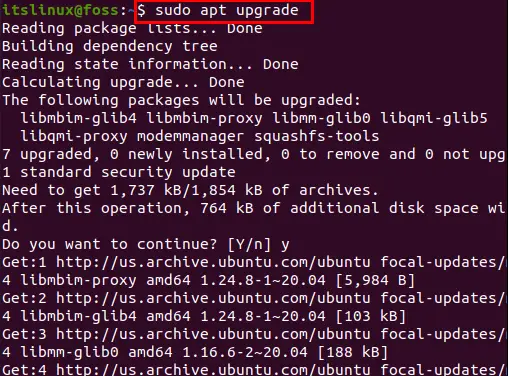
Now that all our packages are updated, let’s install the NFS kernel server. Follow the following command to achieve this task:
$ sudo apt install nfs-kernel-server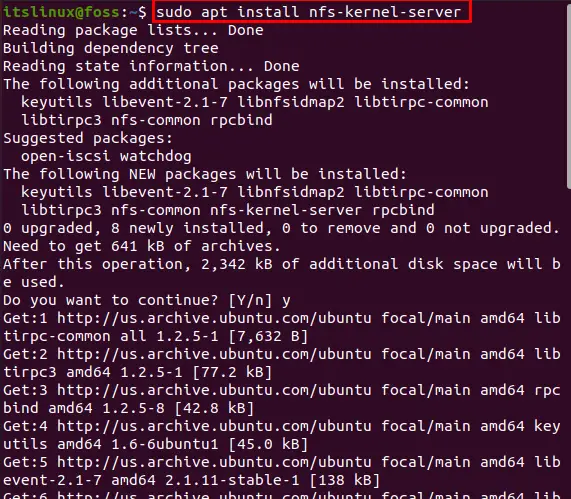
This command also installs some additional packages that we didn’t mention. That includes NFS common and rpcbind. These packages are required for the setting up of file sharing.
Let us now confirm whether the installation was successful or not. For this purpose follow the following command:
$ sudo systemctl status nfs-server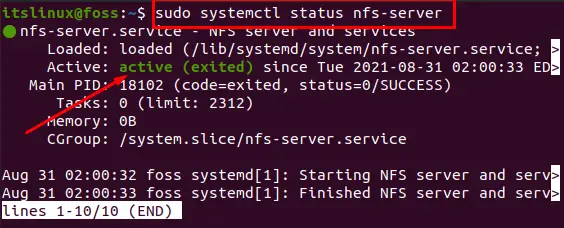
If you see active then it means the installation was successful. Press CTRl+C to end this process.
Step2: Now that NFS kernel Server is installed on Ubuntu, let’s create an NFS export directory. What is the NFS export directory? This is the directory where we will put the files to share with our clients. It will be achieved through the local area network(LAN). We will create it on our desktop. We will name the directory “Sharing_Caring”. Everything in this directory will be shared with our clients.
$ mkdir Desktop/Sharing_CaringYou can create the file in any directory you want.
The next step is to set up the permissions for the directory “Sahring_Caring”. As we want to make all of our files in the “Sharing_Caring” directory accessible to everyone., we will set the following ownership and permissions:
$ sudo chown nobody:nogroup Desktop/Sharing_Caring
$ sudo chmod -R 777 Desktop/Sharing_Caring
These permissions will be applied to all the files and subdirectories in the directory “Sharing_Caring” because these are recursive permissions.
Step3: The NFS directory “Sharing_Caring” is now ready to be shared with the clients. The next step is to give access to clients so that clients can have access to their host server. For this, we have to edit the /etc/exports file. It was automatically created when we ran the command of installing “NFS Kernel Server ”.
First, we have to open the file whose path is “/etc/exports”. For this purpose type:
$ sudo nano /etc/exportsThe following screen will appear:
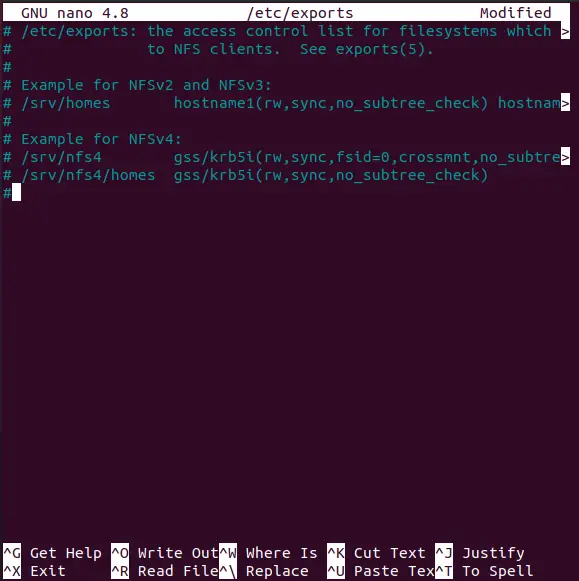
The file is now opened. To give access to a single client, add the following line:
Desktop/Sharing_Caring client-IP(rw,sync,no_subtree_check)
Remember to replace the client-IP with the client’s actual IP. In our case it was:
IP_Client : 192.168.18.90
We can also add more clients. Follow the below lines to add to the list:
Desktop/Sharing_Caring client-IP-1(rw,sync,no_subtree_check)
Desktop/Sharing_Caring client-IP-2(rw,sync,no_subtree_check)
Desktop/Sharing_Caring client-IP-3(rw,sync,no_subtree_check)
Apart from this we can specify the entire subnet as well by following lines:
Desktop/Sharing_Caring 192.168.0.0/24 (rw,sync,no_subtree_check)
Now we have allowed all the clients that are in the subnet of “192.168.0.0”. All the clients with the above subnet will now have access to our server.
After this, we will give all the clients access to our NFS server. Follow the following code:
Desktop/Sharing_Caring 192.168.18.0/24(rw,sync,no_subtree_chec
In this code, we can see some commands. Let’s discuss them and find out what they do:
- Rw is for read and write
- Sync is for writing all the changes to the disk before applying the changes.
- No_subtree_check is to avoid subtree checking.
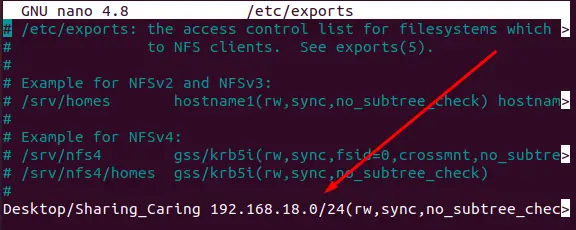
To save this file press CTRL+S. Once saved, press CTRL+X to exit.
Step4: Now let’s export the directory we created and make it available to our client. Follow the following command:
$ sudo exportfs -a
Step5: This step involves the configuration of the firewall rule for the NFS Server. In this step, we are basically gonna allow all our clients with the subnet mentioned earlier to pass through our firewall. If we don’t allow firewall access, clients won’t be able to see the shared directory “Sharing_caring”. All Ubuntu systems have a default firewall. It is UFW and the full form of UFW is an Uncomplicated Firewall.
Let’s check whether UFW is running on our ubuntu or not. For this purpose type the following command:
$ sudo ufw status
If it shows status as inactive then you have to enable it or turn it on using the following command:
$ sudo ufw enable
Now that it is enabled, let us configure it. Basic purpose here is to make UFW allow our clients to have access to our Server.
As, we are going with the allowance of all the clients having the subnet previously mentioned, follow the following command:
$ sudo ufw allow from 192.168.0.0 to any port nfs
Replace the subnet we gave to your subnet or the IP address of the client to give him access.
Congratulations! We have successfully installed as well as configured NFS Server on our system/computer.
Step6: Now that we have successfully installed and configured our server, the next step is to configure our client. For this purpose open your next Ubuntu system that you have created. In our case, its IP address was: 192.168.18.90.
When you are logged in to your client system, the first step is to update and upgrade this system. For this purpose follow step1 till upgrade.
$ sudo apt update $ sudo apt upgradeAfter this, we have to install the package known as “NFS-common”. For this type the following command:
$ sudo apt install nfs-common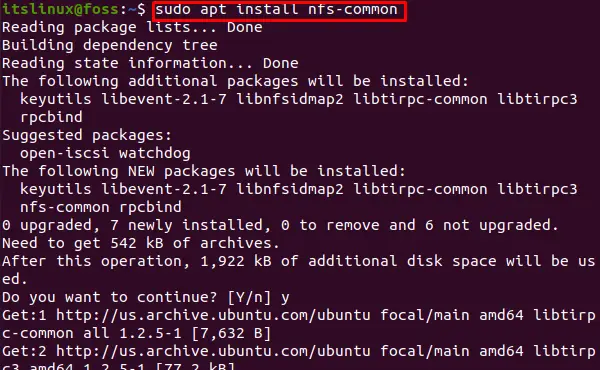
The next step involves creating a new directory where we can mount the NFS shared content from the server. Copy the following command:
$ sudo mkdir -p /mnt/client_shared_folderNow we will mount the NFS share directory to the directory we created above.
$ sudo mount 192.168.18.89:Desktop/Sharing_Caring /mnt/client_shared_folderStep6: This is the final step in which we will test the NFS shared setup. Let’s create a test file in the NFS directory so that we can test.
Copy the following commands:
$ cd Desktop/Sharing_CaringThis command is to change the directory, now we will create a text file with the name of sweets.
$ touch sweets.txtLet’s go back to our client and see whether the “sweets” file is accessible and present or not. For this type in the client system the following command:
$ ls /mnt/client_shared_folder/
If you see the “sweets” file then congrats. You have achieved the task. If you don’t see the file, please follow the steps again.
Conclusion
Now that you have installed and configured NFS Server on Ubuntu 20.04, you can share your files with another computer over a network. If you go for sharing via USB or a cable, that will take a lot of time. Also, you won’t be able to set permission or update. If you update you have to copy it again to the computer. This will benefit you in saving your time.

Saryia is a technology entrepreneur and digital publisher specializing in Linux, open-source technologies, and developer education.