Django is a very famous framework of python; it is an open-source backend framework of Python. Django framework is used for full-stack web apps and server development. It is a fully-featured framework and it does not need external libraries, because it is a full-stack framework. Django helps in the fast development of the most secure websites.
The Django framework is used to develop complicated and data-driven websites. Django framework is also involved in the development of social media platforms. Django. Django allows the development of fast, secure, and maintainable websites. Django was developed by python developers in 2003, and Django is written in Python and HTML.
This article elaborates on all the procedures involved in the installation of Django on Ubuntu 22.04.
How to install Django using the official repository
Official repository is a storage location from where the user can install the official package software for Linux distros. Let’s dig into detail to find the procedure of installation using the official repository method.
Step 1: Update the system packages
Open the Terminal by pressing the shortcut key “CTRL+Alt+T”, and write the following command to update the system packages.
$ sudo apt update
Step 2: Check Python Installation
Next step is to check Python installation. Python comes pre-installed in Ubuntu so to Check the latest version of python installed on the system, run the below command in the terminal.
$ python3 --version
The Python version confirms that it is already installed on the system so we don’t need to install python.
However, if Python is not installed on your system due to some reason, install it by following our dedicated article: install python on Ubuntu
Step 3: Install Django
Install Django using the following command, we are using -y in the following command, which means it will not ask for your confirmation again which is [Y/N]
$ sudo apt install python3-django -y
Step 4: Verify the installation
Now, Django is installed, verify its installation by checking its version.
$ python3 -m -django --version
The Python version number confirms that Django is successfully installed on the system.
How to install Django using pip
PIP is an installation manager of python packages. PIP is a short form of Pip installed in Python and it is a cross-platform supported package manager. Pip helps Python packages to install on the system.
Step 1: Update the system packages
Open the Terminal by pressing the shortcut “CTRL+Alt+T”, and update the system packages by using the update command.
$ sudo apt update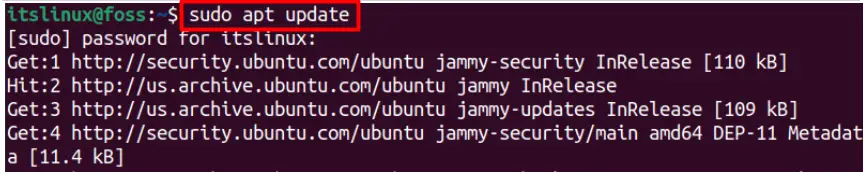
Step 2: Check Python installation
To install Django, you must have Python installed on your system because it is a framework of Python. Python comes pre-installed in ubuntu so to Check the latest version of python installed on the system, run the following command in terminal
$ python3 --version
The Pythons version number is evidence that Python is already installed on the system.
Step 3: Install pip and venv
Install venv(used to create virtual environments for different projects) and pip using the ubuntu repository, we used -y in the following command, which means it will not ask for permissions again and again.
$ sudo apt install python3-pip python3-venv -y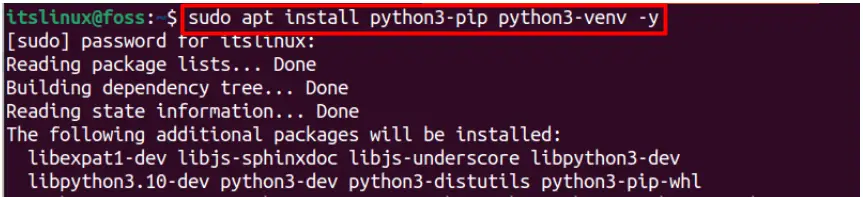
Step 4: Create a new project directory
Create a new directory using the “mkdir” command where we can reside our project and move in to the newly created project directory using the “cd” command as shown in the following commands:
$ mkdir ~/newproject
$ cd ~/newproject
Step 5: Set up new environment
Create a new virtual environment (my_env) by executing the venv module:
$ python3 -m venv my_env
New environment created successfully.
Step 6: Activate the new environment
Activate the virtual environment that you have created by using the command below.
$ source my_env/bin/activate
Step 7: Install Django
The Environment is created and activated, just install Django using pip:
$ pip install django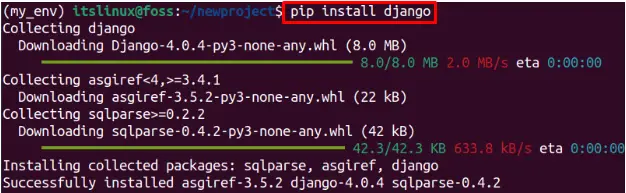
Step 8: Verify installation
Django framework is installed successfully and executes the below command to check its version.
$ django-admin --version
The version number verifies that Django is installed on the system.
How to deactivate the environment
To deactivate the environment simply run the deactivate command in the terminal.
$ deactivate
The (my_env) is removed which confirms that the environment is deactivated successfully.
How to remove Django from Ubuntu 22.04
In the Django installation section, we have performed two methods. Similarly, we are going to use those two methods which are the official repository and pip to remove Django from Ubuntu.
Let’s find out how we can remove Django.
How to remove Django from Ubuntu using the official repository
The removal process is almost the same as the installation process. To do so, execute the following command to remove Django from Ubuntu using the official repository.
$ sudo apt autoremove python3-django -y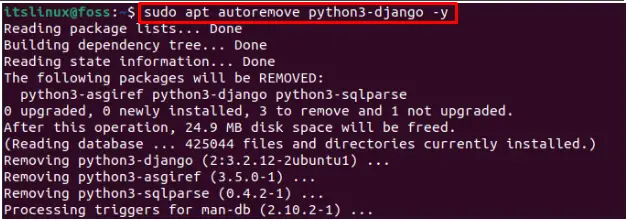
The output shows that the Django and its configuration files are removed from Ubuntu 22.04.
How to remove Django from Ubuntu using pip
You need to have access to the directory in which it is installed and the environment must be activated to remove the Django from Ubuntu using pip. Execute the following command.
$ pip uninstall django -y
The Django will be removed.
Here you go! You have learned to install as well as remove Django on Ubuntu 22.04 via its repository and pip.
Conclusion
Django can be installed on Ubuntu 22.04 via the official repository and the pip methods. To install Django you must have Python installed on your system because Django is a framework of Python. Django is a web-based python framework used to develop web-based applications. This article demonstrates various methods to install Django on Ubuntu 22.04.

Saryia is a technology entrepreneur and digital publisher specializing in Linux, open-source technologies, and developer education.