As Linux is a multi-user system, it allows more than one user to have access to the system at the same time if it’s attached to a network or the internet. Remote users can login via ssh (secure shell) and operate the computer.
In such a multi-user environment, it’s necessary to ensure operational accuracy to users. So that the actions of one user could not be allowed to crash the system, nor could one user interfere with the files belonging to another user.
Although the security measures in the Linux system are extremely good. But still, there exists a loophole. These are file permission based issues that arrive when a user is not given the correct permission to files and directories. In today’s article we’ll understand file permission in Linux and how to define and set permission through various methods.
File Permission in Linux
In Linux, file permission is granted to the following groups:
- Owner: The person who created the file, and hence it determines what action the owner can perform on the file or a directory.
- Group: This could include multiple users who are granted the access and permission to the file.
- Others: This includes all the other users and represents what action they can perform on the particular file.
Types Of Permission in Linux
In Linux, file access is defined by the three terms: read, write and execute access.
- Read: It shows that the user is given the access to view the file.
- Write: It shows that the user is given the access to modify the file.
- Execute: It shows that the user is given the access to run the file.
Reading File Permission
If we run the following command in our terminal, we can understand how this work:
$ ls -l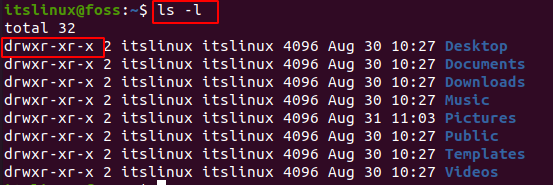
Using this command you can check the file and directory permission on your system. Here the 10 digit highlight part indicates the file type and permission. In these 10 characters the first character indicates the file type. Following are some file types:
- – : It represent a regular file
- d : It represent a directory
- l : It represent a symbolic link
- c : It represents a character special file. Devices that handle data as a stream of bytes, such as a terminal.
- b : It represents a block special file. Devices that handle data in blocks such as hard drives.
Now, the remaining nine characters represent the file attributes, also referred to as file mode. This show the file permission granted to the file owner, groups and others.

Here, after the first character the 3 characters rwx represent the rights of an owner, next three of groups and the last three of others. Here:
- r : allows a file to be opened and read
- w : allows a file to be open and modified
- x : allows a file to be open and executed
Here, in the above example, a directory is shown. Owner has the right to read, write and execute, whereas the group and others have the right to read and execute it only. They don’t have the right to make changes in it.
Now to read the permission of a particular file “ls -l” can be used along with the name of a specific file or directory name:
$ ls -l [name of file or directory]In the below example we used the command to check the information about /etc/passwd file.

Here, the first character indicates that it’s a regular file. Owner has the right to read and modify it. Whereas, groups and others can only read the file, they can not modify or execute it.
Change File Permission
Sometimes, you want to change the permission and grant others some right over your file or directory. For this purpose we have a command called “chmod”. This command can only be used by the file owner or cd super-user to grant other access to the file.
Chmod is used in two ways to grant the access and permission, one is explicitly and other is through the use of binary references.
Explicitly granting the permission:
Here for this you need to keep in mind the symbols used for different permission groups:
- u- represent the owner
- g- represent the group
- o- represent others
- a- represent all the above users
Along with these + and – operators are used to give permission of r, w, x (read, write and execute) the file or a directory. To understand this better we’ll create a text file in the Desktop directory and change its permission using chmod. Run the following commands:
First we need to go to the Desktop:
$ cd DesktopNow, here we need to create a file of text type using touch:
$ touch filename.txt
Now, to check the file information run “ls -l”:
$ ls -l
Now the command “ls -l” showed the information about all the files in Desktop. Here the file we created is present and it shows that owner and group have the access to read and write it only, while others can only read it.
Let’s change the others rights and give them the right to execute the file as well. For this run the following command:
$ chmod o+x [filename]
Here, we gave access to others by using their representative symbol along with the + operator. If you want to give others all the rights of read write and execute, run the following command:
$ chmod o+rwx [filename]
Now after that if you run the “ls -l” command it’ll show you the changes you made.
Binary reference for granting the permission:
Permission can also be given using the binary references using three digits that represent read write and execute:
- r = 4
- w = 2
- x = 1
Here, if you want to give access you simply add the number. For example “chmod 760 filename.txt” shows that the owner has the right to read, write and execute the file. Group has the right to read and write the file while others have no right. Let’s demonstrate it, run the following command:
$ chmod 760 filename.txt
After running the command, if you run “ls -l” you’ll see that the owner now has the right to read, write and execute. Whereas, the group is granted the right of only reading and writing the file and all the permission is taken away from others. In this way binary references work.
Change File Owner and Groups
One more thing you can do is change the file owner and make someone else the owner of your given file. This is done through “chown” along with sudo:
$ sudo chown owner:group [filename]Now, after that if your run “ls -l” you’ll see that another user named “ubuntuuser” has been granted as the ownership of the file:

In this way you can give the ownership to other users of your file or directory.
Conclusion
Linux being multi user has its perks and drawbacks, one of them being file permission. In this article, we learned about file permissions in Linux, what are the different groups in Linux, different permission modes as well as how to grant the permission to each permission group. We further learn different ways in giving permission and how to give ownership to other users in Linux.
This is extremely useful because sometimes you don’t want others to have access to your file. So that their actions can not affect you or the whole system itself.

Saryia is a technology entrepreneur and digital publisher specializing in Linux, open-source technologies, and developer education.