
Some of the most common usages of the apt command in Ubuntu are updating and upgrading system repositories and packages or installing and removing them.
In Ubuntu, when you install any package, it will be stored in the cache memory with a .deb file. So, in the future, if package reinstallation is required, it will take less time.
However, sometimes the cache memory keeps increasing, ultimately occupying more space on the system. It is recommended to clear the apt-cache regularly to avoid any system performance errors.
Considering the importance, this article will demonstrate the possible methods to clear the apt-cache in Ubuntu. The content of the post is:
Let’s get started!
How to Check the apt Cache Memory in Ubuntu 22.04?
The cache grows significantly over time and uses up a lot of memory, which might slow down your operating system, especially if you are low on memory.
Your operating system will reinstall the same version of a software package if you remove and reinstall it from the local cache.
In “/var/cache/apt/archives”, you can find the .deb files downloaded by the apt package manager after installing them.
Check the Packages in Cache
You can check all the packages that are stored on your apt cache memory by typing:
$ ls /var/cache/apt/archives
Check the Size of the Cache
You can further check the size of the apt cache memory which it is consuming by typing:
$ sudo du -sh/var/cache/apt/archives
As you can see in the image below that my apt cache memory is consuming 568 MB’s of memory.
In the next section, we will discuss how you can remove the apt-cache memory from your system.
How to Clear the apt Cache Memory From Ubuntu?
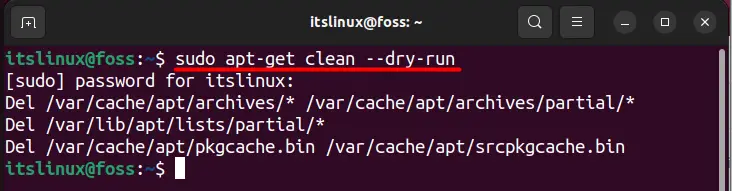
The apt cache can be cleared using the following command, which will list down the actions as well:
$ sudo apt-get clean --dry-run
This command will show you all those directories from where it is clearing the cache memory
So, if you want to clear the cache only without listing the details on the terminal, you can use the below-mentioned command:
$ sudo apt-get clean
How to Verify the apt Cache is Cleaned up or not?
Let’s re-run the command that you used earlier to check if the packages are still in the cache memory or not by typing:
$ ls /var/cache/apt/archives
As you can see, all the cache memory is now removed except the lock and partial folders.
Now, you can see that all the packages have now been successfully removed, except for the locked ones. So now let’s check the size of the cache memory that it is consuming by typing again:
$ sudo du -sh /var/cache/apt/archives
As you can see in the above image, most of the cache memory is now removed, and only 44KB’s memory is left.
This is a wrap-up for clearing the apt-cache in Ubuntu.
Conclusion
The apt cache can be cleaned up using the “sudo apt-get clean” or “sudo apt-get clean –dry-run” commands. Apt is a widely used command that serves various functions and is considered a critical component of Debian-based systems. This Linux post has briefly described the importance of clearing the cache and also illustrates the way to clear the cache as well.

Check our LinkedIn company page