
There are many modern libraries available in Python, such as Numpy, Tensorflow, OpenCV, Keras, etc. A popular open-source library named “OpenCV” is used for computer vision, image processing, and machine learning projects. This library is used for various purposes, such as hand detection, traffic detection, face detection, etc.
To use this library in Python, we must import it at the program’s start. Sometimes while importing, we may encounter multiple errors, one of them is “ModuleNotFoundError”, which occurs when the imported module is not installed in our system.
This write-up will provide you with the reason and the solution of “ModuleNotFoundError: No module named cv2” in Python with an example. It discusses the following topics:
- How to Resolve the “No module named cv2” Error in Python?
- Reason: cv2 Library not installed
- Solution: Install the cv2 Library
So, let’s start the tutorial!
How to Resolve the “No module named cv2” Error in Python?
Let’s discuss the possible reasons/causes and their solutions to the error “ModuleNotFoundError: No module named ‘cv2’ “ in Python.
Reason: cv2 Library not installed
The main cause of this error is that the “cv2” library is not installed in the system, and users are trying to import the “cv2” into the program. The example code below shows this error:
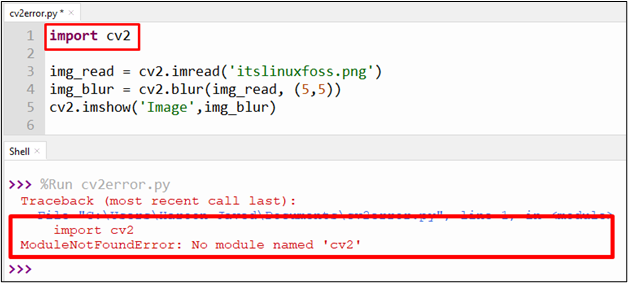
As shown in the above output, when the code is executed, it displays “ModuleNotFoundError”.
Solution: Install the cv2 Library
The simple solution to rectify this error is to install the OpenCV “cv2” library on the system. To install the library, follow the given below steps.
If you are a windows user, the given below steps will help you to solve this error:
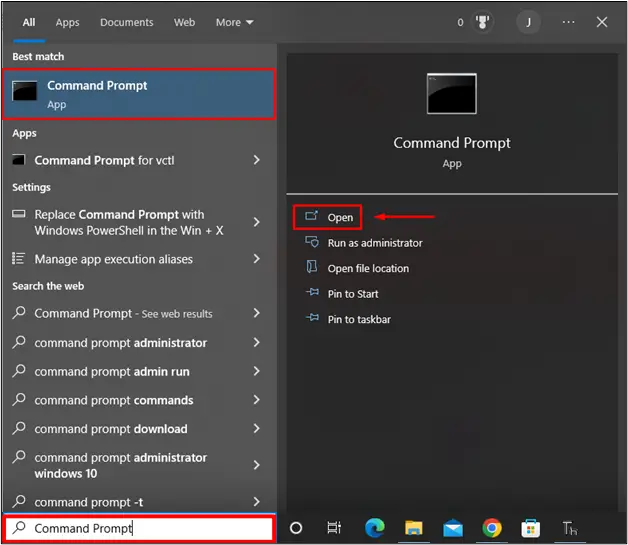
Step 1: Open Command Prompt
The first step is to open the cmd (command prompt) by searching it from the start menu as shown below:
Step 2: Install OpenCV
Run the given command in the command prompt and wait for the installation. The command and installation snippet is shown below:
pip install opencv-python
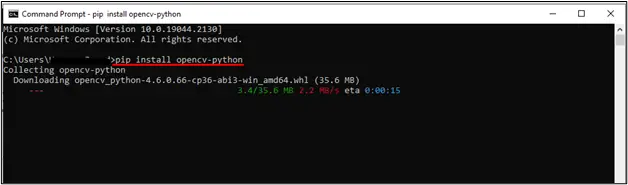
After a few minutes of waiting, the “OpenCV” library was successfully installed into our system, as shown in the below snippet.

If the above command is not working, then there is a possibility that your pip package manager is not upgraded to the latest version. So update your package by the following command.
python -m pip install --upgrade pip
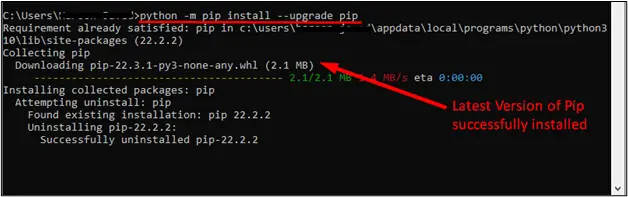
After upgrading the pip manager, install the OpenCV library, and hopefully, the library will be installed on your system successfully.
Step 3: Execute OpenCV Example Code
Now we can verify the “cv2” library installation by the following code given below:
Code:
import cv2

img_read = cv2.imread('itslinuxfoss.png')
img_blur = cv2.blur(img_read, (5,5))
cv2.imshow('Image',img_blur)
In the above code:
- The “cv2” library is imported at the start of the program.
- The “cv2.imread()” function is used to read the image and “cv2.blur()” function is used to blur the image.
Output:

The above output verified that the image is successfully read by the “cv2” module function.
Note: Python IDE usually integrates the “cv2” library from cmd, but if not, you can install it from the IDE terminal shell.
That’s it from this guide!
Conclusion
The “ModuleNotFoundError: No module named cv2” problem occurs in a Python program when the OpenCV library is not installed on the system. The stated issue can be rectified by installing the OpenCV library on your system using the pip package installer. This blog post presented possible reasons and the appropriate solutions for Python’s “no module named cv2” error.