Linux OS is specially designed to resolve/troubleshoot security-related tasks and the dig is its most reliable command-line utility to troubleshoot/manage DNS-related queries. The full form of dig is Domain Information Groper, and its core purpose is to gather domain information. For a network administrator, dig is the most abundantly used and considered the best command line tool for DNS lookup.
This handy guide will provide in-depth knowledge and practical implementation of the dig command in Linux.
Content Covered
- Importance of DNS Protocol
- Installation of dig Command in Linux
- dig Command Different Flags
- List of Common DNS Record Types
- Usage of dig Command in Linux
- Syntax
- Example 1: Perform DNS Lookup
- Understanding the dig Command Output
- Example 2: Set DNS Server For DNS Lookup
- Example 3: Retrieve All DNS Record Type Results
- Example 4: Retrieve Website IP Address Only
- Example 5: Trace DNS Path Using dig Command
- Example 6: Search For Specific Record Type
- Example 7: Reverse DNS Lookup
- Example 8: Multiple DNS Lookup From a File
- Example 9: Customize the Output of dig Command
- Example 10: Set IPv4/IPv6 Transport Mode
- Example 11: Display SOA Record of Domain Name
- Example 12: Set Number of Tries For DNS Lookup
- Bonus Tip: Alternative Command to Find DNS Information
- Relevant Queries
- End Results
Importance of DNS Protocol
The Internet is the combination of various networking protocols and every process of the Internet works under a specific one. More specifically, when a website is hosted on the server, a static IP address is assigned to the website. Because the IP address is hard to remember and search, a domain name is assigned to the website with the help of the DNS (Domain Name System) Protocol. This protocol translates the domain name into an IP address, processes your request to the server, and gives you results.
Installation of dig Command in Linux
The dig command is pre-installed in most Linux distros but can be installed manually by installing the dnsutils. The dnsutils is a package comprising various client programs related to DNS. The installation command for this package is given below, pick the specific one based on your Linux distro:
sudo apt install dnsutils          #For Ubuntu/Debian
sudo yum install bind-utils        #For CentOS/RedHat

Once the installation is done, check the dig command version to verify. For this, run this command:
dig -v

The dig command version 9.18.18 is installed in our Ubuntu OS.
dig Command Different Flags
dig command is a command-line utility having a vast range of options and parameters for DNS-related queries. Some of the popular options and parameters are described here.
Options Table
| Options | Description |
|---|---|
| -f | This option is used for obtaining input from the file (batch mode) such as list domain names specified in each line for DNS lookup. |
| -b | This option is useful for specifying the source IP address under the host’s network for DNS lookup |
| -p | It is used for specifying the specific port number to query DNS instead of the standard port. |
| -q | It is used for specifying the name of the DNS query. |
| -m | Enables the memory usage debugging of the DNS server. |
| -t | It is used for displaying the specific DNS record type. |
| -6 | Restrict the dig command to utilize IPv4 transport. |
| -4 | Restrict the dig command to utilize IPv6 transport. |
Parameters table:
| +[no]cl | Display or do not display class type for DNS lookup. |
| +[no]trace | Trace or do not trace the DNS path. |
| +[no]short | To display or do not display concise output for DNS lookup. |
| +[no]tcp | Use or do not use TCP protocol for DNS lookup. |
| +[no]answer | For printing or not printing the answer section dig results. |
| +[no]all | To clear/set all display flags. |
Note: The “[no]” flag is optional here.
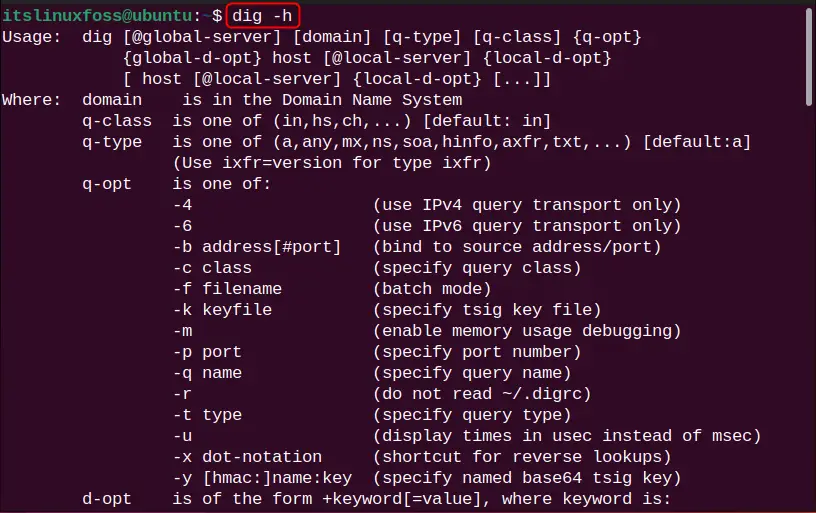
For more options and parameters, enter the help command in the terminal:
dig -h
List of Common DNS Record Types
Before moving toward the usage of the dig command, the user must be familiar with common DNS record types, because the output of the dig command is a bit complex. For this, check out the provided table.
| Record Type | Description |
|---|---|
| AAAA | Quad A represents the IPv6-type record. |
| A | Single A represents the IPv4-type record. |
| MX | MX (Mail Exchanger) represents the email host server |
| SOA | SOA (Start of Authority) represents the information on the authority zone. |
| PTR | Represents DNS Pointer Record (PTR) |
| TXT | Represents Text record type. |
| SIG | Signature record type |
| CNAME | Canonical Name Record for DNS. |
Usage of dig Command in Linux
For usage of the dig command, let us try to implement some of the practical examples.
Syntax
The syntax for using the dig command in Linux is obtained as follows:
dig [Server] [Name] [Type]
[Server] – provide the server IP address to query.
[Name] – given hostname for DNS lookup.
[Type] – specify the type of DNS record. The default behaviour of the dig command displays A (IPv4) record type.
Example 1: Perform DNS Lookup
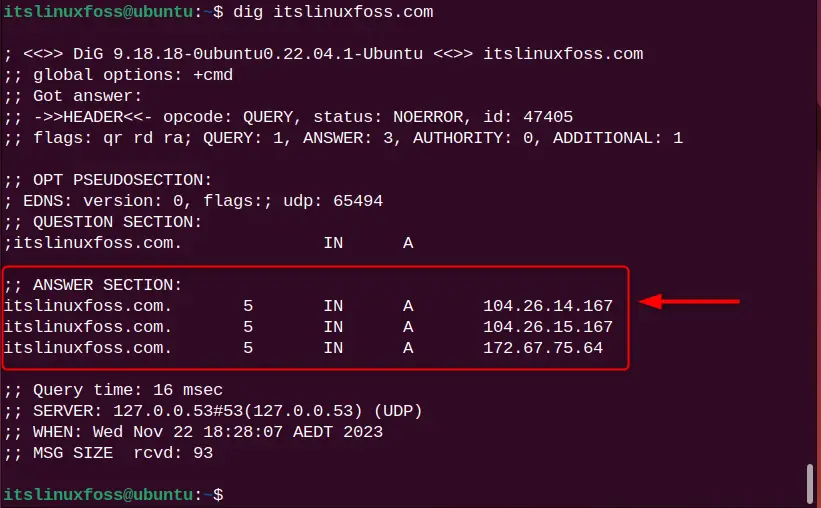
To perform the DNS lookup for any hostname, type dig along with the hostname. Let us say the hostname is “itslinuxfoss.com” and the command will be:
dig itslinuxfoss.com
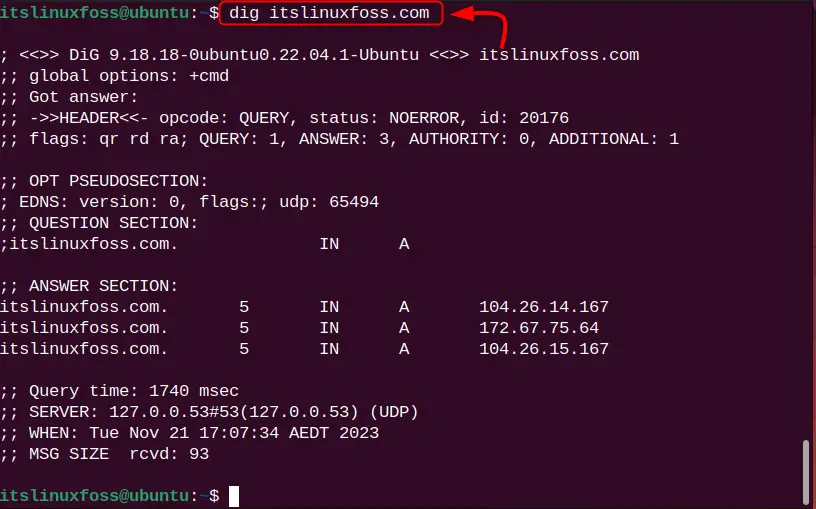
The DNS lookup has been performed for the hostname, but the output is quite complex. Let us understand its output below.
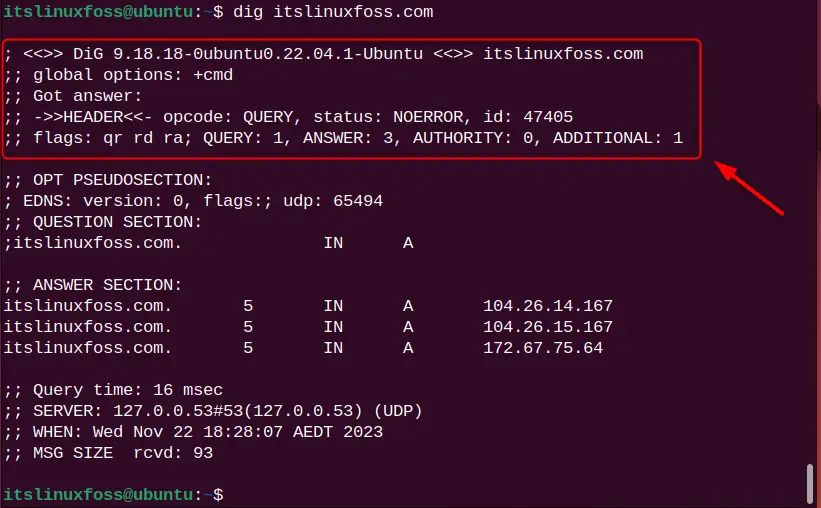
Understanding the Dig Command Output
From the dig command output, you will see different sections such as “OPT PSEUDOSECTION:”, “QUESTION SECTION:”, “AUTHORITY SECTION:” and “Query time:”. Let us explain each section.
1. The first section of the output displays the dig version and name of the server that was queried. The “HEADER” part displays the information obtained from the server:
2. The “OPT PSEUDOSECTION:” section displays advanced data like EDNS (Extensive System For DNS), flags (none, if no flag is specified), and UDP packets.
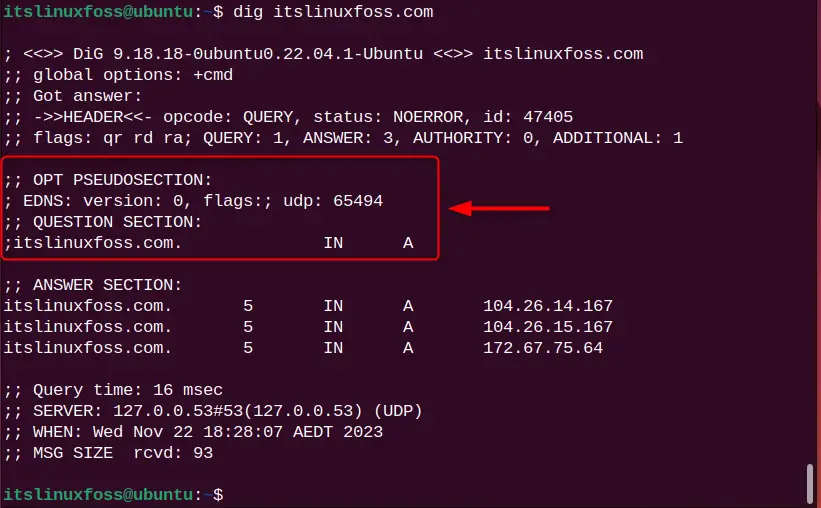
3. The “ANSWER SECTION:” is the most crucial part of your DNS query.
- The first column represents the server’s name,
- The second column represents the TTL (Time to Live),
- The third column represents the class type.
- The fourth column represents the record type (A means IPv4).
- The end column contains the IP address of the server’s name.
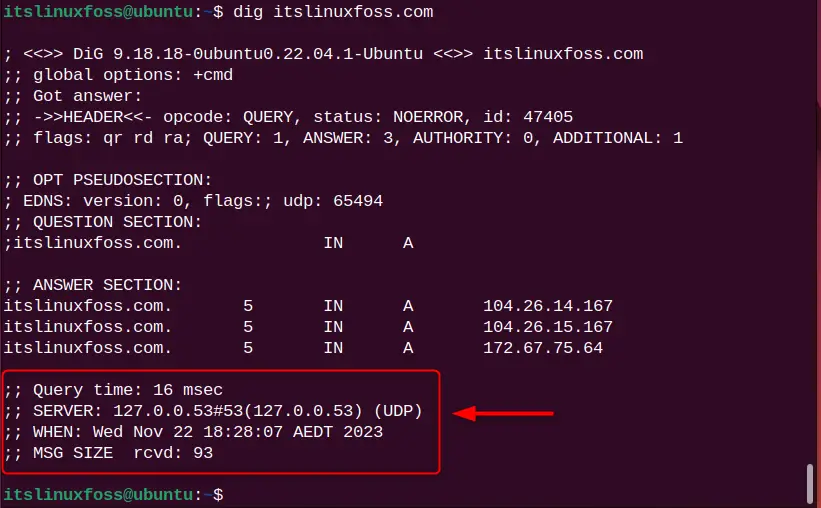
4. The last part of the section contains:
- “Query time”, is the time in milliseconds to process requests.
- “SERVER”, is a server IP address through which the query is processed.
- “When”, is the current timestamp for the query.
- “MSG SIZE”, the total message size received from the server.
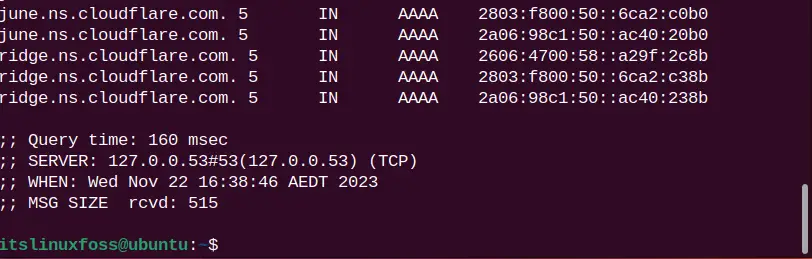
Example 2: Set DNS Server For DNS Lookup
By default, DNS lookup uses the server’s name from the “/etc/resolv.conf” file. If you want to process your DNS request from a different server name, use the “@[ServerIP]” format to specify it. For the illustration, check this command:
dig @9.9.9.9 itslinuxfoss.com
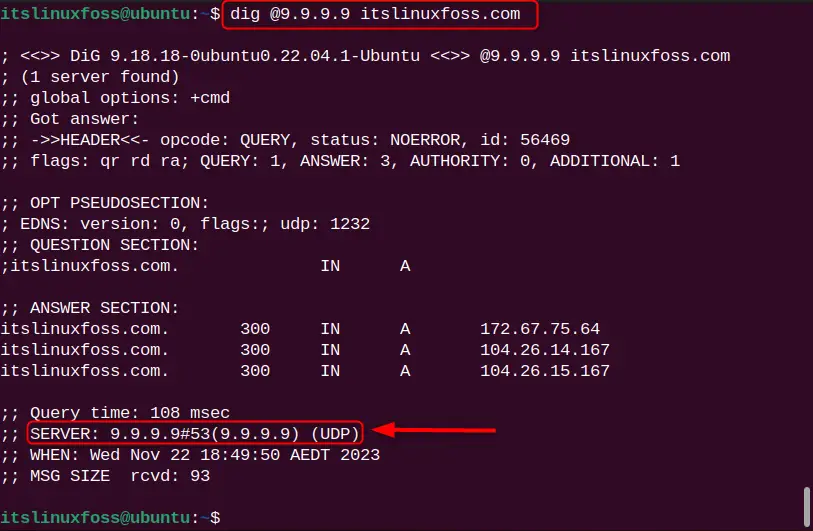
The DNS lookup is processed with the specified server ”9.9.9.9”.
Example 3: Retrieve All DNS Record Type Results
As already explained, there are different types of DNS record types. To retrieve them all, use the “ANY” flag:
dig itslinuxfoss.com ANY
It can be observed that all DNS record types “HIINFO”, “NS”, “A”, and “AAAA” are listed.
Example 4: Retrieve Website IP Address Only
It can be noticed that the dig command displays too much information by default, sometimes unnecessary. To restrict the dig command output, use the “+short” perimeter:
dig itslinuxfoss.com +short
dig google.com +short
dig facebook.com +short
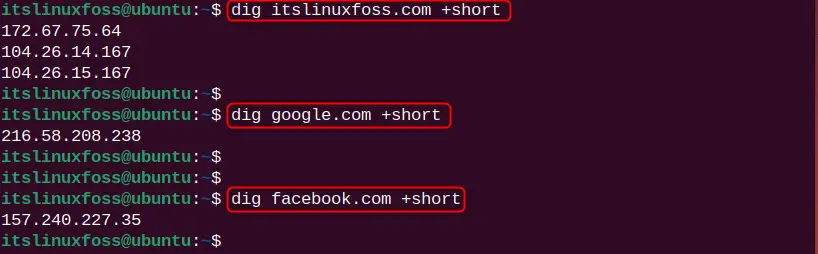
From the above image, only the IP address for the given name servers (itslinuxfoss, Google, and Facebook) is listed.
Note: Here, it can be noticed that the website server has more than one IP address which indicates the DNS load balancing to manage multiple traffics. Moreover, Google and Facebook also have multiple IP addresses, but they display the DNS IP address for specific regions such as Europe, and Asia.
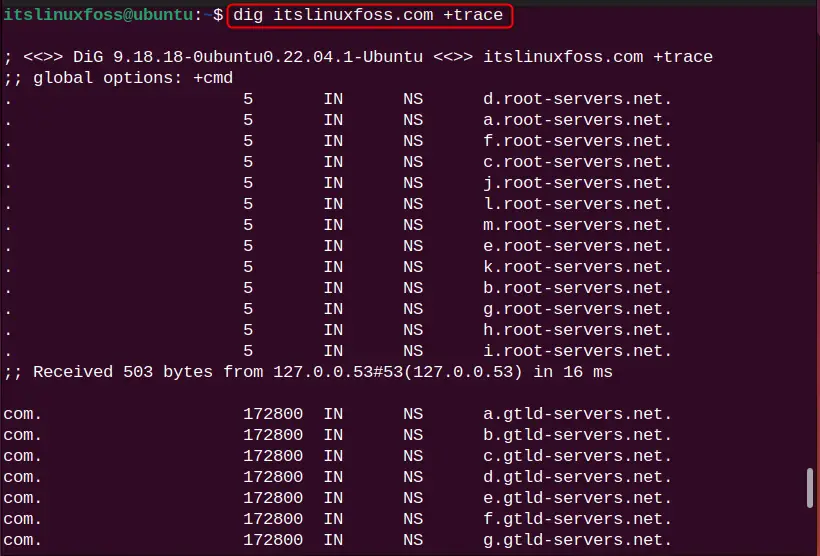
Example 5: Trace DNS Path Using dig Command
Since every DNS request goes from different servers to process the query. To trace the DNS path for the requested DNS query, utilize the “+trace” parameter:
dig itslinuxfoss.com +trace

The DNS path for the “itslinuxfoss.com” website server is traced.
Example 6: Search For Specific Record Type
In example 2, we have seen that the dig command gives various types of DNS records such as txt, MX, and cname. For displaying the specific DNS record type results, specify it at the end of the command. Let us say, the user wants to display the text type record. For this purpose, the command will be:
dig itslinuxfoss.com txt
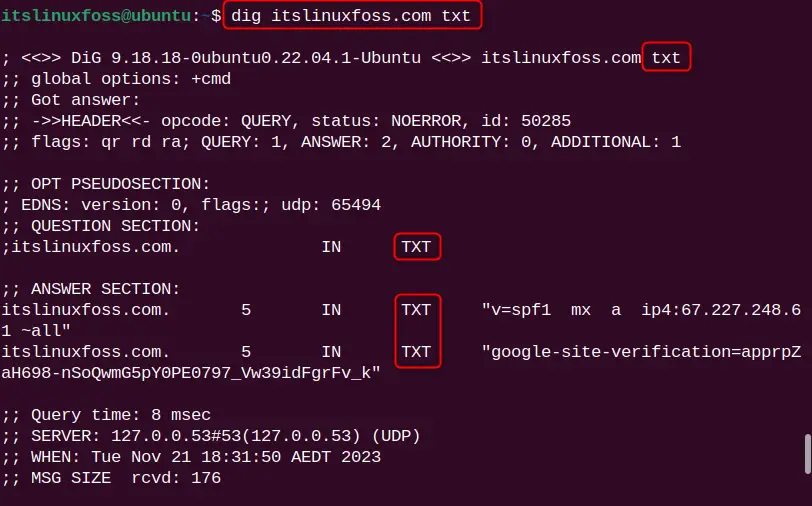
Only the text record output is listed.
Example 7: Reverse DNS Lookup
The dig command uses the domain name for DNS lookup. However, if you want to perform the DNS lookup using the domain name IP address, use the “-x” flag in the command:
dig -x 172.67.75.64
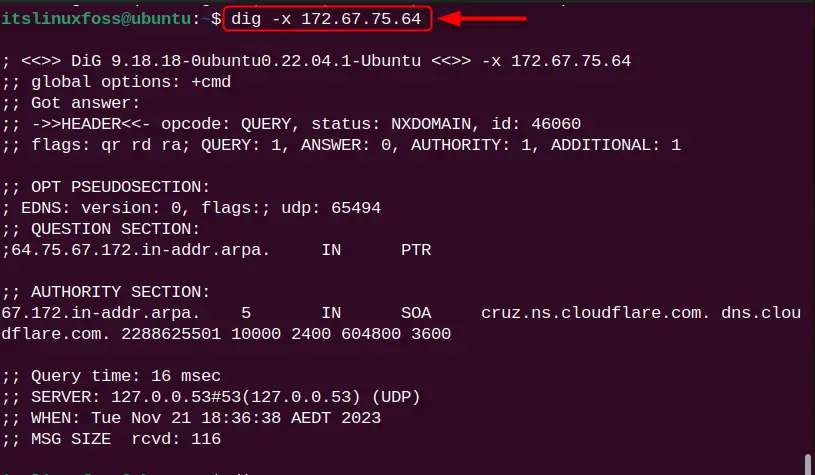
The DNS lookup for the IP address “172.67.75.64” is performed.
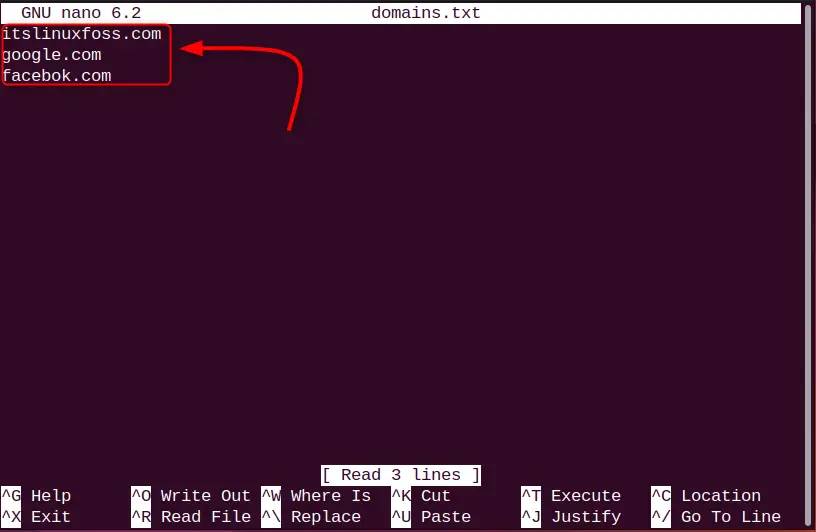
Example 8: Multiple DNS Lookup From a File
The dig command of Linux facilitates the batch mode for getting the input from the file to perform DNS lookup. The user can specify the multiple domain names in each line of the file and get the results. For instance, we have a “domains.txt” file having 3 domain names as follows:
itslinuxfoss.com
google.com
facebok.com
Use the dig command with the “-f” flag and specify the file name which is “domains.txt” in our scenario:
dig -f domains.txt
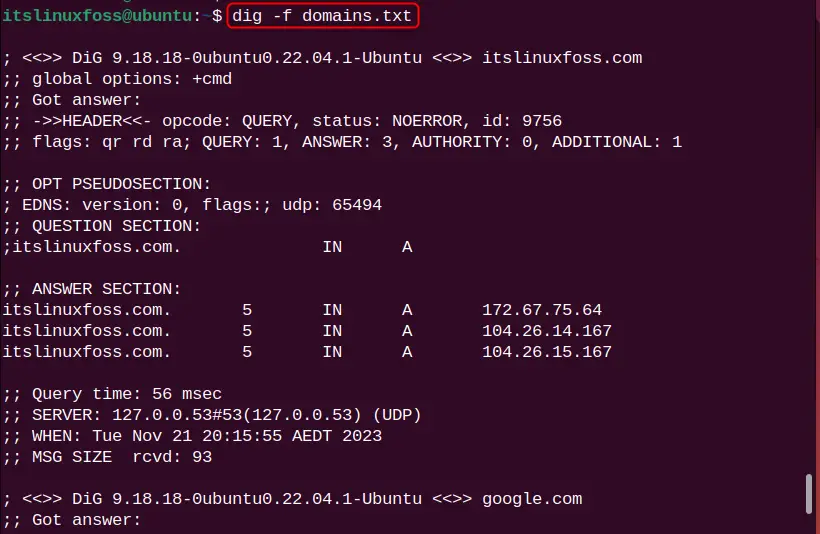

DNS lookup for all mentioned domain names “itslinuxfoss.com”, “google.com”, and “facebok.com” is performed.
Example 9: Customize the Output of dig Command
Instead of giving a parameter to the dig command every time, define the dig command parameter in the “.digrc” file. It will automatically be detected by the dig command and give you the desired results. Create the “.digrc” file in your home directory and open it with the nano editor to define the dig command parameter:
touch .digrc
nano .digrc

Let us say we want to use “+noall” and “+answer” parameters, just put it in the “.digrc” in the line-by-line format:
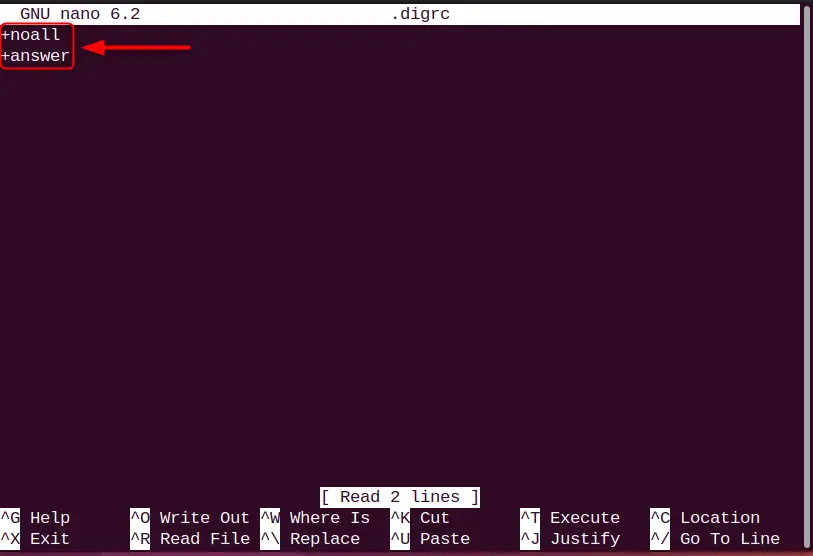
Save the file by pressing “Ctrl+O” and exit from the editor using “Ctrl+X”.
Now, check the results by running the dig command in the terminal:
dig itslinuxfoss.com

It can be observed that the output of the dig command is based on the parameters defined in the “.digrc” file.
Example 10: Set IPv4/IPv6 Transport Mode
To restrict DNS lookup output for specific IP modes such as versions 4 and 6, use the “-4” and “-6” flags in the command. For instance, the following command sets the IPv4 transport mode for DNS lookup:
dig -4 itslinuxfoss.com
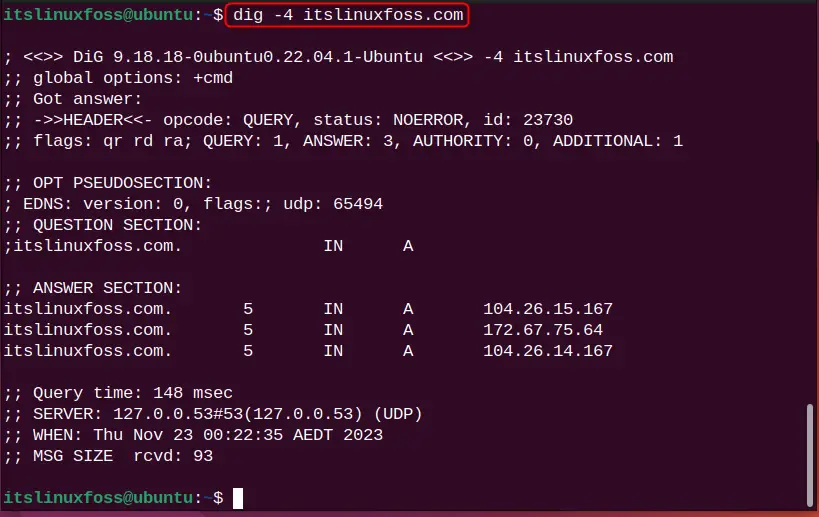
Likewise, for IPv6, the following will be considered:
dig -6 <Domain Name>
Note: If you are not getting the desired output for IPv6, it means your local DNS server cannot access the IPv6 transport. The reason for this is your home routers are not allowed to act as a DNS forwarder on IPv6.
Example 11: Display SOA Record of Domain Name
SOA ( Start of Authority Record) is the DNS record having administrative information such as zone transfers. DNS Zone is the specific portion to handle the domain namespace. To view such type of record, specify the record type “SOA”:
dig itslinuxfoss.com SOA
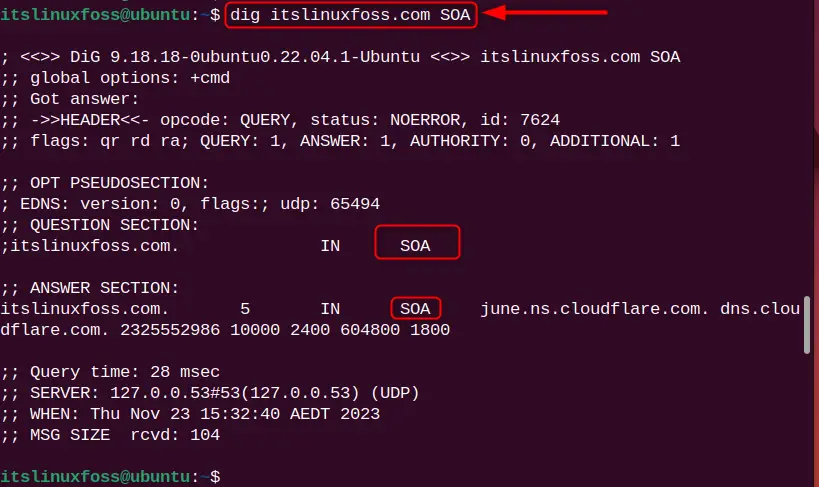
The SOA type record is listed.
Example 12: Set Number of Tries For DNS Lookup
To set the number of tries for performing the DNS lookup, use the “tries=” flag and specify the number of tries. After that, the command will exit the process.
Let us say, the number of tries is 5 and the command will look like this:
dig +tries=5 itslinuxfoss.com
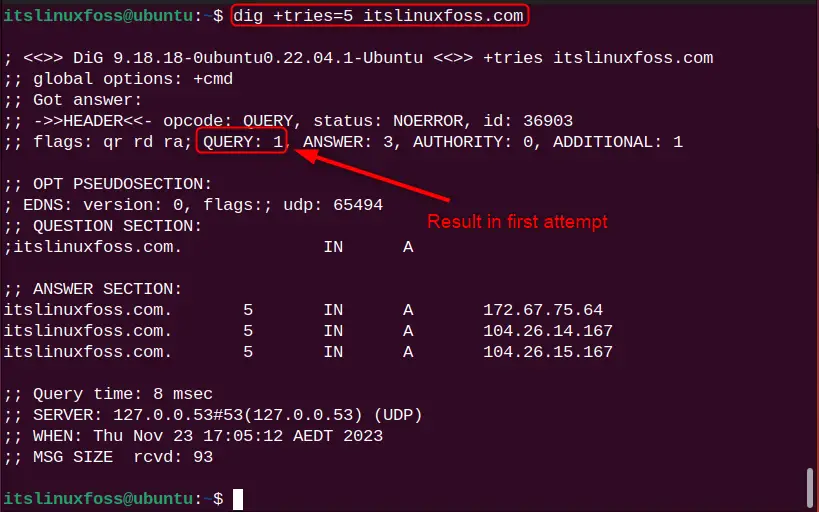
To see how many tries are attempted, check the “QUERY” section in the output. The above output shows that the results are fetched in the first attempt.
Bonus Tip: Alternative Command to Find DNS Information
The nslookup is another popular command in Linux that can be considered as an alternative to get the DNS information domain names. Type the nslookup command and mention a particular domain name:
nslookup itslinuxfoss.com
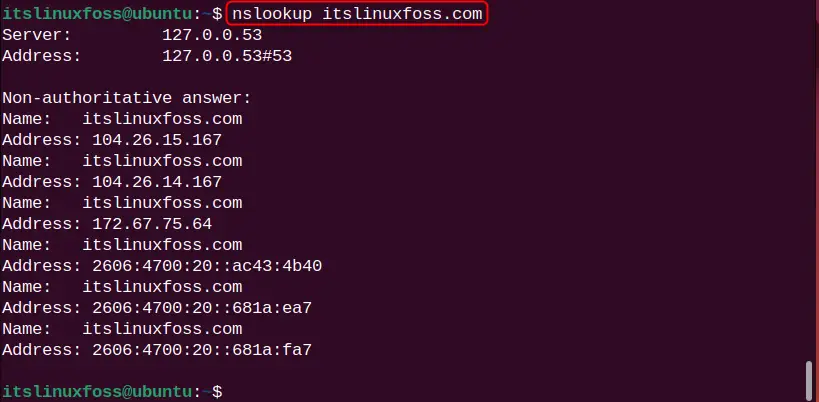
The DNS information for the domain name “itslinuxfoss.com” is printed.
Relevant Queries
Here are some relevant queries related to the DNS information, do not hesitate to explore them to get deeper knowledge:
How to Get a Hostname/Domain Name From an IP Address in Linux?
What DNS Servers Am I Using in Linux?
How to Search DNS History in Linux?
How to Add a DNS Server Via resolv.conf?
End Results
In the end, the dig command is the popular command-line utility for networking administrators to obtain DNS-related information for domain names. The user can use its various flags (-b, -t, -f, etc) and parameters (+[no]trace, +[no]short, +[no]answer, etc) to retrieve the desired results. Congrats, in today’s tutorial, you have learned the dig command deeply.
