Mostly when a user connects to a network through WIFI or eternal cable, the DHCP server automatically picks and assigns IP addresses to the system. Here the downside is that once the lease time of DHCP expires, another IP address is assigned to the system.
Such changes might cause disconnection of the system and due to this it’s recommended to set static IP addresses to the system so that the ip addresses do not change even when the lease time has expired. In this guide, we’ll tell you about how to configure a static IP address on Ubuntu 20.04.
Static IP Configuration on Ubuntu Server
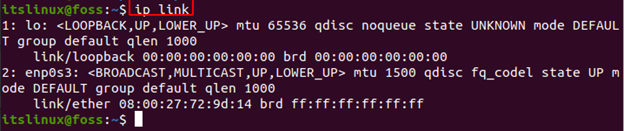
The Ubuntu system uses predictable network interfaces names to identify the interfaces of the network. Firstly, to set up a static IP address we need to identify the name of the interface that we want to configure. For this we will use “ip_link”.
$ ip linkThis will print out all the available network interfaces such as “enp0s3” that we’ll configure.
Netplan is used as a default network management tool by Ubuntu and its files are written using YAML syntax with extension of “.yaml”. In order to configure the interface with Netplan a yaml description is needed to be created and the required configuration files for that particular render tool will be generated by Netplan.
Configuration file of Netplan is stored in “/etc/netplan”. Here there might be some YAML files with the names “01-netcfg.yaml”, “NN_interfaceName.yaml” or “50-cloud-init.yaml”, but they differ in each system.
Now, we need to disable cloud instances just in case your Ubuntu is provisioned with cloud-init.
$ sudo nano /etc/cloud/cloud.cfg.d/99-disable-network-config.cfgThis will open the file, in it write the following.
network: {config: disabled}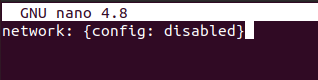
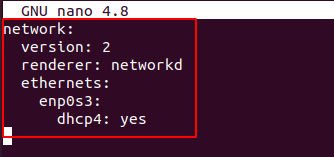
Now, we need to assign an IP address and for this open the configuration file of the YAML file.
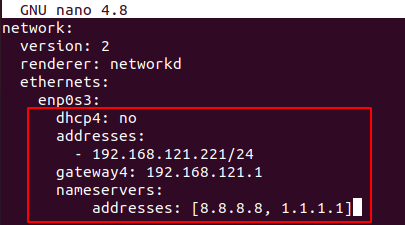
$ sudo nano /etc/netplan/01-netcfg.yamlThis will open the configuration file in which you need to add the following:
network:
  version: 2
  renderer: networkd
  ethernets:
    enp0s3:
      dhcp4: yes
Here you need to understand some key points:
- Each YAML file of Netplan is supposed to start with “network”.
- Networks contain a minimum two elements.
- Here, the first element is the network configuration format’s version.
- Second element is device type which can be ethernets, VLANS or bridges.
- Renders: Incase ubuntu was installed in server mode, render use networkd as back end.
In this under ethernets you can define various interfaces. We defined “enp0s3” that obtains an IP address from dhcp4. Now, in order to assign “enp0s3” an IP address which is static we will edit the file:
- Set no to dhcp4 which is a DHCP server.
- Give a static IP address using addresses: and provide one or more IPv4 or IPv6.
- Specify gateway
- Set the IP address of nameserver under nameservers.
After this save the file and run the below command in order for the changes to apply.
$ sudo netplan apply
Now after everything is completed, verify the changes using the command provided below.
$ ip addr show dev ens3
That’s all, you’ve successfully provided a static IP address to your Ubuntu server.
Static IP Configuration on Ubuntu Server
The easiest way to assign a static IP address is through Ubuntu Desktop as you do not need any technical knowledge as well as no worry about syntax. All you’ve to do is select Settings and go to the Network or WiFi tab. Select the cog icon next to the interface and go to IPv4 tab and there select manual and provide IP address.

After this select Apply and in order to verify run the command below.
$ ip addr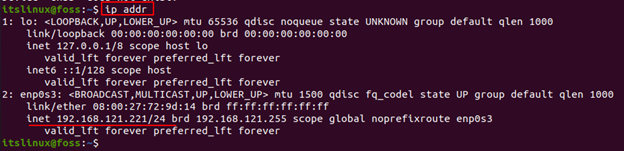
In this you can directly assign a static IP address through Ubuntu Desktop as well as through the command line.
Conclusion
Assigning static IP addresses is beneficial as the IP address won’t change even when the lease has expired. This can be done through various ways. In this guide we showed you how to assign static IP addresses through Ubuntu server as well as through Desktop.
Personally the easiest way is through Desktop as it doesn’t require a lot of technical knowledge and involves just a few steps. Now following this guide you can assign a static IP address to your system.

Saryia is a technology entrepreneur and digital publisher specializing in Linux, open-source technologies, and developer education.