In terms of cybersecurity, there is no better choice than using Linux OS. For troubleshooting networking-related issues, Linux offers different command line utilities such netstat, lsof, and traceroute. More precisely, netstat is the utility that gives network statistics and helps users troubleshoot/resolve network issues. Unfortunately, the netstat command is now deprecated and replaced with the ss command. The reason for this is the faster results and more user-friendly output from the ss command.
Today, the post aims to teach deep knowledge of the ss command in Linux.
Content Covered:
- ss Command in Linux
- Installation of ss Command
- Practical Use Case of ss Command
- Different Flags of ss Command
- Practical Examples of ss Command
- Example 1: Enlist All Listening Non-Listening Sockets
- Example 2: Enlist All Listening UDP Sockets
- Example 3: Enlist All Listening TCP Sockets
- Example 4: Enlist IPv4/IPv6 Sockets
- Example 5: Enlist Socket Processes
- Example 6: Display Port Results in Numeric Format
- Example 7: Display Process Name From Specific Socket
- Example 8: Filter Results For Specific Port
- Example 9: Show Raw Sockets Using ss Command
- Example 10: Display Internal Information of Socket
- Example 11: Display Summary For Socket Connections
- Final Words
ss Command in Linux
As mentioned earlier, the ss command is the replacement of the netstat command. Both commands share similar functionalities. ss (socket statistics) is a faster version of netstat utilized for displaying the desired network socket information like TCP/UDP protocols and listening ports.
Installation of ss Command
Talking about the ss command installation, it is pre-installed in every Linux distribution. Still, if not installed, install the iproute2 package that contains the ss utility. For this purpose, utilize the provided command to install it based on the preferred Linux distro:
sudo apt install iproute2          #  For Debian/Ubuntu
sudo yum install iproute2          #  For CentOS/RHEL
sudo dnf install iproute           #  For Fedora
Either, for the verification of the ss command installation or to see its availability, check the version of the ss command:
ss --version

The ss utility and iproute2-5.15.0 are available.
Practical Use Case of ss Command
As already said the ss command is helpful for troubleshooting or resolving problems on the network. Let us see a practical use case for understanding the importance of ss command.
Suppose there is a user trying to access the Apache web server. Assuming that the web server is listening on port number 12345. Upon connecting, the user sees an error that the server is unable to connect even though the server is accessible through the ping command:
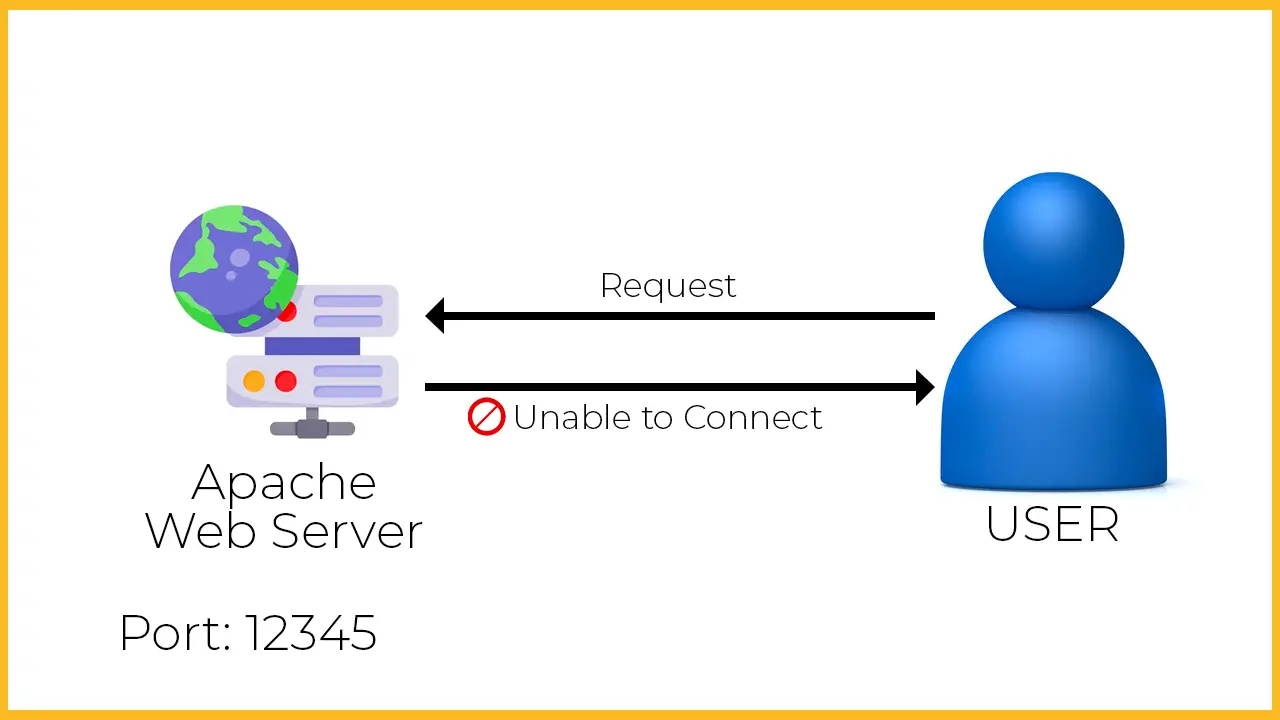
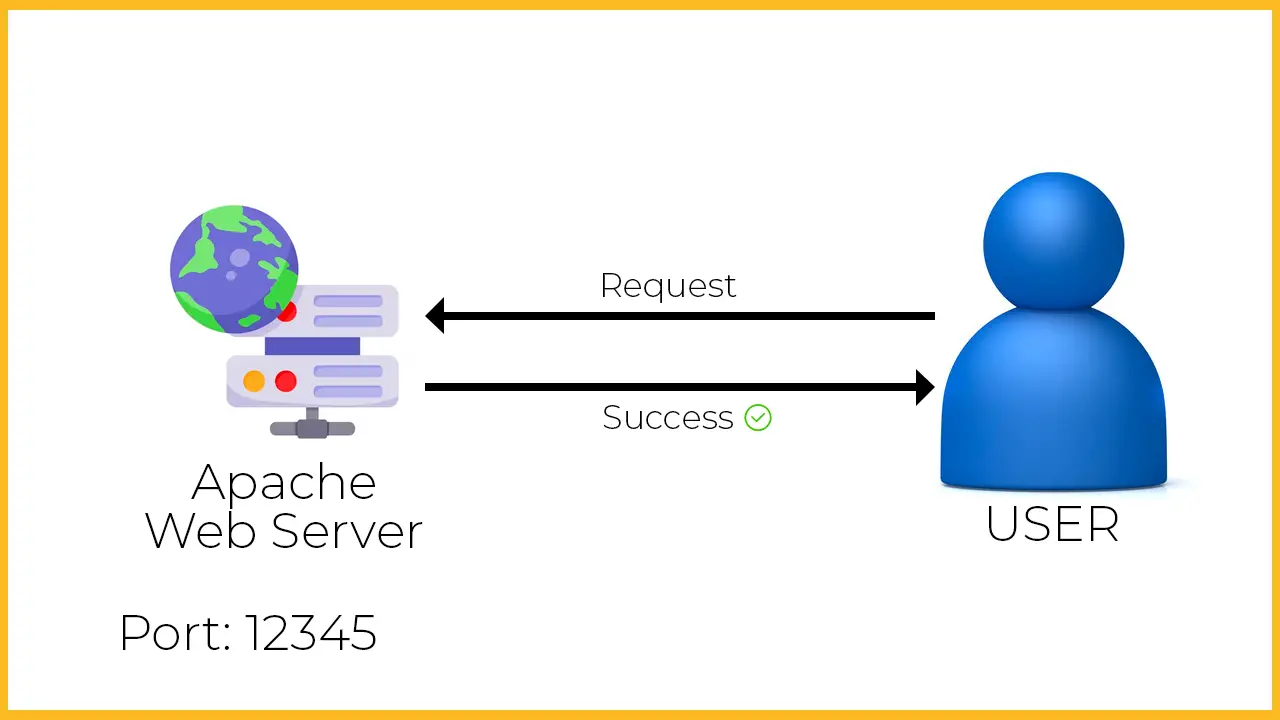
Now, the user thinks that I should check the port number whether it is accessible or not. For this purpose, the user uses the ss command and sees that another process is using the port number 12345. The user kills that process, frees port 12345, and tries to access the server again. This time, the server is accessed, and the connection is established!
Different Flags of ss Command
The ss comes with various flags/options and gives the results depending upon the option:
| Options/Flags | Description |
|---|---|
| -l, –listening | To display listening sockets on the network. |
| -n, –numeric | To display the network sockets in numeric format. |
| -m, –memory | To display the socket memory utilization. |
| -a, –all | To display all types of network sockets. |
| -t, –tcp | To display TCP network sockets. |
| -u, –udp | To display UDP network sockets. |
| -s, –summary | To display the summary of all the network sockets. |
| -e, –extended | To display the detailed information of network sockets. |
| -p, –processes | To display the socket’s processes that are being used. |
| -i, –info | To display the TCP internal information. |
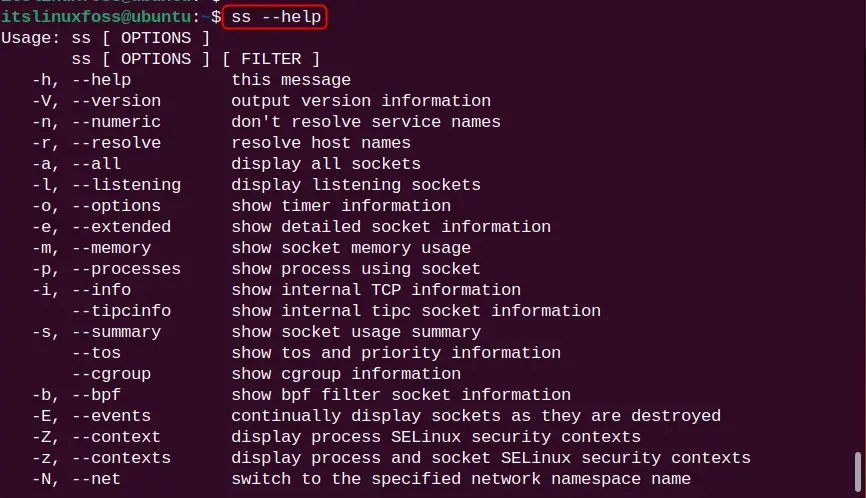
For more options/flags, execute the “–help” command in the terminal as shown:
ss --help
Practical Examples of ss Command
Let us move towards the practical usage of ss command and perform some examples for better understanding.
Syntax
To use the ss command in Linux, the following syntax is considered:
ss [-options]
Type the “ss” along with the appropriate option/flag for obtaining the desired results.
Example 1: Enlist All Listening Non-Listening Sockets
To list all listening and non-listening sockets on the network, use the ss command with the “-a” flag. Here, the “| more” command is for shortening the output:
ss -a | more
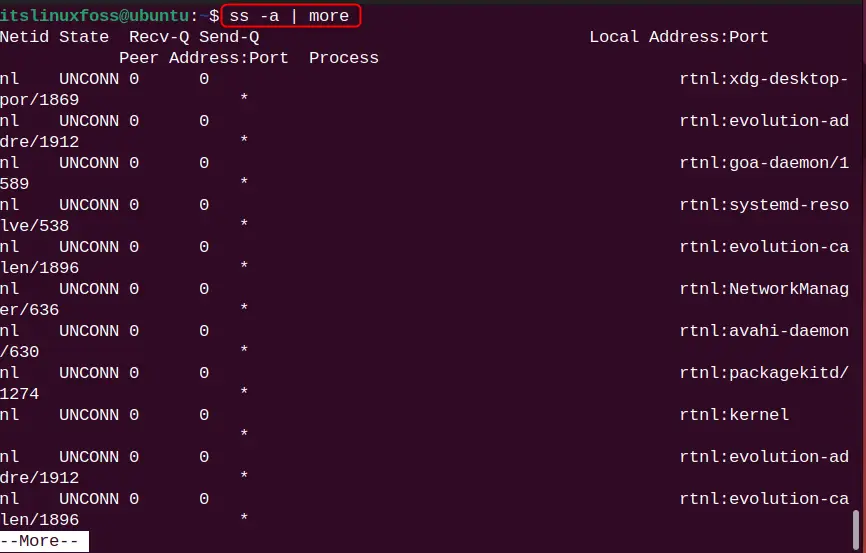
Understanding the ss Command Output
The output of the ss command has different names of columns like “Netid”, “State”, “Recv-Q”, “Send-Q”, and “Local Address: Port”. These columns are described as:
- “Netid”, stands for “Network ID” and displays the type of sockets such as TCP/UDP, Unix Stream (u-str), and Unix Sequence (u-seq).
- “State”, displays the state of the socket whether it is listening (LISTEN), established (ESTAB), or unconnected (UNCONN).
- “Recv-Q”, displays the received packets.
- “Send-Q”, displays the sent packets.
- “Local Address: Port”, displays the local machine address and port.
- “Peer Address: Port”, displays the remote machine address and port.
Example 2: Enlist All Listening UDP Sockets
UDP (User Datagram Protocol) enables IP communication on the network. To list all UDP listening sockets on the network, utilize the “-u”, “-l“, and “-a” flags:
ss -alu
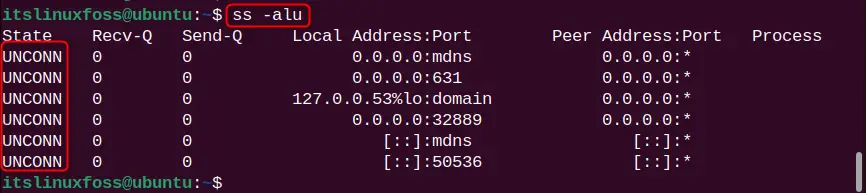
Here, in the above output, UPD sockets have the state “UNCONN” which means that these sockets are connected or established yet.
Likewise, to display the UDP6 sockets, specify the “-u6” flag in the command:
ss -alu6

The output is filtered out for the UDP6 sockets.
Example 3: Enlist All Listening TCP Sockets
In a similar fashion, to enlist all listening TCP sockets, use “-t”, “-l”, and “-a” flag:
ss -alt
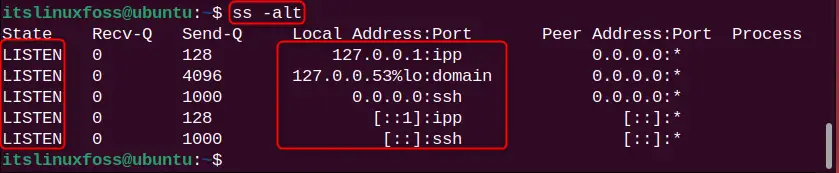
All listening TCP sockets are listed.
Example 4: Enlist IPv4/IPv6 Sockets
To enlist the IPv6 sockets, use the “-6” flag with the “ss” command:
ss -6

Here, one IPv6 socket is listed.
Similarly, to enlist IPv4 sockets, use the “-4” flag:
ss -4

The above output shows that the IPv4 socket connections are printed.
Example 5: Enlist Socket Processes
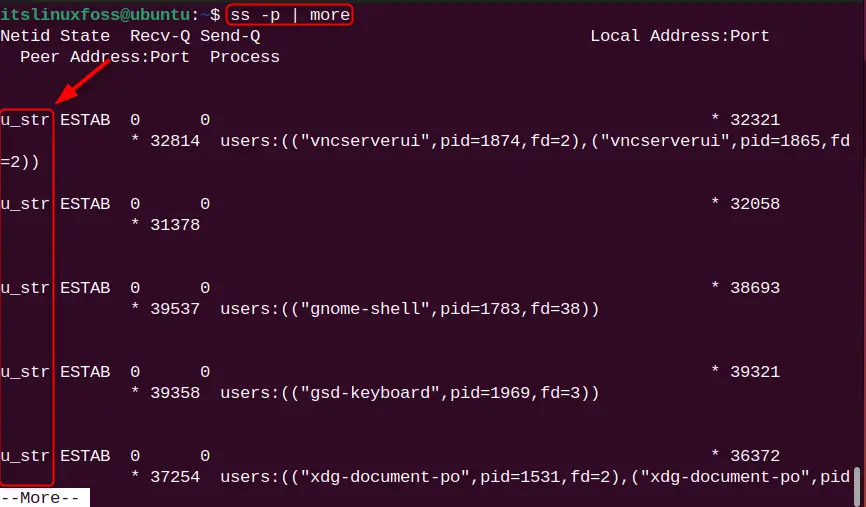
There are several types of sockets on the network such as TCP/UDP, Unix Stream (u-str), and Unix Sequence (u-seq). To enlist these processes for all socket connections, use the “-p” flag:
ss -p | more
Example 6: Display Port Results in Numeric Format
It can be observed in the above examples that “Local Address: Port” is in the format of the name such as ipp, domain, and sshd. To transform this output in the numeric format, consider the “n” flag. Considering this, the following command displays all UDP (-u) and TCP (-t) sockets in the numeric format:
ss -autn
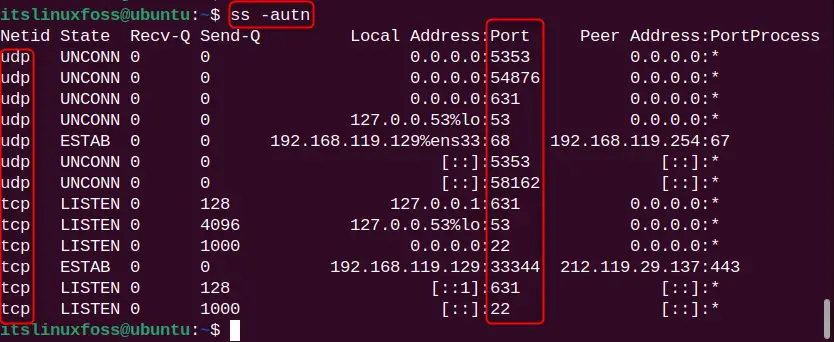
The output is listed in the numeric format.
Example 7: Display Process Name From Specific Socket
To display the processes for the specific socket such as TCP, put the “-p” flag with the “l” and “t”:
ss -plt
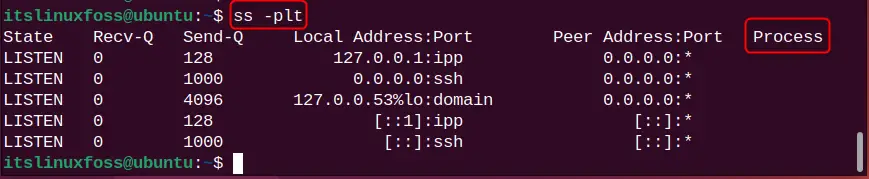
In the above output, the process column is empty because these ports are not used by any process.
Example 8: Filter Results For Specific Port
To show the socket connections for the specific port, the user can specify the destination and source port. For instance, the following command displays the TCP socket connection for specific port 22 only:
ss -at '( dport = :22 or sport = :22 )'

The command output indicates that port 22 is reserved and used by the SSH (Secure Shell).
Example 9: Show Raw Sockets Using ss Command
A raw socket is an endpoint that allows access to the lower-layer protocol. To display the raw sockets using the ss command, give the “–raw” flag:
ss --raw

The command shows that we have 1 raw socket connection of IPv6 type.
Example 10: Display Internal Information of Sockets
To display internal information of the socket, use the “-i” flag. For instance, the command displays the internal socket information for the TCP socket:
ss -ti

The internal pieces of information of the socket such as cubic rto, rtt, mss, pmtu, rcvmss, data_segs_out, etc are listed.
Example 11: Display Summary For Socket Connections
Finally, to displays the summary for all socket connections such as the number of total connections of sockets, IPv4, and IPv6. Run the ss command with the “-s” flag:
ss -s
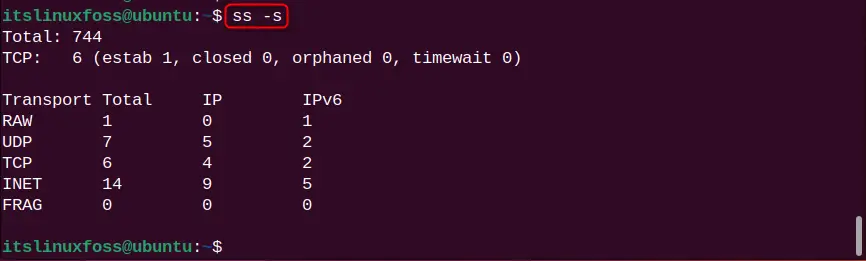
The summary for all TCP sockets is listed.
Final Words
The ss (Sockets Statistics) is the replacement of the netstat command, helpful for troubleshooting or resolving network-related issues. The user can use various flags such as “-l” (for listening sockets), and “-t” (for TCP sockets) to display the desired statistics results. In this tutorial, the full-fledged guide of the ss command has been covered.
