
Zipped files are a handy tool that not only helps in the secure transmission of data but the size of the file is compressed as well. Compressing a file into zipped form makes the transfer much faster. There exist various types of zipped files such as the RAR file, tar.gz, gzip, and so on. GZIP(GNU zip) is an example of the numerous different types of compressed file types. GZIP is more commonly used to compress HTML files which allows the webpages to load at a much faster pace.
This article will provide insight into several methods to extract GZ files in Linux. The content of the post is as follows:
- Unzip/extract the GZ File Using the gzip Command
- Unzip/extract the GZ File Using the gunzip Command
Method 1: Unzip/extract the GZ File Using the gzip Command
The first method involves the use of options in the Linux terminal which is the core tool of any Linux operating system. The first step is to navigate to the directory (using the terminal) where the zipped file is located. This is shown in the snippet below:
$ cd Desktop
If you do not want to navigate, simply use the complete file path while running the gzip command shown below:
$ gzip -d /home/itslinuxfoss/Desktop/sample.txt.gz
Once the directory is accessed, simply run the gzip command (the command that is used to compress the files) in the terminal alongside the “-d” option to unzip the GZ file to your system:
$ gzip -d sample.gz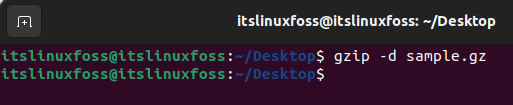
To explain the command shown above, the “gzip” command is the standard keyword that is used to compress any file to a GZ file format. The next “-d” indicates that the file should be decompressed. Finally, the “sample.gz” is the name of the file that needs to be extracted.
Method 2: Unzip/extract the GZ File Using the gunzip Command
Instead of utilizing the “gzip” command, the alternate option is the specialized “gunzip” command which does not require the use of any other options in the code. The syntax for the gunzip command is rather straightforward. The code below needs to be executed in the terminal to decompress the file:
$ gunzip < sample.gz > sample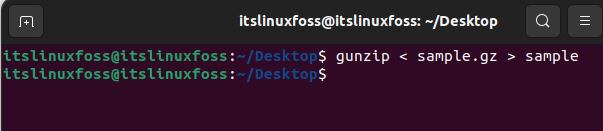
In this command there are no extra options, just the “gunzip” keyword being utilized alongside the name and full extension of the file which is “sample.gz”.
The difference between these methods is that the “gunzip” method keeps the original zipped file and creates a copy for the extracted GZ file. In the case of method 1, the original file is replaced with the extracted file. This is shown in the snippet below:
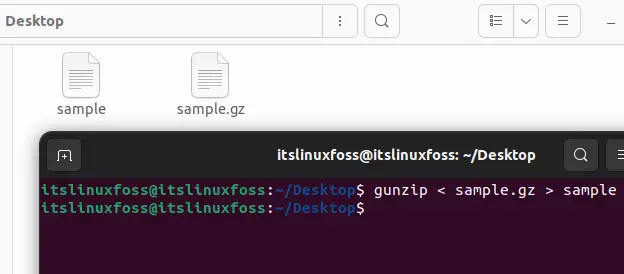
As seen above, a copy of the sample file is created when the “gunzip” command is used. These are the two methods through which any GZ file can be extracted on a Linux system.
Conclusion
There are two major ways through which any GZ file can be extracted on a Linux system. The first method makes use of the “gzip” keyword alongside an extra option “-d” to decompress. The second method utilizes the “gunzip” keyword which does not require any extra option and will simply extract and create a copy for the specified file on the system. This article has provided an in-depth guide to unzip/extract the GZ file in Linux.

Saryia is a technology entrepreneur and digital publisher specializing in Linux, open-source technologies, and developer education.