
Python supports the vast majority of inbuilt libraries and modules that are used to solve simple to intermediate problems. Python is the most demanded language among programmers to develop Machine Learning algorithms and Artificial intelligence software. OpenCV is a Python Library used to perform many image processing and computer vision tasks such as face detection, hand detection, etc.
In this write-up, we will guide you about resizing the image in python using OpenCV cv2. The following aspects are discussed in this blog post:
- Python OpenCV cv2 Resize Image
- Example 1: Downscaling Image Size
- Example 2: Upscaling Image Size
- Example 3: Resizing According to the Value of Width and Height
So, let’s get started!
Python OpenCV cv2 Resize Image
An OpenCV is an open-source Python library normally used for computer vision and machine learning software. The “cv2.resize()” function of “OpenCV” is used to resize the image. The syntax of “cv2.resize()” is shown below:
cv2.resize(src, dsize[, dst[, fx[, fy[, interpolation]]]])
The syntax is described as:
- The “src” parameter takes the value of the original input image.
- The “dsize” is the desired size of the image that is returned as an output.
- “Fx” is the horizontal axis scaling factor.
- “Fy” is the vertical axis scaling factor.
- The last parameter, “interpolation”, takes the value of different flags as input. All flag values have different methods that are performed on the image. Some of the following methods are INTER_NEAREST, INTER_LINEAR, INTER_CUBIC, AND INTER_AREA.
The original image shown below is used in all the upcoming examples. The original dimensions of this image are listed below:
Height = 753 px
Width = 1590 px

Example 1: DownScaling Image Size
In the example given below, we resize the image using a dimensional value. The dimensional value will be set according to the percentage value. A value lesser than “100” is used to downscale the image. Let’s understand via the following code:
Code:
import cv2

pic = cv2.imread('itslinuxfoss.png', cv2.IMREAD_UNCHANGED)

print('Original Dimensions of our Image is : ',pic.shape)

image_scale = 30
width_img = int(pic.shape[1] * image_scale / 100)
height_img = int(pic.shape[0] * image_scale / 100)
dimension = (width_img, height_img)

# resize image
resized_img = cv2.resize(pic, dimension, interpolation = cv2.INTER_AREA)

print('Resized Dimensions of our image is : ',resized_img.shape)

cv2.imshow("Resized image", resized_img)
cv2.waitKey(0)
cv2.destroyAllWindows()
In the above code:
- The Python library named “cv2” is imported.
- The function named “cv2.imread()” takes two parameter values, the first parameter takes the path of the image and the second parameter takes the flags of the image. The flags specify how the function reads the image, such as in grayscale or color.
- The parameter “pic.shape” gets the original image’s dimensions.
- The variable “image_scale” is used to store the percentage value of the image size. 100% means that the value has its original dimension.
- To downscale the image, we input “30”, which is stored in the variable “image_scale”.
- The image scale number is divided by “100” and multiplied by the height and width of the original image. The “image.shape[1]” is used for width, and “image.shape[0]” is used for height.
- The width and height dimensions will be saved in a variable named “dimension”.
- The “cv2.resize()” function takes three parameter values. The first parameter takes the file of the image variable, and the second parameter takes the dimension variable. The third parameter, “cv2.INTER_AREA”, resamples the image using pixel area relation.
- The resized image will be stored in the variable named “resized_img”.
- The function “cv2.imshow()” takes the value of variable “resized_img” as an argument.
Note: The “cv2.waitKey(0)” will display the image until a key is pressed, or it will only move to the next line once it has been pressed. The “cv2.destroyallwindows()” will destroy all the windows (including the one showing us our resized image) before exiting the program so that the PC’s memory is not being consumed.
Output:
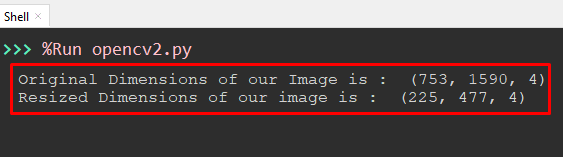
The console output shows the original and resized image dimensions after downscaling.

In the above snippet, the image has been downscaled to 30% of its original size.
Example 2: Upscaling Image Size
To upscale the original image, the variable “image_scale”, which holds the value of percentages, has to be increased. A value greater than “100” can upscale the image. Let’s understand via the following example:
Code
import cv2

pic = cv2.imread('itslinuxfoss.png', cv2.IMREAD_UNCHANGED)

print('Original Dimensions of our Image is : ',pic.shape)

image_scale = 140
width_img = int(pic.shape[1] * image_scale / 100)
height_img = int(pic.shape[0] * image_scale / 100)
dimension = (width_img, height_img)

# resize image
resized_img = cv2.resize(pic, dimension, interpolation = cv2.INTER_AREA)

print('Resized Dimensions of our image is : ',resized_img.shape)

cv2.imshow("Resized image", resized_img)
cv2.waitKey(0)
cv2.destroyAllWindows()
In the above code, everything is the same, just like in the previous example. The sole difference is in the value of the variable named “image_scale”. To upscale the image, the value will be greater than “100”. Here image scale value is “image_scale=140”.
Output:
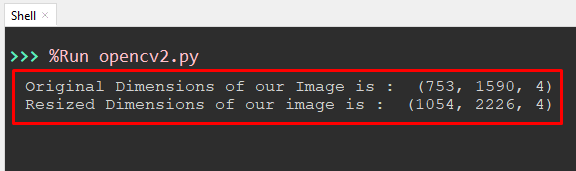
The console output shows the original image dimension and the resized image dimension after upscaling.

In the above snippet, the image has been upscaled to 140% of its original size.
Example 3: Resizing According to the Value of Width and Height
The width and height value while resizing is also set by providing the specific value. In this mode of resizing, the aspect ratio will not preserve. Let’s see an example of code given below:
Code:
import cv2

pic = cv2.imread('itslinuxfoss.png', cv2.IMREAD_UNCHANGED)

print('Original Dimensions of our Image is : ',pic.shape)

width_value = 550
height_value = 550
dimension_img = (width_value, height_value)

# resize image
resized_image = cv2.resize(pic, dimension_img, interpolation = cv2.INTER_AREA)

print('Resized Dimensions of our Image is : ',resized_image.shape)

cv2.imshow("Resized image", resized_image)
cv2.waitKey(0)
cv2.destroyAllWindows()
In the above code:
- The Python library named “cv2” is imported.
- The function named “cv2.imread()” reads the image.
- The “pic.shape()” is used to read the dimension of the original image.
- The value of width ‘550’ is saved in a new variable named “width_value”, and the value of height “550” is saved in a variable named “height_value”.
- The user width and height value is stored in the dimension variable.
- The “cv2.resize()” function resizes the image according to the given value.
- The function “cv2.imshow()” takes the value of variable “resized_img” as an argument.
Output:
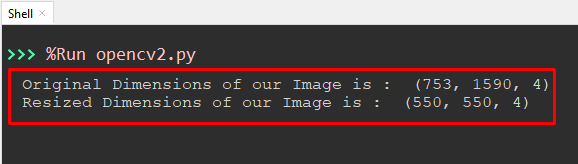
The console output shows the original image dimension and the resized image dimension provided in the program.

In the above snippet, the image is resized according to the given dimension.
Conclusion
In Python, the “cv2.resize()” function of the open source “OpenCV” library is used to upscale or downscale the image. The width and height of the original input image can be resized separately by providing a constant value. The standard percentage value “100” is used as a threshold for upscaling and downscaling the original image. A value greater than “100” upscales the image, and smaller than “100” downscales the image. This Python article delivered a detailed guide on how to resize an image using OpenCV cv2 in Python.