
The SCP (Secure Copying Protocol) transfers files or directories between two systems over the network in a secure way. By default, the SCP uses Port 22 to exchange data in an encrypted form. Can it be used over different ports? The answer is yes.
This post will teach you how to SCP with a different port on a Linux-based machine. The content of this article is given below:
- Prerequisite: Change the Default SSH Port to Different Port
- How Do I SCP with a Different Port?
- General Syntax
- Uploading Directories Using SCP with Different Port
- Uploading File Using SCP with Different PortDownloading Directories
- Downloading File
Let’s start with the prerequisites section.
Prerequisite: Change the Remote Default SSH Port to Different Port
In Linux, users can manually modify the SSH port number by accessing the “sshd_config” file. To do so, execute the below script that navigates the above file:
$ sudo nano /etc/ssh/sshd_config
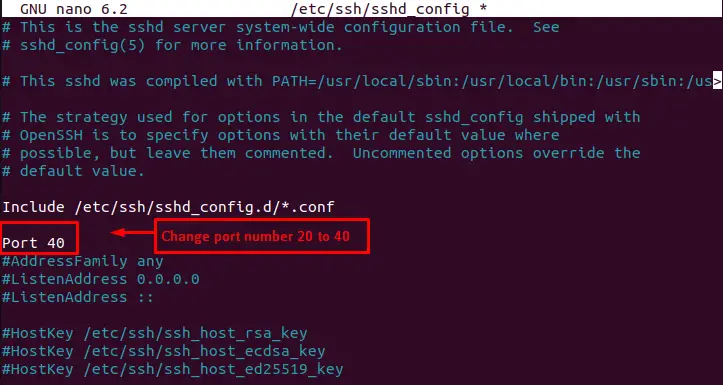
The port number is changed from “20” to “40” for further implementation.
How Do I SCP With a Different Port?
The administrators utilize the “scp” command to transfer data between the host and server securely. The “scp” command is the variant of the “cp” command. The syntax of the SCP command to use different ports is given below:
General Syntax:
$ scp -P <Port> <User>@<IP/Host>:<File/Dir> <Dest_Dir>
In the above syntax, the arguments are explained as below in the listed format:
- P: It refers to the port through which the transmission is performed.
- User: It specifies the remote user from which the directory or file is sent.
- IP/Host It represents a remote user’s IP address or hostname.
- File/Dir: It specifies the file or directory to transmit between the local and remote servers.
- Dest_Dir: It represents the destination.
To explore the different options of the “scp” command, run the “scp” in the terminal as below:
$ scp

The output returns the variety of options that users can practice according to requirement.
Example 1: How to Upload Directories Using SCP with Different Port?
To upload a directory through a different port, the “rp” option is utilized with the “scp” command specifying the port number. The below script will upload the “WorkSheet” directory to the “Downloads” directory of the remote user via “Port 40”:
$ scp -rP 40 WorkSheet roger@ubuntu:Downloads

It requires authentication before uploading a directory.
Verify Uploaded Directory
To verify the uploaded directory in the remote system, access the “Downloads” directory of the remote user and display content through the “ls” utility:
$ cd Downloads

The output confirms the uploaded “Worksheet” directory.
Example 2: How to Upload Files Using SCP with Different Port?
To upload a particular file through a different port, specify the port number with the “P” option. After that, specify the particular file name to be uploaded. In our case, the “linux.txt” file is uploaded to the remote user “roger” in the “Downloads” directory:
$ scp -P 40 linux.txt roger@ubuntu:Downloads

The output shows that the “linux.txt” file has been successfully uploaded.
Verify the Uploaded File
To verify the uploaded file in the remote system, list down the directory’s content where the file is copied:
$ cd Downloads

The output shows that “linux.txt” has been successfully uploaded.
Example 3: How to Download Files Using SCP on a Different Port
To download the “file.txt” from the remote user “roger”, utilize the “P” option with the port number “40” as below:
$ scp -P 40 roger@ubuntu:file.txt ~/Downloads
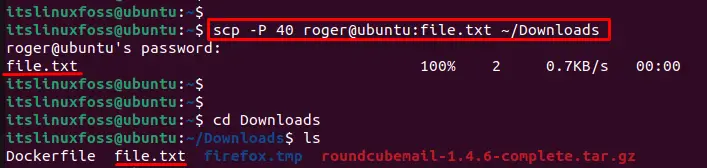
The output displays the particular “file.txt” has been successfully downloaded.
Additionally, users can verify the specified file by accessing the “Downloads” directory.
Example 4: How to Download Directories Using SCP on a Different Port?
To download the complete directory from the remote user, the “rp” option work with the “scp” command specifying the port number “40”:
$ scp -rP 40 roger@ubuntu:Downloads ~/Folder
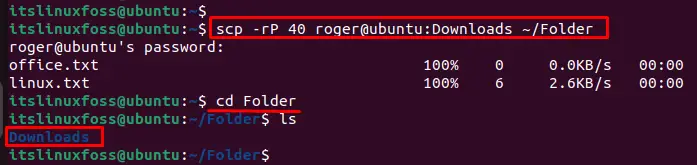
The output returns that downloaded directory “Downloads” with all content in the “Folder” directory.
Additionally, verify the download directory by accessing it via the “cd” command.
That’s all from this SCP detailed guide.
Conclusion
To do SCP over different ports, the users need to change the port number through the “sshd_config” file. After that, the SCP command is used following the syntax “scp -P <Port> <User>@<IP/Host>:<File/Dir> <Dest_Dir>” to transfer data. This post has briefly explained the method to SCP over a different port (other than 22, which is its default).
