
IPv6 is a short Internet Protocol version 6 is the latest communication protocol over the Internet. It assigns a unique identification/address of 128-bit to every device around the globe by enhancing performance and security. However, network admins face the issue of switching from IPv6 to IPv4. Considering its need, this guide will provide CLI and GUI methods to disable IPv6 in Ubuntu Linux.
The content that supports this guide is as follows:
- Method 1: Using the “sysctl” utility to Disable IPv6 on Ubuntu Linux
- Method 2: Using the GRUB bootloader to Disable IPv6 on Ubuntu Linux
- Method 3: Using the GUI to Disable IPv6 on Ubuntu Linux
- Bonus Tip: Enable the IPv6 on Ubuntu Linux
Let’s dig into one by one.
Method 1: Using the “sysctl” utility to Disable IPv6 on Ubuntu Linux
In the Ubuntu system, the sysctl is the utility that reads and modifies the kernel parameter at the runtime.
For disabling the services of IPv6 on the current Ubuntu Linux system, follow the step-by-step instructions:
Pre-request: Display IPv6 Address
To ensure the IPv6 address is enabled in the current system, execute the below script that displays the IPV6 address:
$ ip a
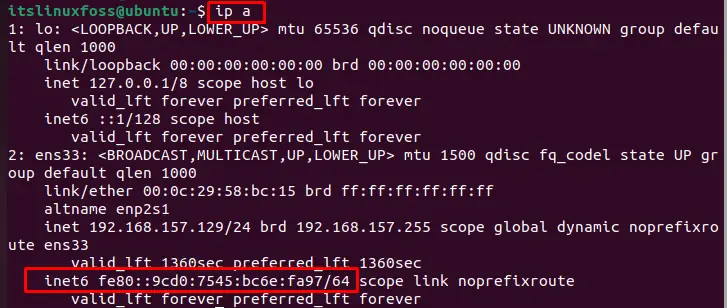
By default, IPv6 is enabled in the current Ubuntu Linux system
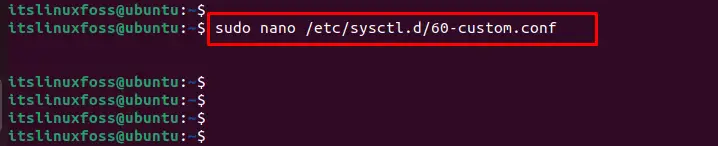
Step 1: Access sysctl Configuration File Via Nano Editor
Using the root privilege, access the “sysctl” utility by following the path directory as below:
$ sudo nano /etc/sysctl.d/60-custom.conf
Step 2: Disable IPv6 on Ubuntu
After accessing the configuration file through Nano Editor, write the following lines of code into the “/etc/sysctl.d/60-custom.conf”:
$ net.ipv6.conf.all.disable_ipv6 = 1
$ net.ipv6.conf.default.disable_ipv6 = 1
$ net.ipv6.conf.lo.disable_ipv6 = 1
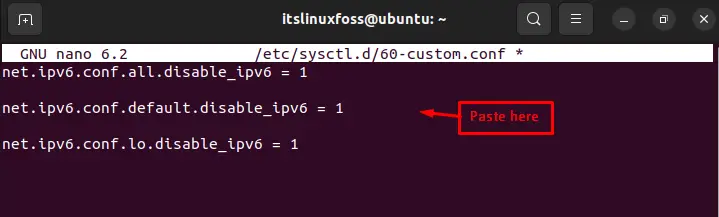
After executing the command, press the “CTRL+S” to save the file and then “CTRL+X” to exit the nano editor tool.
Step 3: Apply the Above Changes
To apply the changes in the above configuration files, execute the below script:
$ sudo sysctl -p

Step 4: Restart System Processes
After that, restart or reboot the systems processes using the “systemctl” utility as follows:
$ sudo systemctl restart procps

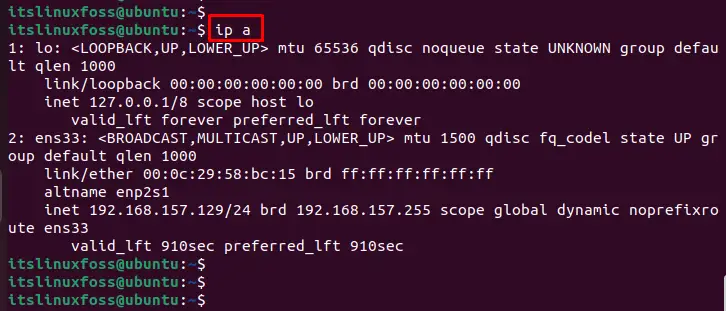
Step 5: Verify Disable IPv6
In the Ubuntu Linux system, verify the disabled “IPv6” by running the “ip” command specifying the “a” utility:
$ ip a
Or
You can also verify through the “cat” command by specifying the path directory of configuration file:
$ cat /proc/sys/net/ipv6/conf/all/disable_ipv6

The output displays the signal “1” that represents the “IPv6” has been successfully disabled in the Ubuntu Linux system.
Method 2: Using the GRUB bootloader to Disable IPv6 on Ubuntu Linux
An alternative method is considered to disable the “IPv6” from the “GRUB”, which is the default bootloader for kernel files. The step-by-step instructions are given below to disable the IPv6:
Step 1: Access GRUB
To access the “GRUB” configuration file, a Nano Editor can also be used to modify the script. For this, specify the particular path of grub as a root user:
$ sudo nano /etc/default/grub

Step 2: Disable the IPv6 on Ubuntu
To disable the services of the “IPv6” address on the current system, type the script in the particular section that is highlighted below:
$ ipv6.disable=1
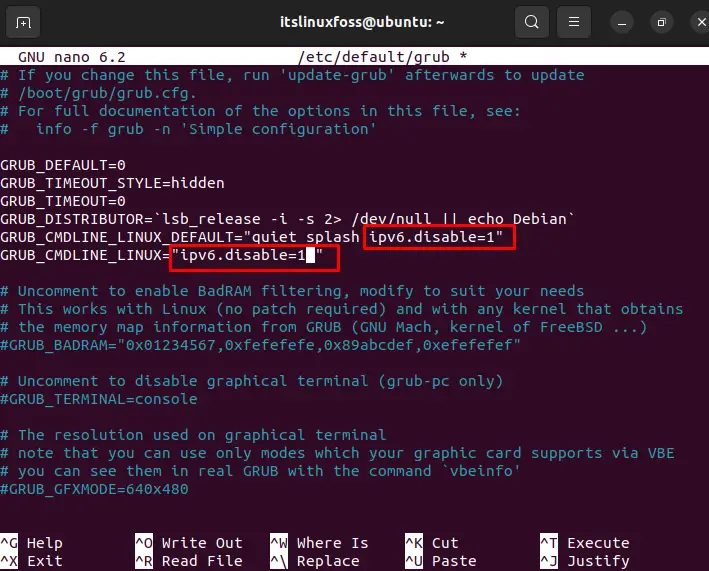
After modification, save the configuration file by pressing the “CTRL+S” key and exit the nano editor via the “CTRL+X” shortcut key.
Step 3: Verify Disabled IPv6
Now, users can verify the disabled services of the IPv6 address. To do so, run the “cat” command that reads the file from the “disable_ipv6” file:
$ cat /proc/sys/net/ipv6/conf/all/disable_ipv6

Let’s get into the second method.
Method 3: Using the GUI to Disable IPv6 on Ubuntu Linux
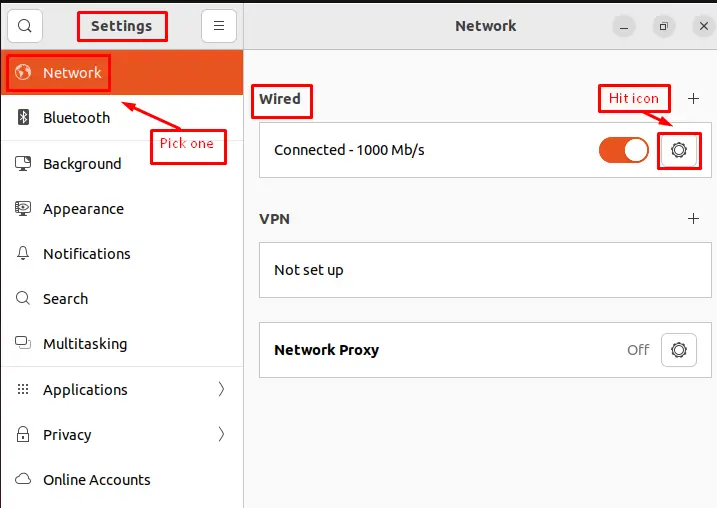
An alternative method is adapted to disable “IPv6” via “GUI”. For this, open the “Settings” window and choose the “Network” section from the left window. After that, hit the “Settings” icon in the “Wired” section as below:
It navigates to the new window on which to hit the “IPv6” tab and mark the “Disable” option from the “IPv6 Method” section. After that, press the “Apply” button to save the changes:
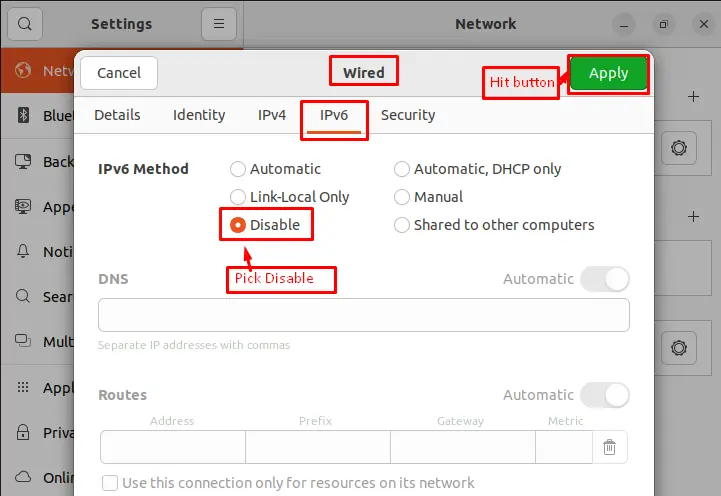
That’s all from the GUI method.
Bonus Tip: Enable the IPv6 on Ubuntu Linux
It is an additional step to switch the enable mode of IPv6 on the Ubuntu Linux system. To do so, change the value from “1” to “0” in the configuration file to enable all services of IPv6. To access the configuration file, execute the below script in the terminal:
$ sudo nano /etc/sysctl.d/60-custom.conf
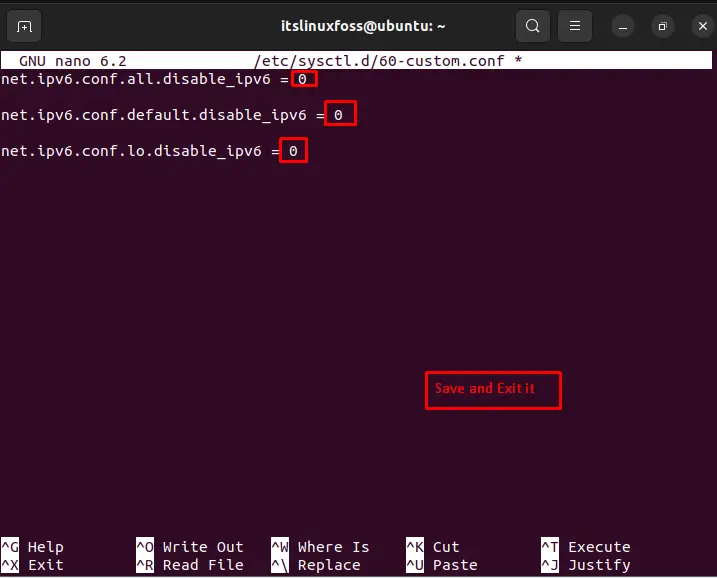
Exit the nano editor by pressing the “CTRL+X” command after saving the file via the “CTRL+S” key.
You can also verify through the cat command by specifying the path directory of the configuration file:
$ cat /proc/sys/net/ipv6/conf/all/disable_ipv6

The output displays the signal “1” that represents the IPv6 has been successfully enabled on the Linux system.
That’s all from this guide.
Conclusion
To disable the services of IPv6 on the Ubuntu Linux system, the “sysctl” utility, GRUB bootloader, and GUI methods are provided. The configuration files are modified through “sysctl” GRUB after opening through the nano editor. In the GUI method, users can pick the “Disable” option from Network Setting to turn off the services of IPv6. Additionally, this guide has explained the method of enabling IPv6 on Ubuntu. Overall, this post has covered each and every aspect to disable the IPv6 on Ubuntu Linux.
