
SSH stands for Secure Shell, which creates a connection between the server & client. This connection can be used to communicate or transfer media/files through the server and client. In certain situations, users face the “Connection refused port 22” message while connecting servers. By default, the SSH service runs on port 22, which is a secure medium to transfer sensitive data.
This article will explain all feasible solutions to tackle the “ssh connection refused port 22” error, along with reasons. The content carried this post is as follows:
- What is the “ssh connection refused port 22” Error in Linux?
- What are the Reasons for the “ssh connection refused port 22” Error in Linux?
- How to Fix the “ssh connection refused port 22” Error?
- Reason 1: OpenSSH is Not Installed
- Solution: Install OpenSSH in the System
- Reason 2: SSH Server Not Active
- Solution: Check the Active Status of SSH
- Reason 3: SSH Service is Running on a Different Port
- Solution: Check the SSH Port Number
- Reason 4: Firewall is Blocking Port 22
- Solution: Configure Firewall Through UFW Utility
- Reason 5: Incorrect Credentials
- Solution: Check Correct Credentials
- Bonus Tip 1: How to Enable SSH on Linux?
- Bonus Tip 2: How to Utilize the SSH Config File in Linux?
- Bonus Tip 3: How to Resolve/Fix the “SSH could not resolve hostname” Error in Linux?
- Bonus Tip 4: How to Resolve/Fix the “SSH host key verification failed” Error in Linux?
What is the “ssh connection refused port 22” Error in Linux?
The “ssh connection refused port 22” error in Linux is a common problem that occurs when trying to establish a secure shell (SSH) connection to a remote server. This error means that the server is either not running the SSH service, or that it is blocking the connection on port 22, which is the default port for SSH. There are several possible causes and solutions for this error, depending on the configuration of the server and the client.
What are the Reasons for the “ssh connection refused port 22” Error in Linux?
There are several possible reasons for getting the “ssh connection refused port 22” error in Linux. Some of the common ones are:
- The ssh service is not running on the remote host or is disabled.
- The port 22 is blocked by a firewall or is not listening on the remote host.
- The ssh configuration file (/etc/ssh/sshd_config) has some settings that prevent the connection, such as AllowUsers, DenyUsers, PasswordAuthentication, etc.
- The ssh client has some settings that prevent the connection, such as StrictHostKeyChecking, IdentityFile, etc.
- The network connection between the client and the server is unstable or interrupted.
How to Fix the “ssh connection refused port 22” Error?
The “ssh connection refused port 22” error arises during the establishing connection to a server. There are many other reasons, such as incorrect “username”, “IP address”, “Internet connection”, and many more. Some technical reasons with solutions are discussed as follows. Before digging into the details, let’s look at what the error looks like

Let’s dig into all possible reasons with practical solutions.
Reason 1: OpenSSH is Not Installed
OpenSSH is a software suite that provides secure network communication and file transfer using the SSH protocol. In the Linux systems, the OpenSSH packages are not installed by default. The missing SSH (server, client) is one reason for this error.
Solution: Install OpenSSH in the System
To resolve the issue, install the ssh services on the Linux operating system. It will install all the relevant dependencies to make an SSH connection via port 22 (by default). To do so, execute the below script for installing the “OpenSSH” packages depending on Linux distribution:
Install OpenSSH on Debian-based Linux Distribution
To install the OpenSSH package in Debian-based Linux distributions, use the apt package manager by specifying the “openssh-server” in the command as below:
sudo apt install openssh-server
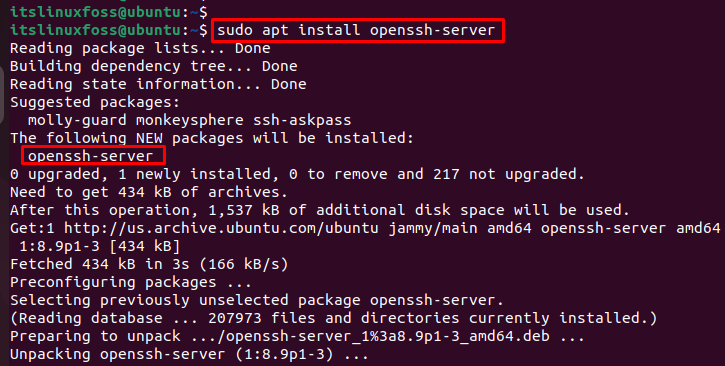
After executing the command, users can connect to the system on port 22.
Install OpenSSH on Other Linux Distributions
For other Linux distributions, including RHEL/Centos/Fedora, OpenSSH can be installed by executing the below script:
sudo yum install openssh-server      #  Fedora
sudo zypper install openssh          #  OpenSUSE
sudo pacman -S openssh               #  Arch Linux
sudo emerge --ask net-misc/openssh   #  Gentoo
Let’s carry on to another error.
Reason 2: SSH Server Not Active
Another reason may cause the “SSH” server not to respond actively. For this, the request will never reach the required destination for executing the communication process. It is due to the server not working.
Solution: Check the Active Status of SSH
You can also check the status of the SSH service and restart it if needed. A solution is provided to check the current status of SSH through the “systemctl” command. It is quite useful to display the complete information, including “Main PID”, “Tasks”, “Memory”, “CPU”, and “Port”.
To check the active status of SSH, use the “systemctl” command with the “status” option by mentioning the service name:
sudo systemctl status ssh

The output shows that the current status is “active(running)”. Else, you can execute the below scripts to active it:
sudo systemctl start ssh          #Start SSH Service
sudo systemctl enable ssh         #Enable SSH Service
sudo systemctl restart ssh        #Restart SSH Service
Reason 3: SSH Service is Running on a Different Port
It may be a reason that SSH services are running on one port and users requesting through a different port. Due to this problem, Port 22 will not respond to the particular request and display an error.
Solution: Check the SSH Port Number
To configure OpenSSH, users can edit the “/etc/ssh/sshd_config” file and make sure that the Port 22 option is enabled and not commented out. A solution is provided here to find the SSH port number through the “sshd_config” configuration file. For instance, the “Nano Editor” is utilized to open this configuration file by following the below script:
sudo nano /etc/ssh/sshd_config
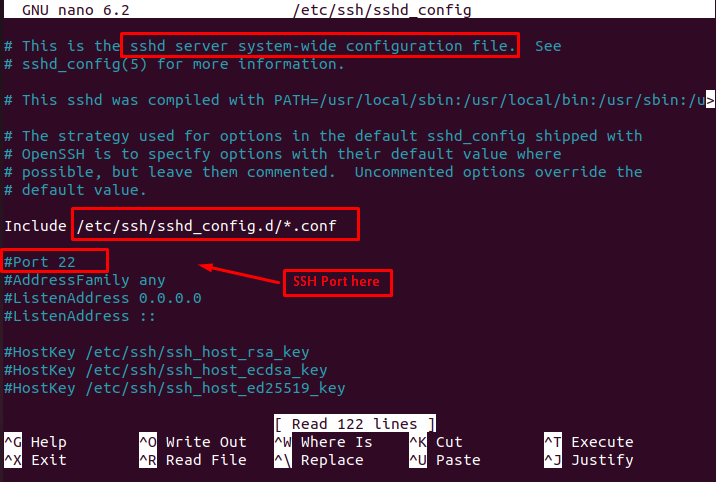
After executing the script, it pops up the “sshd_config” configuration file on which you can verify the SSH Port number 22.
Verify that the SSH Service
Once the port number is confirmed, verify that the SSH service is listening to the same port. To do so, use the below-stated command:
sudo lsof -i -P -n | grep ssh

The output verifies that port 22 is listening via the TCP connection.
Verification
Now, users can verify the SSH connection by mentioning the username and hostname. It requires the password to log into the remote server:
ssh itslinuxfoss@ubuntu
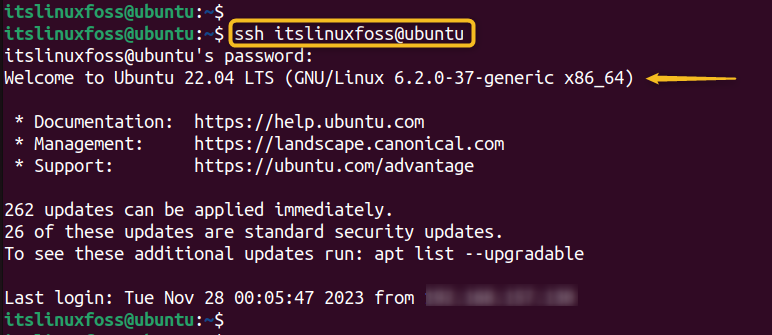
The output shows that an SSH connection has been established.
Reason 4: Firewall is Blocking Port 22
One of the common problems that users may encounter when using UFW is that they accidentally block the SSH port 22, which prevents them from logging in to their remote servers. If you cannot fix the problem through the above-stated solutions, then you should check the firewall and set its rule for port 22. So that it should allow all the connections over that port number.
Solution: Configure Firewall Through UFW Utility
UFW (Uncomplicated Firewall) is a tool that simplifies the configuration of firewall rules on Linux systems. It can be used to allow or deny incoming or outgoing connections based on port numbers, protocols, or IP addresses. To fix this issue, you need to configure UFW to allow SSH connections on port 22.
Here are the steps to do that:
Add Port 22 Over the Firewall
To add Port 22 over the firewall, which allows incoming SSH connection. To do so, execute the below script:
sudo ufw allow 22

In our case, the rules are already added.
Reload the Firewall
After adding the rules, you need to reload the firewall as follows:
sudo ufw reload

Display Configured Firewall Rules
To display the configured firewall after adding rules, run the command below:
sudo ufw show added

Now, you can verify that the rules have been added by configuring the firewall through the ufw utility.
Alternatively, users can also verify the rule which has been added by running the command:
sudo ufw status

The output confirms the status is in an active state.
Verification of SSH Connection
Now, users can verify the SSH connection by mentioning the username and hostname. It requires the password to log into the remote server:
ssh itslinuxfoss@ubuntu
The output shows that an SSH connection has been established.
Reason 5: Incorrect Credentials
One possible reason for the error “ssh connection refused port 22” in Linux is that the credentials are incorrect. This means that the username or password that you are using to log in to the remote server is not valid.
Solution: Check Correct Credentials
To fix the error mentioned above, users need to make sure that they have the correct credentials for the server, and that they match the ones in the “/etc/ssh/sshd_config” file on the server.
Check Username, Password, and Hostname
To make sure you are typing the correct username, password, and hostname for the remote server. For this, check the spelling and case sensitivity of both by specifying the username and hostname. In our case, the username is “itslinuxfoss” and the hostname is “ubuntu”:
ssh itslinuxfoss@ubuntu
The output confirms the SSH connection by specifying the time and date.
Check Port Number
To check the port number through which the SSH connection is established, the grep command can be used by specifying the configuration file path as below:
grep Port /etc/ssh/sshd_config

The output confirms that the SSH connection is established on Port 22 (By default port).
Public/Private Key Authentication
If you use public key authentication, ensure the private key file is readable and has the correct permissions. You can use the “chmod” command to set the permissions to 600, which means only you can read and write the file:
sudo chmod 600 ~/.ssh/id_rsa

In this way, permission has been granted for the above-mentioned file.
If you are using a passphrase for your private key, make sure you are entering it correctly. You can use the command “ssh-add -l” to list the identities added to the authentication agent and verify that your key is loaded:
ssh-add -l

In this way, users can verify the public key, username, and hostname that is given in the above figure.
Bonus Tip 1: How to Enable SSH on Linux?
To enable the SSH utility and the service manager on the Linux operating system, execute the command “sudo systemctl enable ssh –now”. Also, users can check the active status with the “status” keyword.
To perform practical implementation with different aspects, follow our guide on “How to Enable SSH on Ubuntu 22.04”.
Bonus Tip 2: How to Utilize the SSH Config File in Linux?
In Linux, users can use the SSH config file by creating the configuration file and mentioning multiple remote users along their hostnames or IP addresses.
To get more information, follow our tutorial “Use the SSH Config File in Linux”.
Bonus Tip 3: How to Resolve/Fix the “SSH could not resolve hostname” Error in Linux?
The error occurs when the SSH client cannot connect to the remote server using its hostname. To fix it, check the hostname’s spelling and validity, the DNS settings, and hostname entry on the/etc/hosts file, and the SSH client configuration.
To read this fix in detail, check out our article on the “Fix: SSH could not resolve hostname” error in Linux.
Bonus Tip 4: How to Resolve/Fix the “SSH host key verification failed” Error in Linux?
The error occurs when the SSH client tries to connect to a server whose host key has changed or is unknown. It occurs when the server has been compromised, upgraded, or reinstalled. To fix this error, users must remove the old host key from the client’s “known_hosts file” and accept the new one.
To read more about this topic, follow our detailed guide on Fix: “SSH host key verification failed” error in Linux.
Conclusion
The “ssh connection refused port 22” error can be resolved by installing “OpenSSH” packages or checking the active status of SSH services or port numbers. Additionally, incorrect “username” and “IP address” cause the same error of connection refusal. Users can also edit the port number after accessing the “sshd_config” configuration file to make a new connection. This post has listed down all the possible reasons, and their solutions to fix the error “ssh connection refused port 22”.
