FTP
FTP is a file transfer protocol that is used for exchanging files to and from any network system or a remote computer. Unix, Linux, and Windows operating systems also have a built-in command-line prompt that can be utilized as an FTP client for establishing an FTP connection. It is used to transfer files and communicate in Client-Server architecture in an FTP established session.
Active and Passive Connection
When the server starts off a connection towards a client, it is known as Active Connection. Whereas, when a client initializes a connection with the server is called Passive Connection. In phase 1 user credentials are entered for authentication when the connection is established with the server. This phase is known as the control connection phase. Actual data is transferred among the clients and server in data connection (phase 2).
Now let’s discuss some of the features of the FTP Server.
Features of an FTP server:
- For establishing the client’s connection to the FTP server, the password and username are passed over using the PASS and USER commands. When the credentials get accepted by the FTP server then an affirmation is sent to the session and the client to begin the session.
- We can say that the FTP server can support restarting of the checkpoints. If any downloaded is not completed then it can be resumed using an FTP connection.
- FTP server permits uploading and downloading of files.
- Common web browsers can retrieve the file residing in FTP servers.
- It also provides anonymous access to users that makes it possible to download the file from the server anonymously.
That’s all about the FTP server. Now, let’s start the installation guide of setting up an FTP server on Ubuntu 20.04 but first make sure that you are logged in as a ‘superuser’.
Installing FTP Server on Ubuntu 20.04
Step 1: Open the terminal by pressing ‘CTRL+ALT+T’ or search it manually in the activities and update the packages list.
$ sudo apt update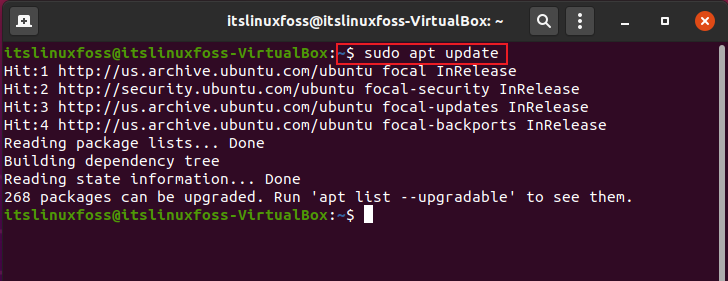
Step 2: VSFTPD is a popular FTP server and is the default tool in Ubuntu. Install VSFTPD using the following command.
$ sudo apt-get install vsftpd
Step 2: You should also have a backup of the VSFTPD configuration file. First of all, rename the file.
$ sudo mv /etc/vsftpd.conf /etc/vsftpd.conf_orig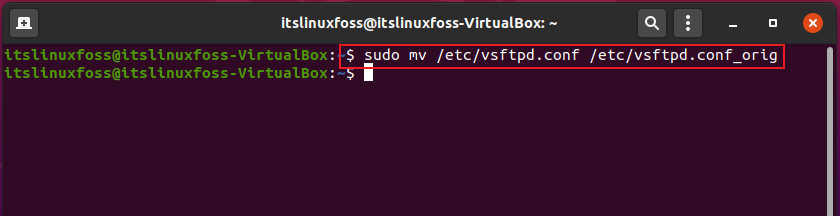
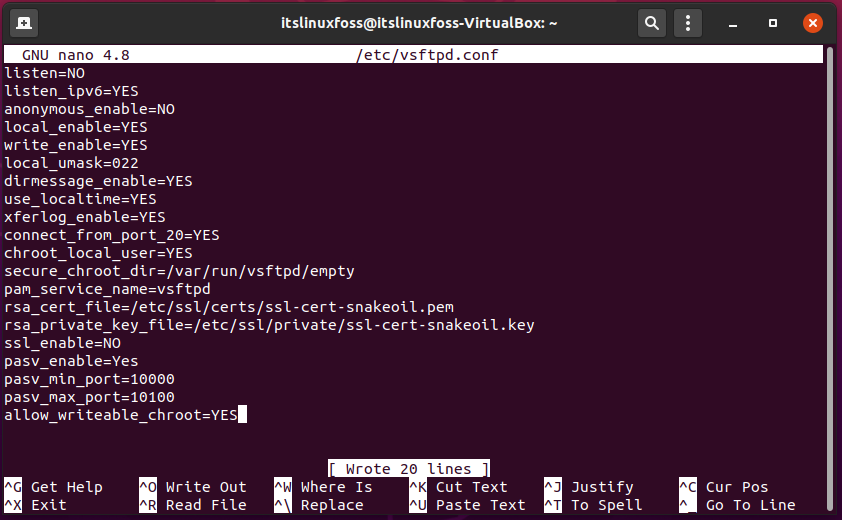
Step 3: Now open the file in bash editor and add the following content in the script.
$ sudo nano /etc/vsftpd.conf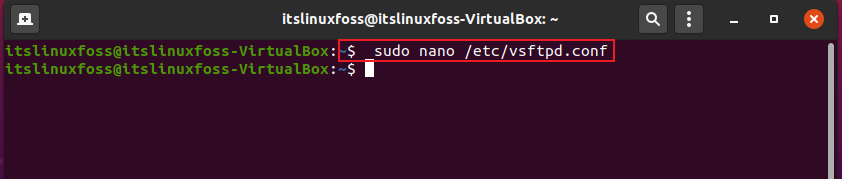
listen=NO
 listen ipv6=YES
anonymous_enable=NO
 local_enable=YES
write_enable=YES
 local_umask=022
 dirmessage_enable=YES
use_localtime=YES xferlog_enable=YES
 connect_from_port_20=YES
 chroot_local_user=YES
secure_chroot_dir=/var/run/vsftpd/empty
pam_service_name=vsftpd
rsa_cert_file=/etc/ssl/certs/ssl-cert-snakeoil.pem
 rsa_private_key_file=/etc/ssl/private/ssl-cert-snakeoil.key
 ssl_enable=NO
pasv_enable=Yes
pasv_min_port=10000
pasv_max_port=10100
allow_writeable_chroot=YES
Step 4: Write-out the following command to allow the traffic.
$ sudo ufw allow from any port 20,21,10000:10100 proto tcp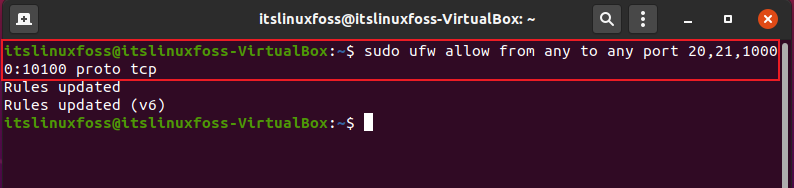
Step 5: Now, Restart the VSFTPD service.
$ sudo systemctl restart vsftpd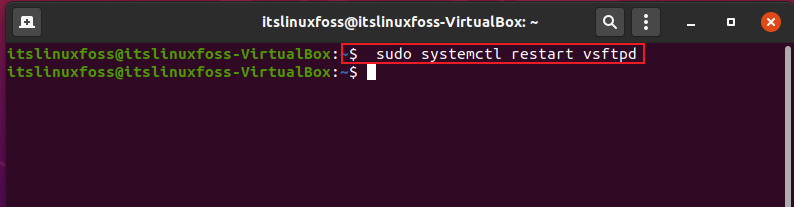
Step 6: Create an FTP user and add password for it.
$  sudo useradd -m ftpuser
$ sudo passwd ftpuser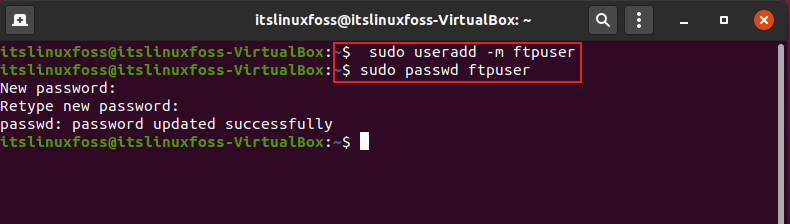
That’s it about the installation of VSFTPD. Now you only need to connect it to the CLI or GUI.
Conclusion:
In this article, we discussed some valuable information about FTP, FTP server, and its features. Next, we provided you with a complete procedure for setting up VSFTPD on your Ubuntu 20.04.

Saryia is a technology entrepreneur and digital publisher specializing in Linux, open-source technologies, and developer education.