
In Linux, the “nc” command is a powerful tool that allows users to perform various networking tasks. It includes sending and receiving data over TCP or UDP connections and scanning for open ports on a remote system. Users can utilize this command to test network connectivity, experiment with network programming, or develop simple network-based applications.
This guide will demonstrate the “nc -l” command with the practical implementation in Linux.
- How to Understand the Action of nc -l Command?
- How Does nc -l Command Work in Linux?
- Simple TCP Server
- Sending and Receiving Data
- UDP Server
- Port Scanning
- Use Verbose by Specify Port Number
How to Understand the Action of “nc -l” Command?
In Linux, the “nc -l” command starts a TCP or UDP server that listens for incoming network connections on a specified port. The basic syntax of the nc -l command is as follows:
Syntax:
$ nc -l [options] [hostname] [port]
The description of the above syntax is mentioned below:
- The “-l” option specifies that the nc command starts a listening server.
- The “hostname” argument specifies the network interface.
- The “port” argument refers to the port number on which the server listens.
How Does nc -l Command Work in Linux?
Here are some examples of using the nc -l command in Linux:
Example 1: Simple TCP Server
Users can use the “nc -l” command to create a simple TCP server that listens on a specified port. For example, the “nc -l” command starts a TCP server that listens on port 1234:
$ nc -l -p 1234
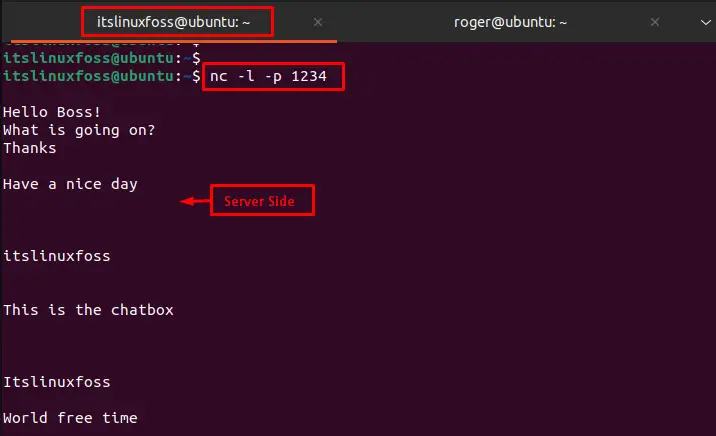
When a client connects to this server; it can send and receive data over the network connection. The below figure shows the conversation at the client end:
$ nc 127.0.0.1 1234
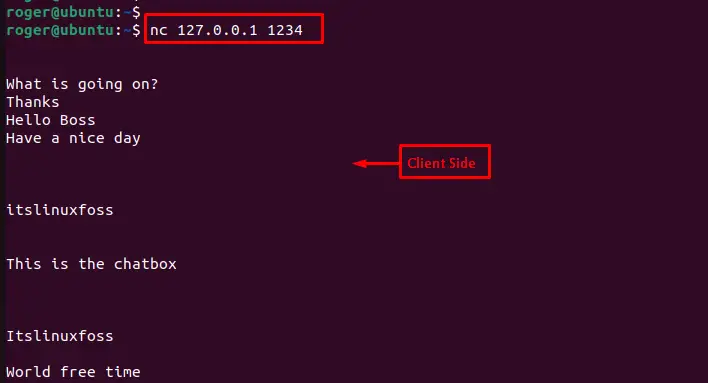
In this way; users can perform conversations through the “ns -l” command in Linux.
Example 2: Sending and Receiving Data
Users can use the “nc -l” command to send and receive data, including files, over a network connection. For this, use the “nc -l” command by specifying the “1234” port to send data over a TCP connection:
$ nc -l 1234 < file2.txt

This command sends the contents of a file called “file2.txt” to a TCP server that is running on the local machine on port 1234.
On the other side, users can utilize the “>” operator to receive data over a TCP connection:
$ nc -l 1234 > file2.txt
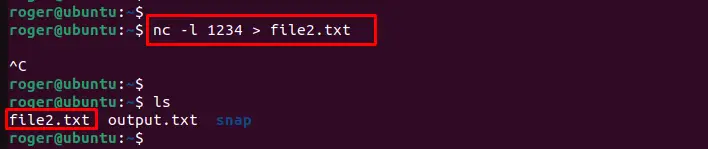
The output shows that the particular “file2.txt” has been received over port “1234” on the client side.
Example 3: UDP Server
To start a UDP server that listens on a specified port, use the “nc -u -l” command. For instance, the following command starts a UDP server that listens on port 1234:
$ nc -u -l 1234

When a server sends data to the client over UDP; the client receives and processes the data.
Example 4: Port Scanning
Users can use the “nc” command with the “-zv” option to scan for open ports on a remote system. For example, the following command scans the 75 to 85 TCP ports on a remote system and displays a list of open ports:
$ nc -zv 127.0.0.1 75-85
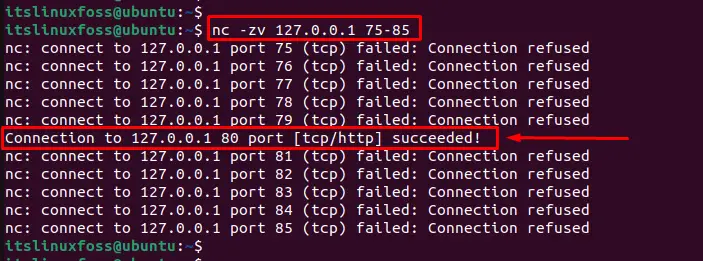
The output shows that port 80 is opened between 75 to 85.
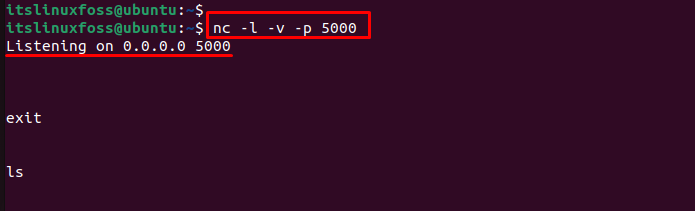
Example 5: Use Verbose by Specify Port Number
Users can utilize the “nc -l” command by specifying the “v(verbose)” and “p(port) ”options with the port number 5000:
$ nc -l -v -p 5000
On the client side, use the “nc” command by specifying the IP address “127.0.0.1” with the port number 5000 as below:
$ nc 127.0.0.1 5000
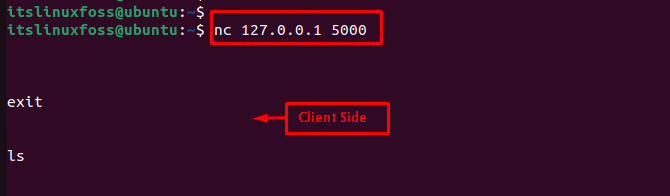
The output shows that all the conversation at the server side has been displayed on the client side.
Conclusion
In Linux, the “nc -l” command creates a simple network server by specifying the <hostname> and <port number>. It starts a TCP or UDP server that listens for incoming network connections on a specified port.
Users can utilize this command to test network connectivity, experiment with network programming, or develop simple network-based applications.
This guide has explained how the “nc -l” command works, and users can use it to create a wide range of network-based applications and services.
