
In Linux, the “nice” command is utilized to run a program with a high or low scheduling priority. It is useful for running background tasks or other non-critical processes. While the “renice” command is utilized to modify the priority of an existing running/executing process.
The purpose of this guide is to demonstrate the “nice” and “renice” commands with all possible examples in Linux.
- How Do nice and renice Commands Work in Linux?
- Run a Program With a Lower Priority Value
- Increase the Priority of a Particular Process
- Change the Priority With a Process ID
- Increase the Priority of a Specific User
- Change the Priority of All Executing Processes of a Specific Group
- Change the Priority of All Same Name Processes
How Does Nice and Renice Command Work in Linux?
By default, most processes run with a priority of 0. However, the nice command assists users in running the process with less priority. For this, the basic syntax for the “nice” and “renice” commands are provided below:
Syntax of nice Command:
$ nice -n [priority] [command]
In the above syntax, the priority is a number between -20 and 19. The lower numbers indicate the higher priority.
Syntax of renice Command:
$ renice -n [priority] -p [pid]
In the renice syntax, the “priority” is the same as above, and “pid” is the process ID of the process whose priority you want to change.
Note: The root user can set priority to any value from -20 to 19, and a normal user can only set priority to values from 0 to 19.
Here are some examples of using the nice and renice commands in Linux:
Example 1: Run a Program With a Lower Priority Value
The “run” command offers the priority value to run a program according to user needs. To run a program with a lower priority, specify the program name with a priority value. To do so, mention the process name as “gnome-terminal” with the low priority value 10 as below:
$ nice -n 10 gnome-terminal

The output shows that the “gnome-terminal” process runs on the 10 priority value.
Example 2: Increase the Priority of a Specific Process
To increase the particular process priority, specify the nice value. In our case, specify the 10 value to increase the process of “ps”:
$ sudo nice --10 ps -l
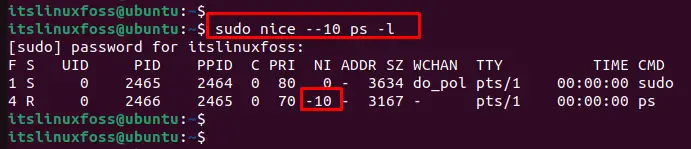
The output displays the priority of a particular process that has been increased in the terminal.
Example 3: Change the Priority With a Process ID
To modify the priority of an executing process with a process ID, specify the process ID with the priority value. In our case, specify the process id “2355” to a high priority value as “-5”:
$ renice -n -5 -p 2355

The output shows that the running process having process id “2355” has set the new priority 5.
Example 4: Increase the Priority of Particular User
To increase the priority of all specific user processes, mention the user’s name with the priority value. Let’s set the priority value 5 to the specific user “roger” in the following command:
$ sudo renice -n 5 -u roger

The output returns that all processes of the “roger” have been set to the new priority value.
Example 5: Change the Priority of All Executing Processes of a Specific Group
To change the priority of all executing processes, use the group name or ID. To do so, specify the group id with the “g” option with priority value “8” in the following command:
$ renice -n 8 -g 2355

The output shows the priority of all running processes of the specific group has been changed.
Example 6: Change the Priority of All Same Name Processes
To change the priority of all processes, the “pgrep” command matches the process name through the “f” option. Let’s, specify the process name “firefox” to change priority:
$ renice -n 10 $(pgrep -f firefox)
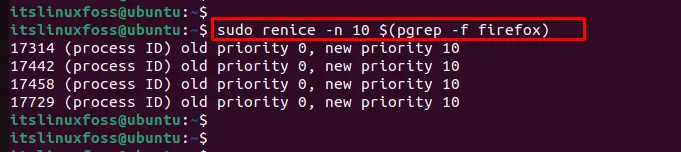
The output shows that all processes of “firefox” have changed the priority value.
Conclusion
Linux offers the “nice” command to run a program with a modified scheduling priority and “renice” for an already-running process. Using these commands, you can run a program with a lower or higher priority value and change the priority of all running processes of a specific user. This guide has explained the “nice” and “renice” commands with different examples in Linux.
