
The network configuration refers to the network settings, policy, and control. It is the procedure of connection to the local host or server throughout the world. Most internet users use a dynamic IP address that can be changed. However, a user can set a static IP address that helps in remembering the IP address of the internal and external devices as well.
Ubuntu comes with the ideal network setting and does not face such hurdles. However, if you want to do some network configuration, Ubuntu 22.04 provides various methods. In this writeup, you will gain deep insight knowledge of network configuration on Ubuntu 22.04 using:
Let’s explore the CLI method first:
Method 1: Ubuntu 22.04 Network Configuration Using Command Line Interface
The Terminal is the Command-Line utility used to run several commands. Ubuntu 22.04 supports several command-line utilities to manage the network. This section follows the CLI to perform basic network configuration on Ubuntu 22.04.
Step 1: Check the Current IP Address
First, check your current IP address, assigned by your router to your device, using the command typed below:
$ ip a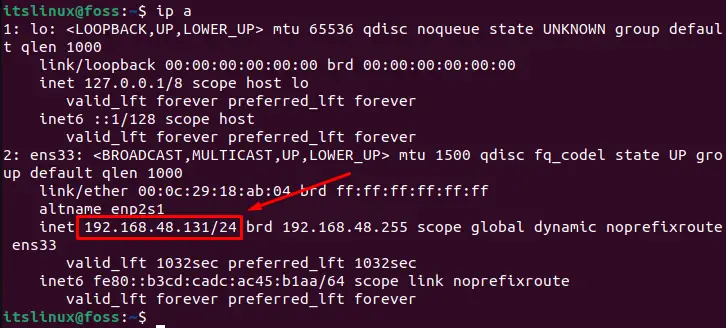
The current IP address of our Ubuntu 22.04 machine is 192.168.48.131, which is dynamic and can be changed at any time whenever we reconnect to the internet.
Step 2: Open the NMTUI Menu to Edit the Connection
NMTUI is a network manager text user interface tool that helps in configuring the network on Ubuntu. To open the NMTUI menu, execute the below script in the terminal:
$ nmtui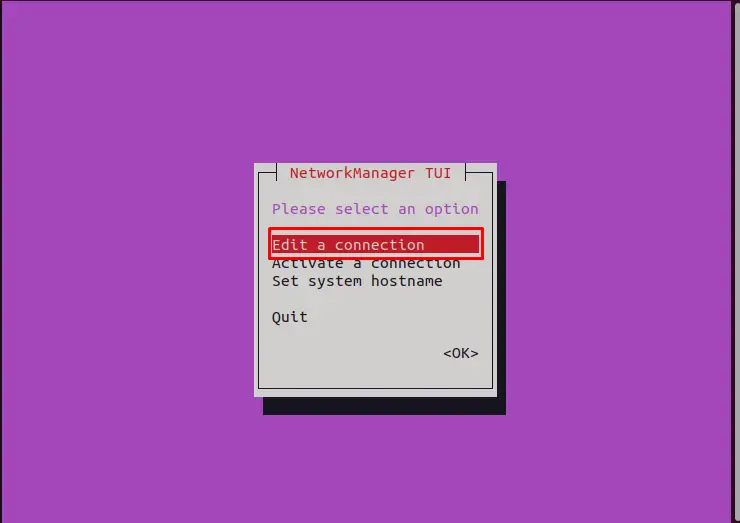
Choose the “Edit a connection” option and press the“Enter” button.
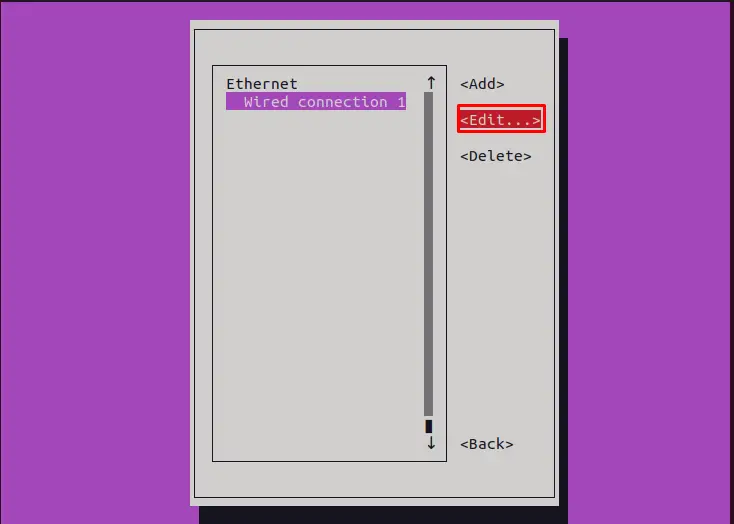
In the following window, choose the network connection (in our case, it is “Wired connection 1“), navigate to the “Edit” option, and hit the “Enter” key.
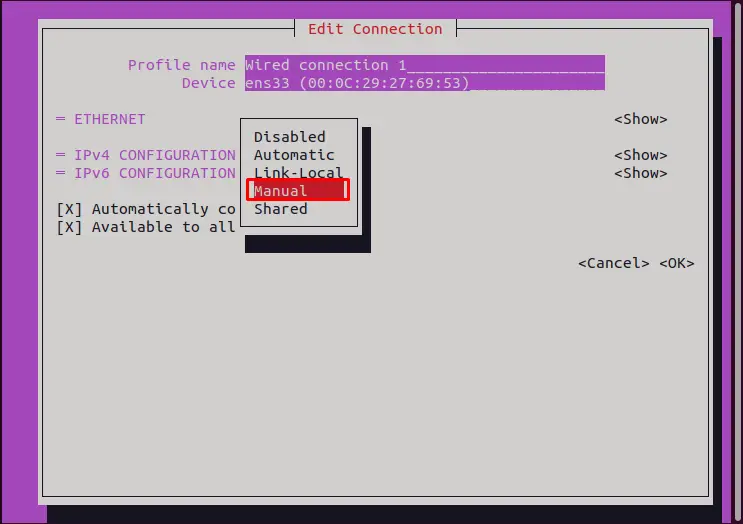
Step 3: Configure the IP Address
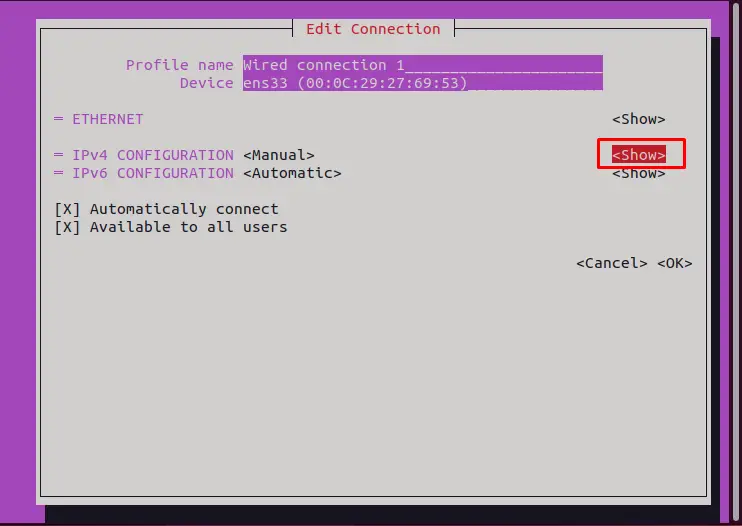
Open the IPv4 configuration and change the setting from “Automatic” to “Manual” with the help of the keyboard.
Note: To navigate through the options, use the Tab key and hit Enter to open/edit the menu.
To show the menu, click on the “Show” option:
Go to the “Addresses”, “Gateway”, and “DNS servers” options to add the values:
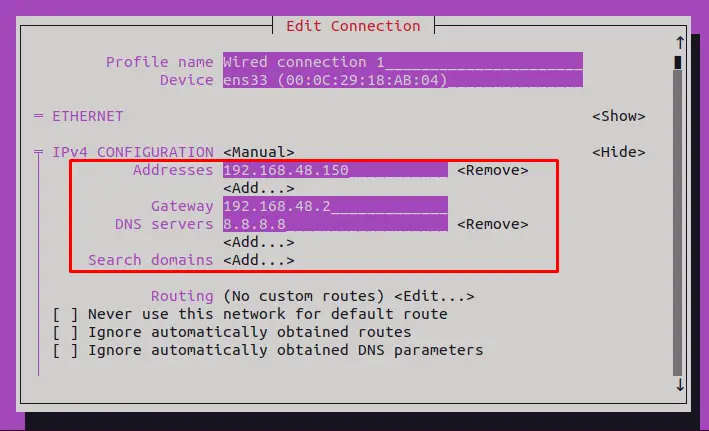
We have added the IP address “192.168.48.150”, the Gateway “192.168.48.2”, and DNS “8.8.8.8”.
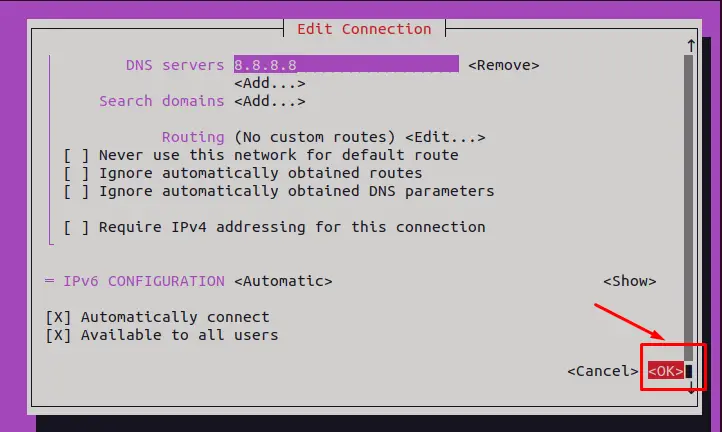
Step 4: Apply Changes
Click the “OK” button to save all the changes:
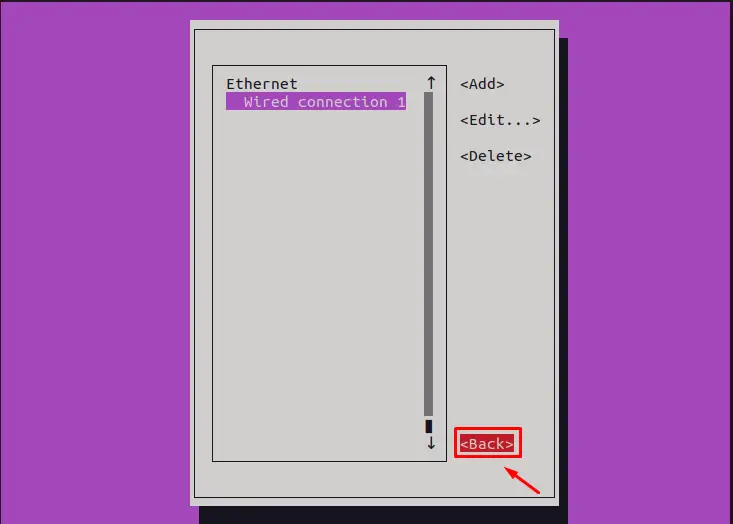
It moves to the main menu. Click the “Back” option:
Step 5: Restart the Network
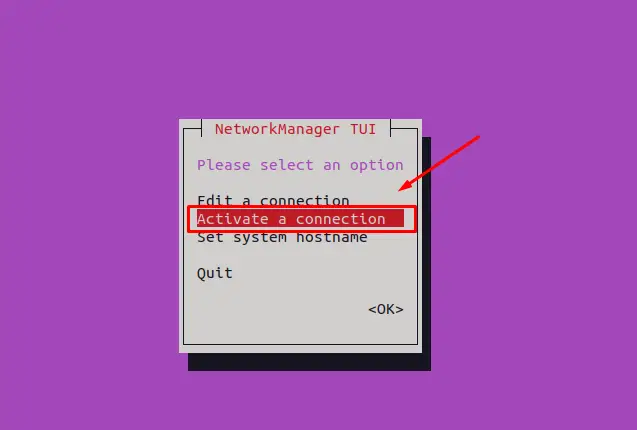
From the main menu, click the “Activate a connection”:
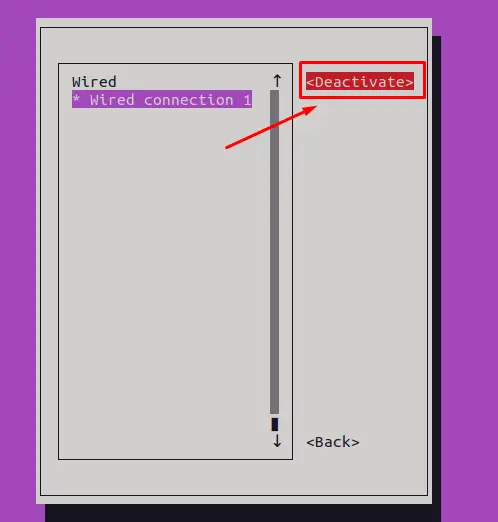
The figure below will pop-up that moves to “Deactivate” to switch off the connection:
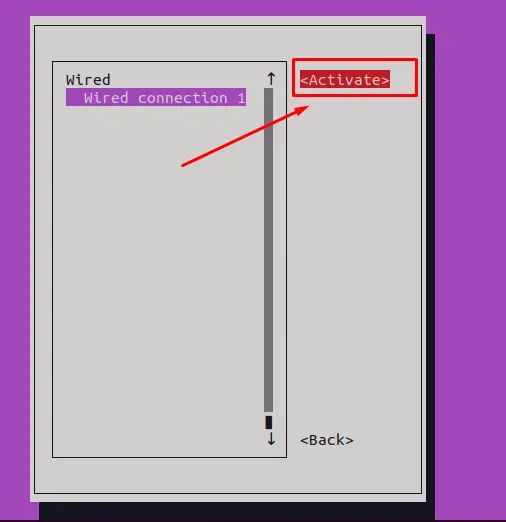
Then, activate the network by clicking on “Activate“.
The network has reset.
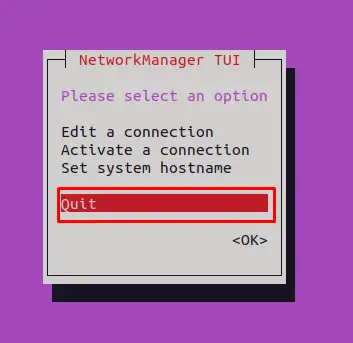
Navigate to the main menu and choose “Quit” to come out of the NMTUI.
Step 6: Verify the Changes
To verify the newly assigned IP address, run the following command:
$ ip a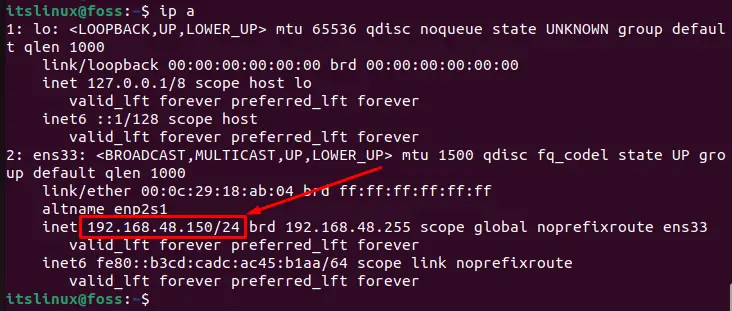
The IP address has been changed successfully.
Furthermore, to verify if the network is working fine after setting up the static IP address, execute the command given below:
$ ping -c 3 google.com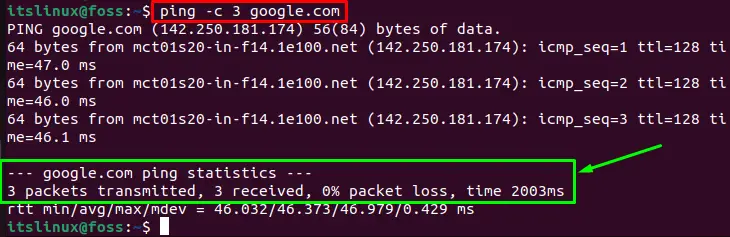
The 3 packet transmission verified that the network is working smoothly. However, if you do not find output like shown in the above screenshot (and the transmission of the packets fails), it shows that the user may have made an issue on setting up the IPv4 Address, Gateway, DNS Server, or restarting the network.
Method 2: Ubuntu 22.04 Network Configuration Using Graphical User Interface
The Graphical User Interface helps in using the computer system by interacting with the graphical icons. The following steps are carried out to configure the network using the GUI.
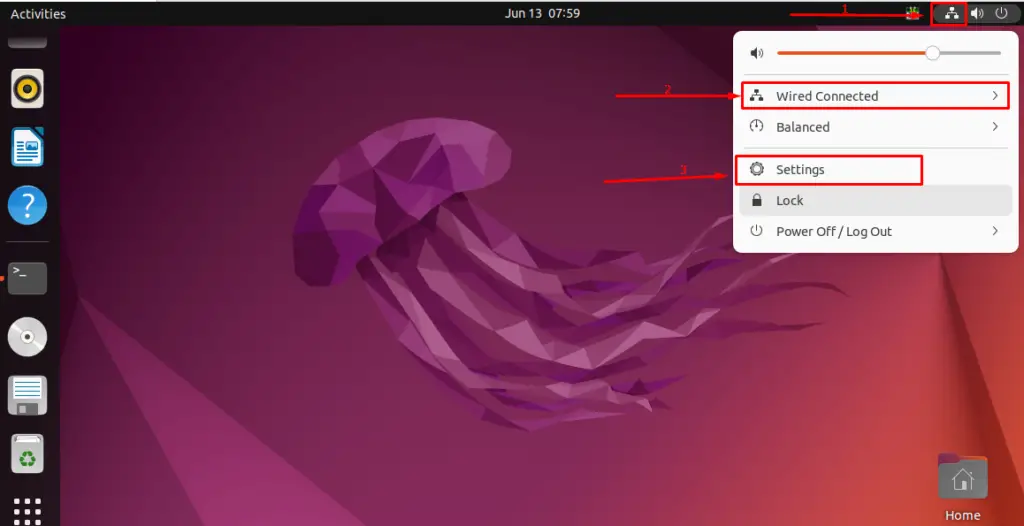
Step 1: Open Wired Settings
First, go to the “Network icon”, and click to open it. A new (drop-down) menu will appear as follows. Click on “Settings”:

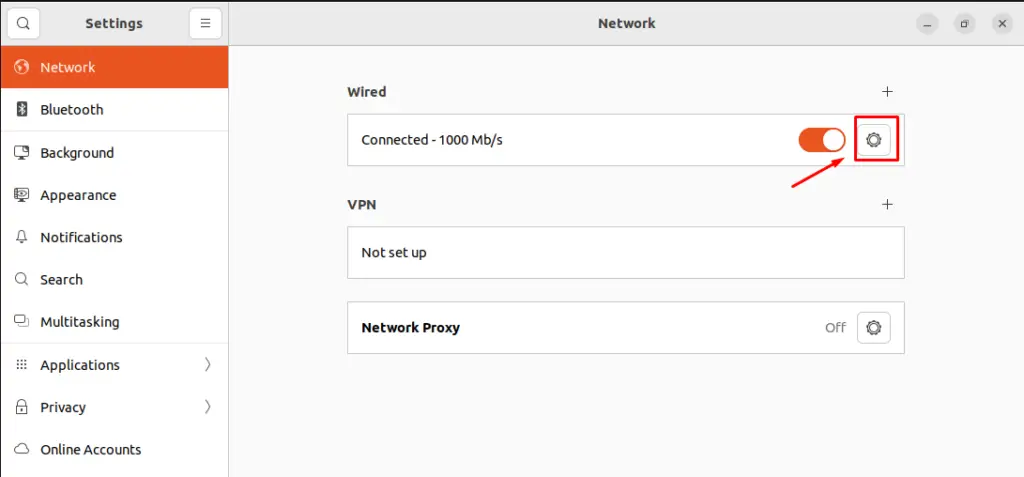
Step 2: Open Network Settings
In the following window, the wired settings are opened. Now, click on the “Settings”icon.

A settings box will open up like this:
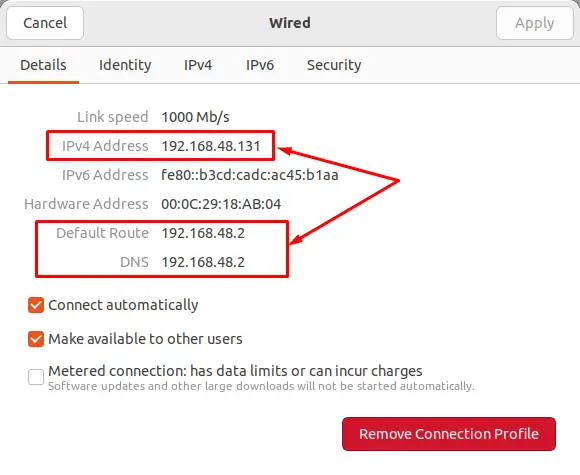
In this “Details” section, you can notice that our current IP address, default route, and DNS are “192.168.48.131”, “192.168.48.2”, and “192.168.48.2” respectively.
We will only change and set the IP address to make it static so that whenever we will connect to the internet, the router will assign the same IP address to our system. However, the default route should stay the same in order not to interrupt the internet settings.
Step 3: Add IP Address, Gateway, and DNS
Select the “IPv4”tab to add the IP address and change the IPv4 from Automatic to Manual. Enter the IP address, Gateway, and DNS(optional) of your choice. To save all the new changes, hit the“Apply” button:
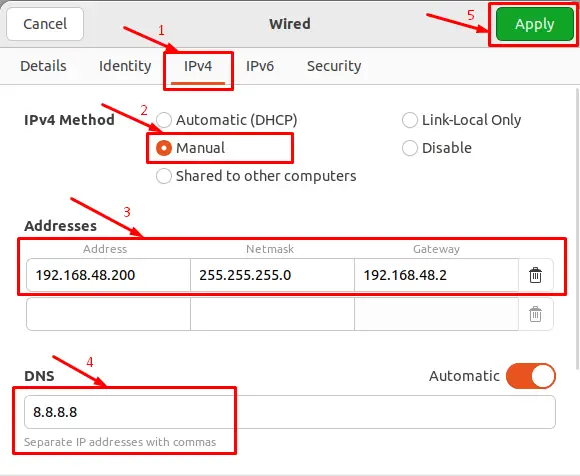
We set the IP address “192.168.48.200”, Netmask “255.255.255.0”, Gateway “192.168.48.2” and DNS “8.8.8.8”.
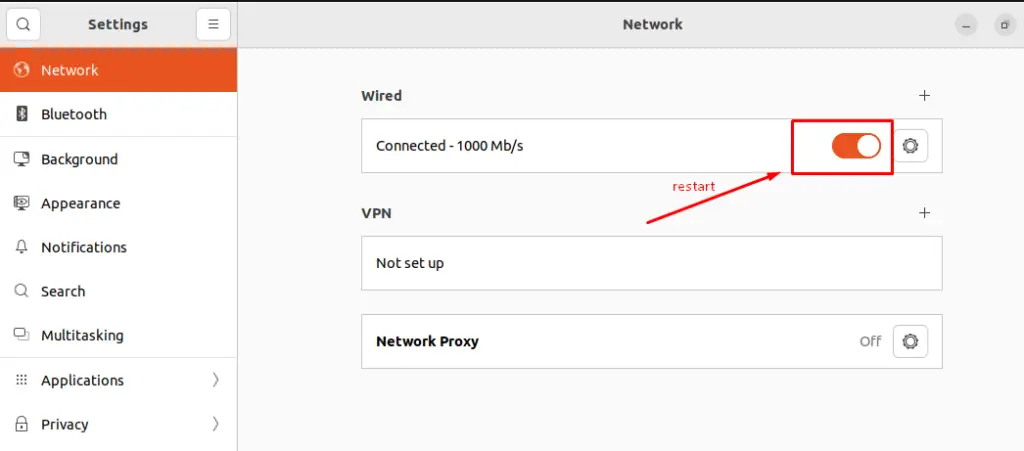
Step 4: Restart Network
To restart the network, turn the “Toggle” button OFF and then ON:
Step 5: Verify Configuration
To verify the configuration, click on the settings icon. The following window will open. Go to the “Details” tab to verify the configuration:

The output showed that the network was configured successfully.
Bonus Tip: Change the IP Address From Static to DHCP on Ubuntu 22.04
Here, the procedural steps for changing the IP address from static to dynamic are presented.
Go to the network settings of the network you want to configure:
Select“IPv4”, choose “Automatic(DHCP)”, and click on the “Apply”button:
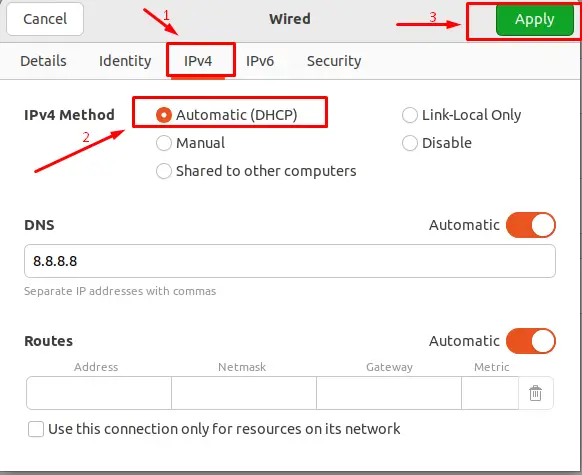
It will change the IP setting from “Manual”to “Automatic”.
Note: You can perform the above said changes using the NMTUI utility as well. It will change the network setting from manual to automatic.
Here you go! You have learned to apply the basic network configuration on Ubuntu 22.04.
Conclusion
Network configuration can be performed on Ubuntu 22.04 utilizing the Command-Line-Interface and Graphical-User-Interface. The network configuration is the procedure for changing the settings, policies, and control of a network. This article demonstrated the process of Ubuntu 22.04 network configuration. The NMTUI command-line utility is used to set static IP addresses. Additionally, we have also demonstrated the way to change the IP address using the GUI of Ubuntu 22.04.

Saryia is a technology entrepreneur and digital publisher specializing in Linux, open-source technologies, and developer education.