The “brew” is an open-source package manager designed for Linux and Mac to access different software applications using a command line interface.
It is a lightweight utility that can easily download, install, update and uninstall different software packages from the system.
This guide aims to elaborate on the multiple reasons and solutions of the above-stated error. The content of this tutorial is defined below:
- Reason 1: “brew” Command is not Installed
- Solution 1: Install the “brew” Command Correctly
- Reason 2: Due to Path
- Solution 2: Change the “brew” Path
Let’s start the article with the first reason.
Reason 1: “brew” Command is not Installed
The main reason is that the “brew” command is not installed in the current system. Suppose when the user runs the “Homebrew” command in the terminal then an error generates such as
$ Homebrew

To resolve the above error install it by following the “Solution 1” instructions.
Solution 1: Install the “brew” Command Correctly
Follow the step-by-step instruction to install the “brew” command line tool in the current working system “Ubuntu 22.04”:
Step 1: Update the System
First update the system to get the latest versions of the newly installed application into the system:
$ sudo apt update
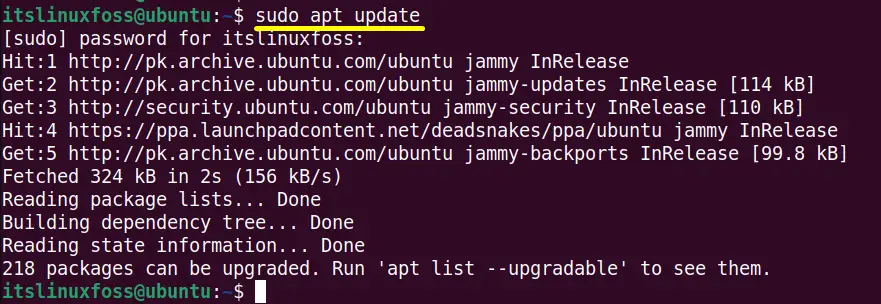
All the system packages have been updated successfully.
Step 2: Install the git
Install the “GIT” for setting up the “brew” into the Linux system “Ubuntu 22.04” by executing the “apt” command in this way:
$ sudo apt install git                       #Debian/Ubuntu-Based
$ sudo dnf install git                       # Fedora/RHEL/CentOS
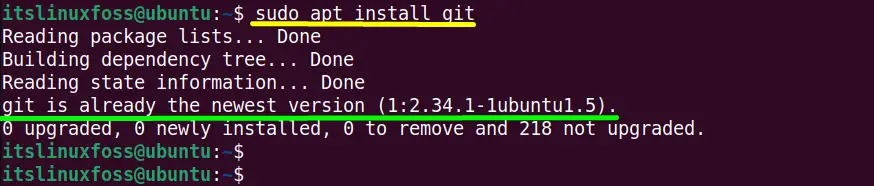
Here in this system the “GIT” is already installed and has the latest versions.
Step 3: Add the Homebrew Installation Script
The official website https://brew.sh/ of “brew” provides a predefined script that is used to install and download the “Homebrew” into the most common Linux distributions such as Linux Mint, CentOS, RHEL, and many others.
To install the script into the “Ubuntu 22.04” use the following specified command:
$ /bin/bash -c "$(curl -fsSL https://raw.githubusercontent.com/Homebrew/install/HEAD/install.sh)"
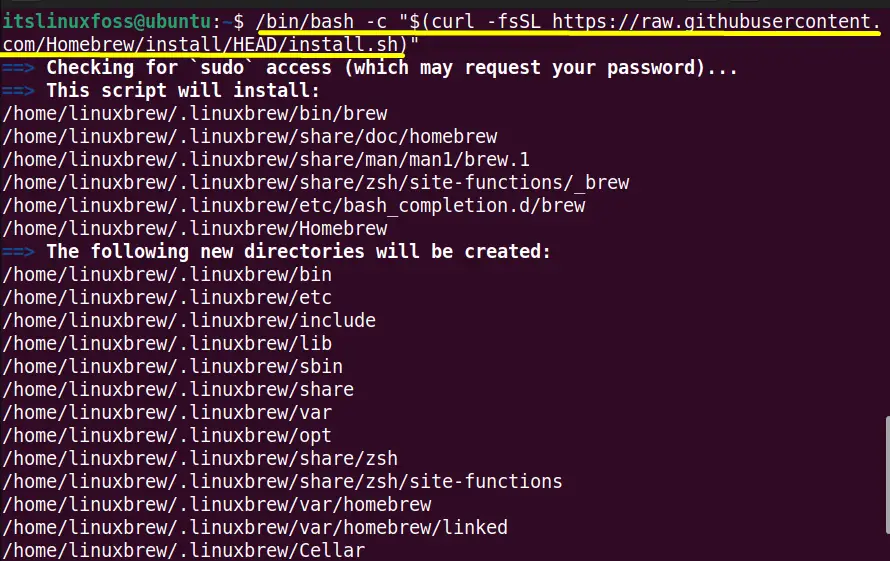
The “brew script” is successfully installed into the “Ubuntu 22.04”
Step 4: Add Homebrew PATH
Now add it into the current system after the complete installation of “brew” command in the following way:
$ eval "$(/home/linuxbrew/.linuxbrew/bin/brew shellenv)"

Step 5: Verify the “Homebrew” Installation
To check the “Homebrew” installation status for the verification run the “brew” command with its “-v” version:

It is verified that “brew” having its latest version “3.6.15” is installed into “Ubuntu 22.04” successfully.
Note: Re-install Homebrew
If the “brew” is already installed into the system then re-install it properly by executing the below-mentioned command:
$ NONINTERACTIVE=1 /bin/bash -c "$(curl -fsSL https://raw.githubusercontent.com/Homebrew/install/HEAD/uninstall.sh)"
Reason 2: Incorrect Path
As the “homebrew” command automatically adds the install directory to the path by default during the installation as shown in the “installation” section of “Homebrew” command. Also, users need to add the directory manually. When the user runs the “Homebrew” command in the terminal then the system will search for it in the “PATH” environment variable
So let’s move on to the solution on how to change the “Homebrew” path.
Solution 2: Change the “brew” Path
The solution is that if the “Homebrew” is installed in another different directory then replace the “/usr/local/bin” as mentioned in the below command with the target directory.
$ echo 'export PATH="/usr/local/bin:$PATH"' >> ~/.bash_profile
That’s all about the possible reasons and solutions for the above error “brew command not found”.
Conclusion
The reason for the error “brew command not found” error is that the “brew” Command is not Installed” and its “Incorrect Path”. The solution is to install the “Homebrew” command and add its correct path. If it does not work then change its path manually. This guide has described all the possible reasons and solutions to the error “brew command not found”.
