The IPv6 address is assigned by default to the network interface, and the system will automatically use the protocol (IPv4/IPv6) for a given connection. However, users face connectivity issues or compatibility problems that may occur with certain applications or network devices that do not properly support IPv6.
Considering this issue, this guide will explain step-by-step instructions to disable IPv6 on Ubuntu 22.04 Jammy Jellyfish Linux. The content of this guide is mentioned below:
How to Permanently Disable IPv6 on Ubuntu 22.04 Jammy Jellyfish Linux?
IPv6 is enabled by default which is utilized in parallel with IPv4. To disable IPv6 on Ubuntu 22.04 Jammy Jellyfish Linux, you can follow these steps:
Step 1: Open and Configure the sysctl File
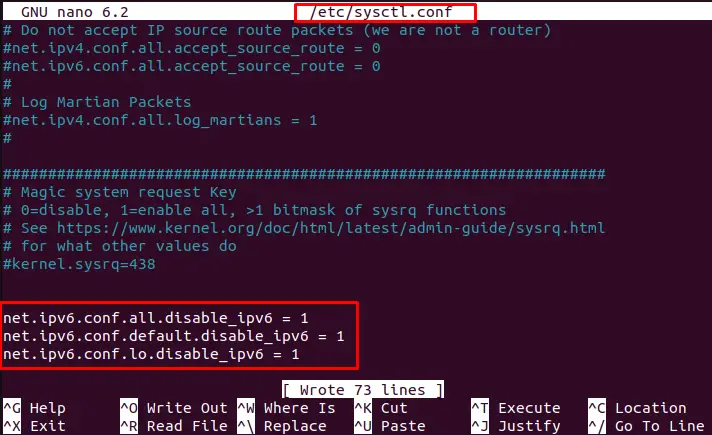
Run the command to open the sysctl configuration file in the nano text editor.
$ sudo nano /etc/sysctl.conf

It navigates to the “sysctl.conf” configuration file.
Add the following lines to disable the IPv6 services in this file:
$ net.ipv6.conf.all.disable_ipv6 = 1
$ net.ipv6.conf.default.disable_ipv6 = 1
$ net.ipv6.conf.lo.disable_ipv6 = 1

Save (CTRL + S) and then exit (CTRL + X) the editor.
Step 2: Apply the Changes to the System
To apply the changes to the system, the “sysctl” command is utilized with the “p” option:
$ sudo sysctl -p

The output shows that the configuration changes have been applied to the system.
Step 3: Restart Network Service
It is necessary to restart the network services by running the “systemctl” command with the “restart” option:
$ sudo systemctl restart systemd-networkd

Step 4: Check the Status of IPv6
Users can verify the disabled IPv6 services after restarting the network services. For this, the “cat” command is utilized by specifying the configuration file path “disable_ipv6” to check the status of IPv6:
$ cat /proc/sys/net/ipv6/conf/all/disable_ipv6

The output shows that the status of IPv6 returns 1, which indicates that IPv6 is now disabled on your system.
Note: If you want to re-enable IPv6, remove the lines you added in step 1 and run the command “sudo sysctl -p” again.
How to Temporarily Disable IPv6 on Ubuntu 22.04 Jammy Jellyfish Linux?
To temporarily disable the IPv6 on Ubuntu, the “sysctl” command is utilized with the “w” option by assigning 1 value to a specific variable:
$ sudo sysctl -w net.ipv6.conf.all.disable_ipv6=1

If the output is “1“, it means IPv6 is now temporarily disabled. To re-enable IPv6, you can change the value of “net.ipv6.conf.all.disable_ipv6” to 0.
Restart Network Service
It is necessary to restart the network services by running the “systemctl” command with the “restart” option:
$ sudo systemctl restart systemd-networkd

It will configure all dependencies that temporarily disabled the IPv6 services.
Conclusion
Linux offers the “sysctl.conf” configuration file to permanently disable the IPv6 services on Ubuntu 22.04 Jammy Jellyfish Linux. After configuration, it is necessary to restart the network services using the “systemctl” command. IPv6 services can be disabled temporarily by assigning the value of “net.ipv6.conf.all.disable_ipv6” to 1. This article has explained the step-by-step procedure to disable the “IPv6” on Ubuntu 22.04 Jammy Jellyfish Linux.
