
Secure Shell (SSH) keys are a combination of public-private key-value pairs for making a secure connection between remote devices. The public key has significant importance in automating the authentication process. While dealing with the SSH keys to make the SSH connection, an error “ssh permission denied (publickey)” occurs in the terminal.
This article will explain multiple solutions to resolve the error mentioned above. The helpful content of this tutorial is noted below:
- What is the “ssh permission denied (publickey)” Error in Linux?
- What are the Reasons/Causes of the “ssh permission denied (publickey)” Error in Linux?
- How to Resolve/Fix the “ssh permission denied (publickey)” Error in Linux?
- Reason 1: Incorrect Configuration of the sshd_config File
- Solution: Edit the Default SSH Configuration “sshd_config” File
- Reason 2: Incorrect Public Key
- Solution: Regenerate the Public Key
- Reason 3: Incorrect Private Key
- Solution: Generate a New Key Pair
- Reason 4: Incorrect SSH authorized_keys File Permission
- Solution: Check and Change SSH Permission
- Reason 5: Broken/Corrupted OpenSSH Package
- Solution: Install/Reinstall the OpenSSH Package
- Tip 1: How to Resolve/Fix the “SSH could not resolve hostname” Error in Linux?
- Tip 2: How to Resolve/Fix the “ssh host key verification failed” Error in Linux?
- Tip 3: How to Resolve/Fix the “SSH connection refused port 22” Error in Linux?
- Tip 4: How to Enable SSH on Linux?
- Tip 5: How to Utilize the SSH Config File in Linux?
What is the “ssh permission denied (publickey)” Error in Linux?
In Linux, the error appears when users try to connect to a remote server via the Secure Shell (SSH) protocol, but the server does not recognize the public key. It means that the server is expecting users to authenticate with a public key, but they either don’t have one or are using the wrong one.
The screenshot of the “ssh permission denied (publickey)” error is as below:

What are the Reasons/Causes of the “ssh permission denied (publickey)” Error in Linux?
One of the most common reasons for causing the “ssh permission denied (publickey)” error is the incorrect configuration of the “sshd_config” file, the public key is not copied to the server’s “authorized_keys” file, copied the public key is to the wrong location or the wrong permissions on the server.
Furthermore, specify the wrong username or hostname when connecting to the server, and change the private key or passphrase on the local machine, but not on the server. Lastly, a firewall or network configuration has blocked SSH connections.
How to Resolve/Fix the “ssh permission denied (publickey)” Error in Linux?
To fix the error, edit the default SSH configuration “sshd_config” file, verify the public key is correctly configured on the server, and correct credentials and settings to connect to it. Also, users can reinstall the OpenSSH package, add the SSH Key to the Server, and try to connect again with SSH.
Let’s start with the first reason along with the possible solution.
Reason 1: Incorrect Configuration of the sshd_config File
One of the common reasons causing errors is that the “sshd_config” file is not properly configured. It is the default SSH configuration file having keyword-argument pairs. Therefore, the system does not locate the required public keys to establish a connection.
Solution: Edit the Default SSH Configuration “sshd_config” File
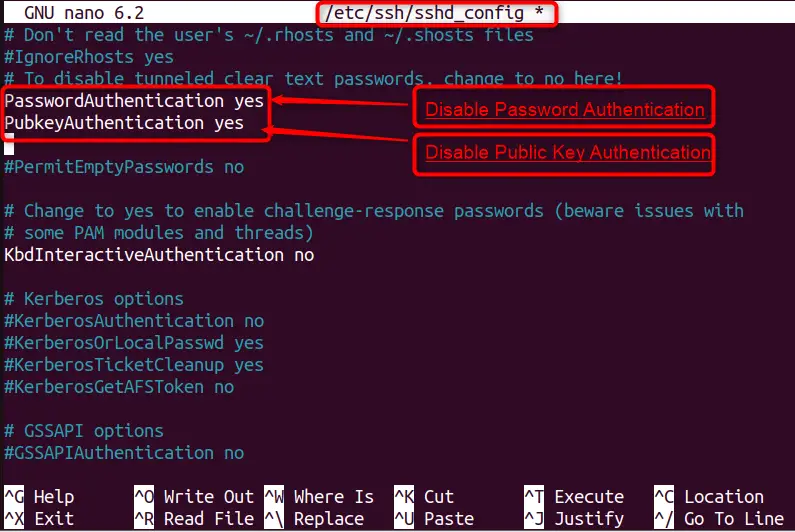
To encounter the above error, edit the default SSH configuration “sshd_config” file and disable the password and public key authentication services. To do so, access the “sshd_config” file via the nano editor and edit the “PasswordAuthentication” and “PubkeyAuthentication” attribute values:
sudo nano /etc/ssh/sshd_config

Edit the “sshd_config” File
By default, the value of the “PasswordAuthentication” and “PubkeyAuthentication” attributes are “no”. So, change the value from “no” to “yes” and save the file by disabling both services:
Once the modification is performed, save and exit the configuration file by pressing the “CTRL+C” and “CTRL+X” keys.
Restart SSH Services
After closing the file, restart the “sshd” services using the “systemctl” command to apply changes:
sudo systemctl restart sshd

In this way, the SSH services has been restarted.
Verify SSH Services
To verify the SSH services, write the current username with the hostname along with the “ssh” command. In our case, “itslinuxfoss” is the username, and “ubuntu” is the hostname. It displays the details of the last login with the IP address:
ssh itslinuxfoss@ubuntu

The output shows that SSH services are running perfectly on the “192.168.157.130” IP address.
Alternatively, users can also check the SSH services by following the syntax “ssh user-name@ip-address”. Here “itslinuxfoss” is the username and “192.168.157.131” is the IP address:
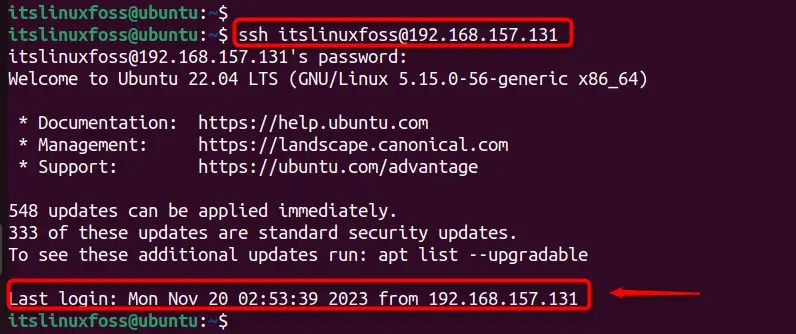
The output confirms that SSH services are running correctly by specifying the username and IP address.
Reason 2: Incorrect Public Key
The most important reason for causing the “ssh permission denied (publickey)” error in Linux is that the public key on the remote server does not match the one on the local machine. This can happen if the public key file is corrupted, deleted, renamed, or overwritten by another key.
Solution: Regenerate the Public Key
To fix the error, users need to regenerate the public key on the local machine and copy it to the remote server using the “ssh-copy-id” command. For this, follow the below instructions:
Step 1: Generate New SSH Keys
To resolve the SSH permission denied error, generate the new SSH keys, and add them to the server. To generate the public-private key pair, follow the below script:
ssh-keygen
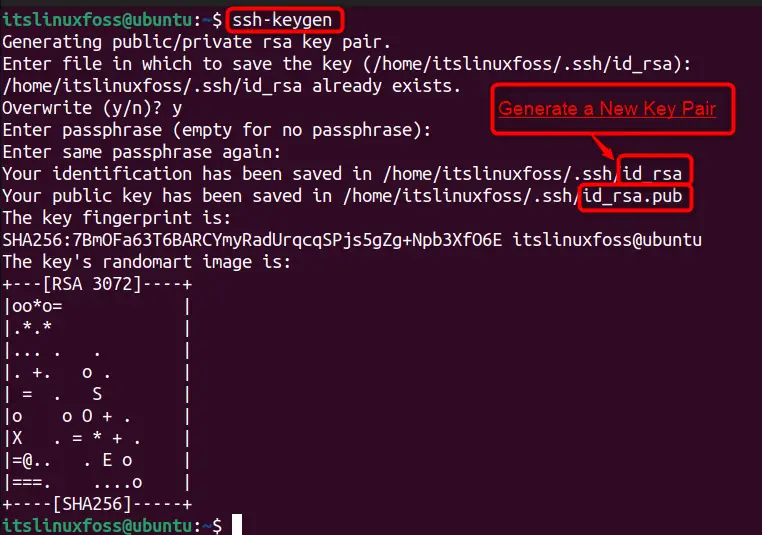
The output shows that the public-private key has been successfully generated.
Step 2: Add SSH Key to the Server
To add the generated key to the server, use the “ssh-copy-id” command and specify the username with the host. In this case, the “itslinuxfoss” represents the username, and “ubuntu” refers to the hostname:
ssh-copy-id itslinuxfoss@ubuntu

The output shows that the ssh key has been added successfully to the server.
Step 3: Verify Public Key and SSH Services
Users can verify the added public key via the below command:
ls -l ~/.ssh/id_rsa.pub

The output confirms the newly generated public key’s date, time, and location.
To verify the SSH services, write the current username with the host that will display the details of the last login with the IP address:
ssh itslinuxfoss@ubuntu
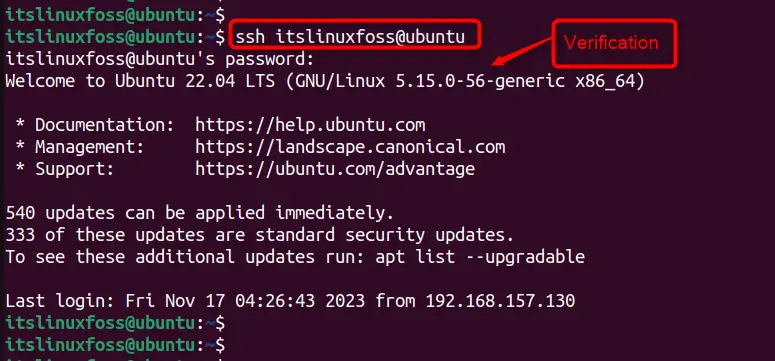
The output shows that SSH services are running perfectly.
Reason 3: Incorrect Private Key
Another reason is that private key files are incorrect or corrupted. It can occur if the file has been overwritten, modified, or deleted by mistake.
Solution: Generate a New Key Pair
ls -l ~/.ssh/id_rsa

The output verifies the generated private key file along with the date, time, and location.
Reason 4: Incorrect SSH authorized_keys File Permission
When trying to connect to a Linux server via SSH it has incorrect permissions for the “authorized_keys” file or the .ssh directory. The “authorized_keys” file contains the public keys of the users who are allowed to access the server, and the .ssh directory is where the file is located.
The SSH “authorized_keys” file has incorrect permissions. The file contains the public keys of the users who are allowed to log in to the remote server using SSH.
The file should be owned by the user who is logging in and should have permissions of 600 (read and write for owner only). If the file is owned by another user or has permissions that are too permissive (such as 644 or 777), then SSH will reject the public key authentication and deny access to the server.
Solution: Check and Change SSH Permission
To fix the error, users make sure that the “authorized_keys” file has 644 permissions and the .ssh directory has 700 permissions. To explore the permission regarding files and directories, follow our guide “Understanding Linux File Permissions”. Users can use the following instructions to check and change the particular file permissions:
Check the Permissions of the authorized_keys File
To check the permissions of the “authorized_keys” file along with the creation time, run the below script:
ls -l ~/.ssh/authorized_keys

The output shows that the particular file has only read and write permission.
Change the authorized_keys File Permissions
To change the permissions of the “authorized_keys” file, run the “chmod” command along with the “644” number. It represents that the owner has access to read and write the file while users only has access to read it:
chmod 644 ~/.ssh/authorized_keys

It shows that the particular file has above mentioned permission.
Check the .ssh Directory Permissions
To check the permissions of the .ssh directory, users can utilize the “ls” command along with the “-ld” flag:
ls -ld ~/.ssh

The output shows that the particular directory has only read, write and executable permission.
Change the .ssh Directory Permissions
To change the permissions of the .ssh directory, use the “chmod” command along with the “700” number. It represents that owner can do anything on the file, while other ones have no access to the file:
chmod 700 ~/.ssh

After changing the permissions, try to connect to the server again and see if the error is resolved.
Verify SSH Connection
To verify the SSH connection, write the username along with the host that will display the details of the last login with the IP address:
ssh itslinuxfoss@ubuntu

The output shows that the SSH connection is established perfectly.
Reason 5: Broken/Corrupted OpenSSH Package
One reason for causing the error is that the OpenSSH package is not correctly installed or corrupted due to malfunction or another configuration issue.
Solution: Install/Reinstall the OpenSSH Package
Another solution that can resolve the error is possible by installing the “openssh-server” package. To install the required package, execute the below script:
For Ubuntu/Debian/Linux Mint:
sudo apt install openssh-server
For RHEL/Centos/Fedora:
yum install openssh-server
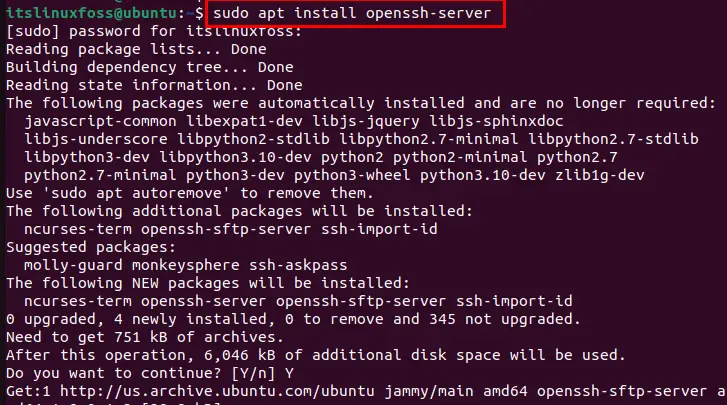
The output shows that the “openssh-server” package along with all dependencies has been installed in the system.
Note: Users can go through the detailed installation by navigating to the “Install and Enable OpenSSH” guide.
These are all the possible reasons along with solutions to resolve/fix the error permission denied (publickey).
Tip 1: How to Resolve/Fix the “SSH could not resolve hostname” Error in Linux?
The error occurs when the SSH client cannot connect to the remote server using its hostname. To fix it, check the hostname’s spelling and validity, the DNS settings, and hostname entry on the /etc/hosts file, and the SSH client configuration.
To read this fix in detail, check out our article on the “Fix: SSH could not resolve hostname” error in Linux.
Tip 2: How to Resolve/Fix the “SSH host key verification failed” Error in Linux?
The error occurs when the SSH client tries to connect to a server whose host key has changed or is unknown. It occurs when the server has been compromised, upgraded, or reinstalled. To fix this error, users must remove the old host key from the client’s “known_hosts file” and accept the new one.
To read more about this topic, follow our detailed guide on Fix: “SSH host key verification failed” error in Linux.
Tip 3: How to Resolve/Fix the “SSH connection refused port 22” Error in Linux?
If users are trying to connect to a remote Linux server via SSH returns an error message. To tackle this, check the running status of the SSH service on the remote server via the “sudo systemctl status sshd” script. Also, check port 22 is open, the local network or firewall is blocking port 22. Check the correct credentials and permissions to access the remote server.
To read more of our guide, check out this “Fix “ssh connection refused port 22” Error in Linux”.
Tip 4: How to Enable SSH on Linux?
To enable the SSH utility along with the service manager on the Linux operating system, execute the command “sudo systemctl enable ssh –now”. Also, users can check the active status with the “status” keyword.
To perform practical implementation with different aspects, follow our guide on “How to Enable SSH on Ubuntu 22.04”.
Tip 5: How to Utilize the SSH Config File in Linux?
In Linux, users can use the SSH config file by creating the configuration file and mentioning multiple remote users along their hostnames or IP addresses.
Conclusion
The error “ssh permission denied (publickey)” occurs due to the incorrect configuration of the “sshd_config” file, the public key is not copied to the server’s “authorized_keys” file, or the wrong permissions on the server. It can be solved by disabling the password and public key authentication services in the “sshd_config” file, reinstalling the OpenSSH package, and generating and adding the SSH key to the server. This article has provided all methods to encounter the above error.
