
In Linux, the “hexdump” command is utilized to display the file contents in a hexadecimal and ASCII format. This command is important for examining the binary data in a file or comparing the contents of two files.
This guide will demonstrate the “hexdump” command with practical implementation in Linux. The supported guidelines are mentioned below:
- How Does the “hexdump” Command Work in Linux?
- Display the Content of a File in Canonical Format
- Display the Content of a File in Hexadecimal Format
- Display the First Ten Lines of a File
- Skip the Specific Bytes of a File
- Display Custom Format String
How Does the “hexdump” Command Work in Linux?
Linux offers the “hexdump” command to visualize the content of a file in a machine language format. Here is the basic syntax for the hexdump command:
$ hexdump [options] [file]
The above syntax shows that the “file” argument is the name of the file you want to display. If no file is specified, hexdump reads from standard input.
Some common options for the hexdump command include:
- -C: Display the output in a canonical format, which includes the offset, hexadecimal representation, and ASCII representation of each line of data.
- –v: Display all input data, even if it is identical to the previous line.
- -n: Specify the number of bytes to display.
- -s: Skip a specified number of bytes at the beginning of the input.
- -e: Specify a format string for the hexadecimal and ASCII output.
Here are some examples of how to use the hexdump command in Linux:
Example 1: Display the Content of a File in Canonical Format
To display the contents of a file in a canonical format, a unique representation of format to understand the system files. For this, specify the name of a file with the “-C” option:
$ hexdump -C file.txt

The output displays the contents of the “file.txt” in a table with three columns: the offset, the hexadecimal representation of the data, and the ASCII representation of the data.
Example 2: Display the Content of a File in Hexadecimal Format
To display the contents of a file in hexadecimal format, the “-v” option is used by mentioning the filename. Additionally, the “cut” command with the “c” option is used to ignore the columns information between 8 and 57:
$ hexdump -C -v file.txt | cut -c 8-57

It displays the hexadecimal representation of the data in the file, but not the ASCII representation.
Example 3: Display the First Ten Lines of a File
Users can display the first ten lines of a file or 40 bytes by specifying the “n” option with the filename:
$ hexdump -C -n 40 file.txt
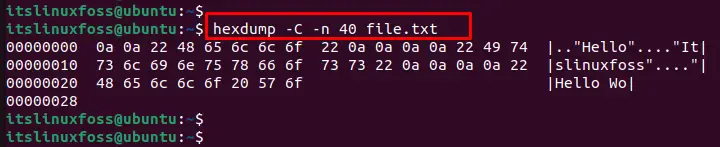
The display shows the first 40 bytes (10 lines) of the file in the terminal.
Example 4: Skip the Specific Bytes of a File
To skip some specific file data, the “-s” option is used to skip a specified number of bytes “20” at the beginning of the input. Additionally, visualize the content of “file.txt” within the 40 bytes:
$ hexdump -C -s 20 -n 40 file.txt

This will display the next 40 bytes of the file, starting at the 21st byte.
Example 5: Display the Content of a File Using a Custom Format
To display the content of a file in a custom format string, use the “-e” option that specifies a format string for the hexadecimal and ASCII output:
hexdump -C -e '16/1 "%02x " " | "' -e '16/1 "%_p" "\n"' file.txt

It displays the contents of the file in a format that includes a vertical bar between the hexadecimal and ASCII representations of the data.
Conclusion
Linux offers the “hexdump” command to visualize the file contents in an ASCII and hexadecimal format. Using this command, you can display the contents of a file in canonical, hexadecimal, custom format string, and many more. This article has explained the “hexdump” command with different examples in Linux.
